
72c - Installing Windows from ISOs using Easy2Boot
Please go to the www.easy2boot.com website for up-to-date information.
Introduction
This page has been split off from the main Tutorial 72a page and only covers Windows Install ISOs.

The E2B menu entries for Windows ISOs (see above) will only be listed if one or more ISOs are found in the appropriate \_ISO\WINDOWS\xxxxxx folder.
Here is a quick summary of the main ways Windows ISOs are supported by E2B - all use an unmodified Windows Install ISO file:
1. Install XP (or 2003) from an XP Install ISO using two E2B USB boot stages (use for 32-bit and 64-bit XP on IDE and some AHCI systems)
2. As (1) but with DPMS (driver pack mass storage files) added to the E2B drive - this allows installation to SATA\RAID\SCSI systems without needing a modified XP ISO (32-bit XP only)
3*. Boot to WinPE and install XP from an XP ISO using winnt32.exe - this is a one-step process. If installing to an AHCI\RAID\SCSI system, a modified (nLited) XP Install ISO is required. This process can be automated using an unattend.txt file.
4*. Install Vista/7/SVR2K8 from an ISO - you can use your own unattend.xml if you wish
5*. Install Win8/SVR2012 from an ISO - you can pick a product key or your own unattend.xml file
Windows 8 Product Key requirements
When installing Windows 8 from an Install DVD, it will usually request a Product Key from the user. If using E2B with an Autounattend.xml file, the Product Key must be specified in the AutoUnattend.xml file. E2B will thus ask you to choose a product key and will then write the key into the AutoUnattend.xml file. You can remove the requirement for a product key during Installation by editing the ISO contents. See here for details.
Installing Windows from an E2B USB Hard disk (or 'Fixed disk' USB Flash drive)

*IMPORTANT: If your E2B drive is of the 'Fixed disk' type (i.e. a USB Hard disk or a USB Flash drive that appears in Windows Explorer as a 'Local drive' or in RMPrepUSB as a 'Fixed Disk') then (3), (4) and (5) above will also require a USB Helper Flash drive to be connected at the same time as the E2B drive.
If you are using a USB Hard Disk to hold your E2B configuration or a USB Flash Drive that is of the 'Fixed Disk' type, then you need to make a E2B 'Helper; Flash drive. See here for details.
Windows Install ISO files
All .ISO files larger than 0 bytes in a folder will be listed - note that these ISO files should not be modified to auto-install or they may or may not work!
The ISO files can be any name and should be placed in the appropriate folder (look at the sub-folders under \_ISO\Windows to see where they should go).
Note: Most OEM Windows 7 and 8 install ISOs contain all SKUs, so for instance a Windows 7 Home Basic DVD will usually contain Starter, Home Basic, Home Premium, Professional and Ultimate SKUs. You will be able to choose any of the these versions. So if you have a Windows 7 SP1 64-bit Ultimate ISO, simply rename this to Win7_64_SP1.ISO and it will be listed in the menu system and you can choose any of the versions inside it.
Note that Retail ISOs usually contain a single SKU and a single language. These are smaller than the OEM ISOs (e.g. Win7_64 is only 2GB instead of 3GB+) and the ISO \Sources folder contains the word 'Retail' in the EI.CFG file. If you have an OEM multi-lingual Vista/7/8 ISO it should contain all SKUs.
You can use the Install Windows XP using WinPE menu to pick any XP ISO to install and also pick an unattend.txt file. A WinPE v2/3/4 ISO or Windows Install ISO is also required. Only a single boot to the Easy2Boot USB drive is required with this method. This method will also work if booting from an exFAT formatted Easy2Boot USB drive using a Win7/8 WinPE or Install DVD. This method can also be used with XP install ISOs that contain $oem$ folders.
Although you are asked for a partition size, you can later skip over partitioning and formatting of the drive. If you specify a partition size and an unattend.txt, when you later confirm with Y - the disk will be wiped, re-partitioned, re-formatted and the whole XP build will continue automatically without further user input being required.
The XP ISO should have any mass storage drivers already integrated (nLite'd) as required by the system (e.g. AHCI drivers).
Custom Windows Vista/7/8 Install ISO files
If you have a custom-made Windows Install ISO (such as a large All-in-One 8GB+ ISOs which boot to a Desktop with a Start Menu and can install lots of different versions of Windows) try the following:
1. Place the ISO file in the \_ISO\MAINMENU folder and rename it using the .ISOPE01 file extension
2. Boot to E2B and run the ISO
3. When the ISO boots, look for the LOADISO blue command console window which will load the ISO file as Y: - if you do not see this blue console window, run a Windows shell (e.g. press SHIFT+F10 or run the command console from the Start Menu or Total Commander, if present) and from the Windows shell console, type wpeinit - after 5-30 seconds, you should see the E2B blue console window appear for a few seconds.
4. Now you can proceed as normal and the ISO will be available as drive Y:.
If you wish, you can also try this with standard Vista/7/8 Install ISOs. Note: Many Win8 ISOs also require a product key to be pre-defined in which case you will need to use the standard method of installing from a Win8 Install ISO (see below).
Where to put your standard Windows Install ISOs
If you wish to install from your Windows Install ISOs, you must place them in the correct specific folder in the E2B file structure.
\_ISO\WINDOWS\SVR2012 <-- Server 2012 Install ISOs go here
\_ISO\WINDOWS\SVR2K8R2 <-- Server 2008 R2 Install ISOs go here
\_ISO\WINDOWS\VISTA <-- Wndows Vista Install ISOs go here
\_ISO\WINDOWS\WIN7 <-- Winodws 7 Install ISOs go here
\_ISO\WINDOWS\WIN8 <-- Windows 8 Install ISOs go here
\_ISO\WINDOWS\XP <-- XP Install ISOs go here (XP 64-bit ISOs should have '64' somewhere in the name of the ISO file)
At least one ISO file must be detected in one of these folder, to see a Main menu entry for Windows Install.
Although not fully supported in E2B, Windows Server 2003 Install ISOs can also be placed in the \_ISO\WINDOWS\XP folder and installed as if it was XP.
Note: Always run WinContig on the E2B drive after copying the ISO files (RMPrepUSB - Ctrl+F2)
Installing Windows from an E2B Hard Disk (instead of an E2B Flash drive).

USB Flash drives can be 'Removable' or 'Fixed Disk' type.
USB Hard drives are nearly always of the 'Fixed Disk' type.
When Windows Setup runs (Vista and later versions), Setup will look for a file called \AutoUnattend.xml on a removable drive. E2B relies on this feature. The AutoUnattend.xml file generated by E2B contains an entry which causes Windows Setup to run a utility (FiraDisk and/or ImDisk) which finds and then loads the Windows Install ISO file as a virtual DVD drive so that Windows Setup can access the files inside the ISO.
Note: Some modern (win 8 certified) USB flash drives can also appear as a hard disk to Windows. Run RMPrepUSB and select the USB flash drive - check that it is listed as a (Removable) drive. If not, you will need to follow these instructions and use a secondary 'removable' Helper USB Flash drive.
E2B Windows XP+WinPE (see section below), Vista and later OS installs will not work if you only use an Easy2Boot USB Hard Disk (you will get a 'Driver required' error).
To make Windows Vista/7/8/2012/SVR2K8 installs work from an Easy2Boot USB Hard/Fixed Disk (Local Disk in Windows Explorer), you must use an Easy2Boot USB Hard drive together with a spare, writeable, 'removable' USB 'Helper' flash drive, as follows:
1. Prepare your Easy2Boot USB Hard disk as described in this tutorial.
Add your Windows install ISOs to the \_ISO\Windows\xxx sub-folders and check that it the menus work and can detect your Windows ISO files.
Run WinContig (RMPrepUSB - CTRL+F2) to make the files contiguous.
2. On any small spare USB Flash drive that you have available - this drive must be seen by Windows as a writeable, removable disk which is usually the case for small USB flash drives - check that RMPrepUSB reports it as (Removable):
Copy the 3 files - Unattend.xml, AutoUnattend.xml and WINHELPER.USB files from the \_ISO\docs\USB FLASH DRIVE HELPER FILES folder to the root of the USB helper Flash drive using Windows Explorer.
Note: The Unattend.xml file is only required if you use the 'Windows XP install using WinPE' menu option.
IMPORTANT: When you use the Easy2Boot USB Hard disk+flash drive combination, the only \WINHELPER.USB file in the whole system, on any disk volume or filesystem, should be the one on the USB 'Helper' Flash drive. Do not copy WINHELPER.USB to the root of your Easy2Boot USB hard disk or anywhere else!
The USB 'Helper' Flash drive should not contain the Easy2Boot \_ISO\E2B folders, otherwise Easy2Boot may get confused (certain files are searched for during Windows installs and so the only Easy2Boot files should be on the boot device).
3. To install Windows Vista/7/8/etc. (or XP via WinPE method) onto a target system, connect both the Easy2Boot USB hard disk and the USB flash drive - but boot from the Easy2Boot hard disk.
This will only work when booting from a real system (it will not work under a Virtual Machine or Emulator). Even just using a single E2B USB flash drive will not work because a USB Flash drive is seen as a hard disk by VM's and so the AutoUnattend.xml on the flash drive is not found by Windows Setup.
WARNING: If you use a multiple-partition USB flash drive and the xml files are not on the first partition then Windows Vista/7/8 installs will not work because Windows Setup only mounts the first partition of a flash drive and so cannot see any of the files on the other partitions of the flash drive!
IMPORTANT: Only one drive in the entire system must contain the E2B files - do not put the E2B files and folders on the Helper USB drive!
If your (Dell) system only boots from a USB Flash drive
Some Dell Optiplex systems (for instance) do not seem to support booting from a USB Hard drive. In this case, you can boot from the USB Helper flash drive and then run E2B from the USB Hard drive as follows:
1. Run RMPrepUSB and select the USB Helper Flash drive
2. Click on the Install Grub4dos button and install grub4dos and copy over the grldr file when prompted
3. Press F4 in RMPrepUSB to create a new menu.lst file on the USB flash drive and add these lines to the file and save it:
clear
pause --wait=3 Booting from Easy2Boot USB Helper Flash Drive...
find --set-root /_ISO/e2b/grub/menu.lst
chainloader /grldr
boot
If Windows Vista/7/8 will not install ('system partition' error)
If you get a message similar to:
Setup was unable to create a new system partition or locate an existing system partition. See the Setup log files for more information.
or
Windows is unable to find a system volume which meets its criteria for installation.
then ensure that the BIOS boot order is set so that the internal hard disk is the first boot device. Do not set the USB Hard disk as the first boot device.
To boot from the E2B USB Hard disk, use the BIOS Selection menu hotkey (e.g. F10, F11 or F12) to boot from the E2B USB drive.
Ensure that all SD cards and other unnecessary storage devices have been disconnected. See here for a discussion on this error.
Using E2B from a USB Hard drive without a Helper drive
You can run LOADISO.CMD manually (instead of needing a Helper USB drive) as follows:
1. Boot to E2B
2. As soon as Setup loads and asks you for a language/country, press the key combination SHIFT+F10 - a black console window should open (if not, answer the next question and try SHIFT+F10 again)
3. In the console window, type dir C:\_ISO and press the ENTER key - if the folder is not listed, try dir D:\_ISO etc. until you find the E2B USB drive letter - let us assume that 'dir E:\_ISO' worked - then the USB drive letter must be E:
4. Now run loadiso by typing E:\_ISO\e2b\firadisk\loadiso,cmd - a blue console window should open - if then prompted to Repair Windows, just hit ENTER
5. The blue console Window should close - now continue with Windows Setup in the normal way.
1. Install XP from an XP Install ISO using two boot steps
If you have an unmodified, original Microsoft ISO, then you will only be able to install to an IDE target system using this method. You need to press F6 at the start of XP Setup.
For more details on how to install Windows XP using the 2-step FiraDisk method see the instructions in Tutorial #30 (hint: if you get BSOD in Step 1, try without pressing F6).
Windows XP Installs using the 2-Step + F6 method
Note: Your Windows XP Install ISO file must be in the \_ISO\WINDOWS\XP folder. If it is 64-bit Windows XP, ensure that the numbers '64' are used in it's name - this will suppress the DPMS feature (DPMS only works for 32-bit XP)
See here for more detail about this process.
1. Boot from your E2B drive, press W for the Windows menu and then Alt+1 for Step 1
2. Choose from the list of XP ISOs
3. You will see some instructions about pressing F6 - on some systems pressing F6 during Windows XP Setup is not necessary. So try not pressing F6 first.
If you get a BSOD in Step 1 or XP cannot detect your internal hard drive, then reboot and press F6 and select FiraDisk32+WinVBlock32. If you have a system which uses a SATA AHCI HDD controller, also add that driver too (if it is present).
See Tutorial 30 for how XP ISO installs work using FiraDisk/ImDisk.
See here for a list of AHCI drivers included with the F6 XP install process used in E2B. You can identify your AHCI controller using the List Disk Controller PCI IDs [L] menu.
4. Continue with the text mode setup and allow the system to reboot after the copy-files stage has completed
5. Reboot back to the E2B USB drive (do NOT allow the computer to boot from the internal HDD). Select W and Alt+2 for Step 2.
6. The system should now boot from the internal HDD and continue the GUI Setup phase of the XP install. It may be necessary to confirm the loading of some drivers during this phase.
7. Once XP has been fully installed, you can delete the storage drivers which show up as errors in Device Manager and then install all drivers for your hardware in the usual way.
2. Install XP in two steps using DPMS (driver pack mass storage files)
If you have an unmodified, original Microsoft 33-bit XP Install ISO, then you will be able to install XP to a target system even if it has an AHCI controller with SATA hard disks, or has SCSI or RAID hard disks. The correct 32-bit XP driver for the target mass storage devices is automatically selected by DPMS. You do not need to press F6 at the start of XP Setup.
If your XP ISO has been modified with driver packs or nLited, or if your ISO has $oem$ folders then it may not install correctly using the STEP1/2 method, so use the WinPE Install menu (3) instead.
Video. 2 - Installing Windows XP using E2B
3. Boot to WinPE and install XP from an XP ISO using winnt32.exe
If the Easy2Boot Windows XP two-step process is not working on some systems, try this WinPE method instead. With this method you can also automate the install.
Click here for a video demonstration of this procedure.
With this method you only need to boot to the E2B USB drive once and the E2B drive is not required once the initial file copy phase has finished. In addition, you can use an unattend.txt file to automate the install process. The disadvantage with this method is that if you are installing to an AHCI\SATA\SCSI\RAID system, then you need to use a modified XP Install ISO that contains the correct drivers (i.e. nLited with the correct mass storage driver for the target system).
This process requires two ISOs, one of which must be a Vista (or later) Install ISO (e.g. Vista Install ISO, Win7 Install ISO, Win8 Install ISO, SVRk2012 Install ISO, SVR2K8 Install ISO) or a WiNPE ISO. E2B will boot from this ISO to use WinPE. Under WinPE it will load the XP ISO file as a virtual CD and then, after formatting the target hard disk, will run XP winnt32.exe to install XP onto the target partition.
This method will also work if booting from an exFAT formatted Easy2Boot USB drive using a Win7/8 WinPE or Install DVD. This method can also be used with XP install ISOs that contain $oem$ folders.
Although you are asked for a partition size, you can later skip over partitioning and formatting of the drive. If you specify a partition size and an unattend.txt, when you later confirm with Y - the disk will be wiped, re-partitioned, re-formatted and the whole XP build will continue automatically without further user input being required.
The XP ISO should have any mass storage drivers already integrated (nLite'd) as required by the system (e.g. AHCI drivers).
Note: There is an example file in \_ISO\Windows\XP for an Asus EeePC install.
These installs work in a similar way to Vista/7/8 installs, ImDisk is used to load the ISO file as a virtual DVD:
1. Easy2Boot overwrites \AutoUnattend.xml and \Unattend.xml with \_ISO\E2B\FiraDisk\auwinnt.xml
2. Windows Setup or PE boots
3. WinPE Setup looks for \AutoUnattend.xml file on any REMOVABLE DRIVE (e.g. USB Flash drive or CD/DVD) - WinPE looks for \Unattend.xml when wpeinit runs.
4. PE runs the WindowsPE RunSynchronous command from the .xml file which then looks for and runs LoadIsoW.cmd
5. \_ISO\E2B\FiraDisk\LoadIsoW.cmd loads the XP ISO as a virtual drive and then runs \_ISO\E2B\FiraDisk\RUNWINNT.cmd
6. RUNWINNT.cmd prompts the user and formats, or wipes and partitions the target drive and runs winnt32.exe with the correct command line parameters.
You can change the name of the XP Install ISO files as you wish (but keep the .ISO file extension).
This method requires two ISO files.
The first ISO is just your Windows XP Install ISO - i.e. the OS that you want to install (this does NOT need to be contiguous)
The second ISO needs to be a WinPE v2/3/4 ISO - this can be a whole Vista/Win7/Win8 Install ISO OR just a Vista/7/8 WinPE ISO (Win8 PE recommended)
If you are booting Easy2Boot from a USB Hard disk, you will also need a USB flash drive containing these 3 files -
AutoUnattend.xml (overwritten - required for Win Vista and later OS Install ISOs),
Unattend.xml (overwritten - required for WinPE ISOs)
WINHELPER.USB (marker file to find correct USB drive)
These 3 files must be on the root of your USB 'Helper' Flash drive.
Note: E2B can install any number of Windows ISOs because it uses a special feature of Vista+ OS's which looks for a removable media drive such as a USB Flash drive or DVD. If you only want to install ONE Windows Vista/7/8 ISO using E2B from a USB Hard disk then you can accomplish this without the need for a 'Helper' Flash drive by simply extracting the whole \sources folder from the Windows Install ISO using 7Zip and copying the \sources folder to the root of your E2B Hard drive. If you delete the \sources\ei.cfg file then all available versions (e.g. Basic, Professional, Ultimate) will be offered. Of course, if you do this, you can then only install the version of Windows that is in the \sources folder on your hard disk. See here for details on installing Win7 in this way.
How to make a WinPE ISO
You can use pretty much any WinPE v2/3/4 ISO that you have on your Easy2Boot drive or a Windows Install ISO (e.g. an existing Windows 7 or 8 Install DVD ISO that is already on your E2B drive, but not an XP-based ISO).
OR
You can make a 150MB WinPE ISO by downloading and using the >3GB Windows WAIK (use copype x86 c:\winpe3) and make an iso file using mkfsiso from the Windows command line.
OR
A much easier and fully automated way to obtain a bootable WinPE3 ISO that is also useful as a rescue ISO (a download and then just a few mouse clicks!) is to followTutorial 107 and make a Macrium Reflect Rescue ISO. This ISO can then be used with this method to install XP and as a general purpose rescue ISO (you can put it in the \_ISO\MainMenu, \_ISO\MainMenu\MNU or any of the \_ISO\Windows\xxx folders).
Method
1. Ensure you have an XP Install ISO file in the \_ISO\Windows\XP folder (any .iso filename can be used)
2. Make sure you have a Vista, 7 or 8 Install ISO or WinPE v2/3/4 ISO in one of the \_ISO sub-folders - the helper PE .iso file can have any filename you like.
3. The file at \_ISO\Windows\WINPE_INST.TAG should be already present (don't delete it!) - if you delete it you will not see the 'Install any ISO using WinPE' option in the menu!
4. You can add your own unattend.txt file to the \_ISO\Windows\XP folder (use any suitable filename but it must end in .txt). Use the sample one as a template. The sample one provided will run Setup without any user interaction.
5. Run WinContig (RMPrepUSB - Ctrl+F2) to ensure the PE ISO file is contiguous
6. If you are booting from an Easy2Boot USB Hard drive, you also need to prepare and connect an auxiliary 'Helper' USB Flash drive (see section above for details)
Using the 'Install XP using WinPE' menu option
When you boot from the Easy2Boot USB drive, the Windows XP install menu will have the option:
Install any XP ISO using WinPE
When you select this option you will need to answer some user questions before it boots from the ISO file:
Select a Windows XP ISO - choose the XP ISO you want to actually install
Which folder is the WinPE ISO in: - choose one of the Windows folders on your Easy2Boot drive that has a WinPE 32-bit ISO file (if using XP 32-bit)
Enter WinPE 'Helper' ISO - choose the helper WinPE ISO (for instance a Windows 7 32-bit install ISO file or a Win8PE 32-bit .iso if installing XP 32-bit)
Default Disk 0 1st partition size in MB (0=MAX) : - You will be asked to confirm this again later on before the disk is wiped, and then you can choose to just format one partition only and not wipe the whole disk or install to a partition without formatting. Use 0 for maximum size. If you are not going to wipe and partition the disk, choose 0 or any size.
Choose an Unattend.txt file (0=MANUAL INSTALL) : - You can specify an unattend.txt file (there is one included in the XP folder which you can copy if you like). Press 0 for no unattend.txt file which means you will have to answer all the questions from XP Setup manually.
Booting to WinPE
The system will then boot to WinPE from the Vista/7/8 WinPE ISO and should automatically open a blue console window (the auxiliary USB Flash drive must also be connected if using a USB E2B Hard Disk)
WinPE will detect the xml files, run the section of code inside it and then mount the XP ISO file as a virtual drive.
You will be asked if you want to wipe the internal hard disk and re-partition it. Check the drive list carefully to make sure the correct drive has been selected! You may need to maximise the blue console window.
If you answer N then you will be asked if you want to format a single partition on the hard drive (e.g. C:). This partition will be made active and will become the system partition. Note: if you answer N to this question also, the install will stop. If you answer S=Skip then XP will be installed to an existing partition.
Winnt32.exe will then be run (and will use the Unattend.txt file if you specified one to automate the install process) - this will take several minutes...
Press a key to reboot to the internal hard disk and the XP Setup should then proceed - the USB drive(s) can be disconnected.
If you have an XP ISO with integrated AHCI drivers (e.g. using driverpacks.net or nLite), then it should work on an AHCI system.
If possible, use a 32-bit Windows 8 Install ISO as the WinPE installer OS as that will have the widest range of drivers and USB 3.0 support.
Tip: To automate the process further and remove the final prompt to reboot (see step 6 above), edit the \_ISO\E2B\firadisk\RUNWINNT.cmd file and add REM to the line near the end of the file as shown below:
echo Press a key and reboot from the internal hard disk to continue Setup...
REM pause > nul
wpeutil reboot
4. Installing Windows Vista, Windows 7 and Server 2008 R2
Add any number of OEM/System Builder Windows Install ISO files to the correct folders under \_ISO\Windows\sub-folder and name them as you wish.
Multi-language Win7 ISO files can be downloaded from Digital River (see Useful Links on this site).
You can rename the ISOs and use spaces in the ISO filenames to make them look better in the menu if you wish (or add a .txt file - see below).
NOTE: Always run WinContig to ensure all files are contiguous after copying them over (Ctrl+F2 in RMPrepUSB).
If you are booting Easy2Boot from a USB Hard disk, you will also need a USB flash drive containing these 3 files -
AutoUnattend.xml (overwritten - required for Win Vista and later OS Install ISOs),
Unattend.xml (overwritten - required for WinPE ISOs)
WINHELPER.USB (marker file to find correct USB drive)
These 3 files must be on the root of your USB 'Helper' Flash drive.
Additional Files
Add a .txt file to change the text in the menu
For Vista.SVR2K8R2,7 you can also add a .txt file of the same filename and add an alternate title (rather than have the filename listed in the menu).
If you also add a .txt file of the same filename containing a single line of text such as:
title some_text_here\nsome_help_text_here
then that text will be used as the menu title instead of the name of the file itself (note that the line must start with the lower-case word 'title'). See here for more details.
Note: .iso files of 0 length are not listed (but may add to the total file count displayed in the menu!).
Add an .xml file to automate an install
You can also have your own unattend.xml files in the same folder. This can contain all your settings and a product key - you can just choose any xml file and run the ISO. If you delete all .xml files from the Vista/7/8/SVR2012 folders, then the default unattend.xml will be automatically used and the user will not be prompted to select an xml file.
You can download Windows 7 Install ISO files from the link on the Useful External Links page.
For more details on how to install Windows Vista and later OS's see Tutorial #43.
5. Installing Windows 8 and Server 2012
Add any number of OEM/System Builder Windows install ISO files to the correct folders under \_ISO\Windows\sub-folder and name them as you wish.
You can rename the ISOs and use spaces in the ISO filenames to make them look better in the menu if you wish (or add a .txt file - see below).
NOTE: Always run WinContig to ensure all files are contiguous after copying them over (Ctrl+F2 in RMPrepUSB).
Many Windows 8 ISOs will not install unless a Product Key is specified in the AutoUnattend.xml file first. For this reason, E2B will ask you to choose the correct Product Key for the version of Windows that you want to install. This is the main difference between installing Vista/Win7 and Win8/SVR2012 ISOs.
If you are booting Easy2Boot from a USB Hard disk, you will also need a USB flash drive containing these 3 files -
AutoUnattend.xml (overwritten - required for Win Vista and later OS Install ISOs),
Unattend.xml (overwritten - required for WinPE ISOs)
WINHELPER.USB (marker file to find correct USB drive)
These 3 files must be on the root of your USB 'Helper' Flash drive.
Additional Files
Add a .txt file to change the text in the menu
For Win8 and SVR2012 ISOs you can also add a .txt file of the same filename and add an alternate title (rather than have the filename listed in the menu).
If you also add a .txt file of the same filename containing a single line of text such as:
title some_text_here\nsome_help_text_here
then that text will be used as the menu title instead of the name of the file itself (note that the line must start with the lower-case word 'title'). See here for more details.
Note: .iso files of 0 length are not listed (but may add to the total file count displayed in the menu!).
Add a .key file to hold Product Keys
For Win8/SVR2012, the product key can be typed in manually by the user, after selecting an ISO in the Easy2Booty menu. To use your own pre-defined set of Product Keys, make lots of .key files (copy the format from the other files) - OR if you have lots more product keys you can add all the keys to the CHOOSE FROM A LIST.key file. You can delete any .key files you don't want. Another alternative is to make a .xml file with your Product Key already in it and not use .key files at all.
1a - Example Win8 Preview Pro.key file
Win8_PreviewPro.key
================
!BAT
set KEY=TK8TP-9JN6P-7X7WW-RFFTV-B7QPF
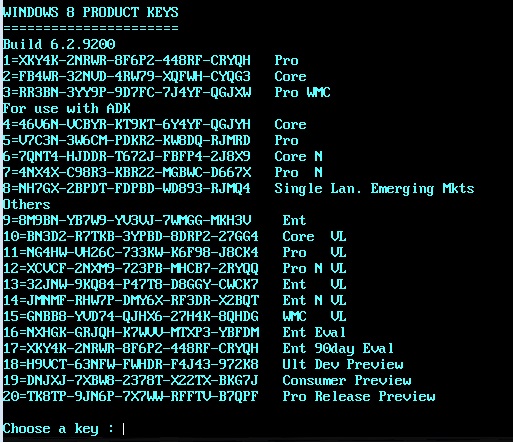
1b - Example CHOOSE FROM A LIST.key file
CHOOSE FROM A LIST.key
=====================
!BAT
echo
echo WINDOWS 8 PRODUCT KEYS
echo -e ======================
echo Build 6.2.9200
echo 1=XKY4K-2NRWR-8F6P2-448RF-CRYQH Pro
echo 2=FB4WR-32NVD-4RW79-XQFWH-CYQG3 Core
echo
set /p ask=Choose a key :
if "%ask%"=="1" set KEY=XKY4K-2NRWR-8F6P2-448RF-CRYQH
if "%ask%"=="2" set KEY=FB4WR-32NVD-4RW79-XQFWH-CYQG3
Add an .xml file to automate an install
You can also have your own unattend.xml files in the same folder. This can contain all your settings and a product key - you can just choose any xml file and run the ISO. If you delete all .xml files from the WIN/8/SVR2012 folders, then the default unattend.xml will be automatically used and the user will not be prompted to select an xml file.
1c - Windows 8/Server 2012 Product Keys
After you have selected a Win8/SVR2012 ISO, E2B will prompt you to select any unattend.xml file that is present in the \_ISO\Windows\Win8 folder from a list or CHOOSE A PRODUCT KEY or from any *.xml file or NO KEY.
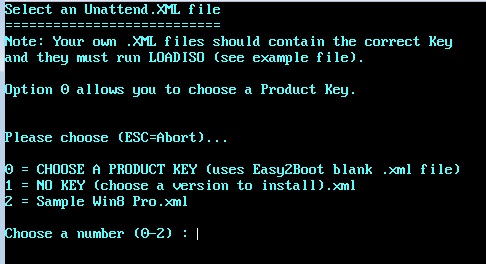
You can define your own Unattend.xml files which should contain the correct product key and can contain your own settings too. These must contain a special entry for LOADISO.CMD (see below). Any extra .xml files will also be automatically listed. If you delete all .xml files from the Vista/7/8/SVR2012 folders, then the default unattend.xml will be automatically used and the user will not be prompted to select an xml file.
CHOOSE A PRODUCT KEY - Alternatively, you can use the Easy2Boot default Unattend.xml file and then pick a key from a list of user predefined product keys using the Select a Product Key file menu. Product keys can either be contained in separate .key files and/or in one single 'CHOOSE FROM A LIST.key' file (see above for an example of the contents). You can tailor the CHOOSE FROM A LIST.key file to show only the product key entries that you want to allow (you can edit it using NotePad - see above for details).
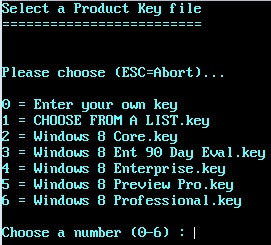
The pre-defined .key files can be deleted or altered or added to. These can be selected by using the E2B menu (items 2-6 in the example above).
If you select the CHOOSE FROM A LIST.key menu option (1) then you will be presented with a pre-defined list of different keys:
NO KEY - No product key will be set in the unattend.xml file - the user will be able to pick any version of Windows 8 to install that is contained in the ISO file and can enter the Product Key manually during installation.
Note: The keys pre-defined in E2B are sample keys for installation only and will not activate. If you organisation has volume licence keys, you should edit the CHOOSE FROM A LIST.key file to use your own legal Product Keys.
Where there is only one choice of XML or .key or ISO file, E2B will automatically pick that file. If you delete the example files and leave just one file, then that single file will be selected automatically. If there is only one Windows XP ISO, then that file will be automatically selected.
Tablet PC and Media Center Edition
You need to add the \CMPNENTS folder to the CD #1 ISO file and ensure you use the correct Tablet PC or MCE Product Key when installing it.
See here for how to install these from one single ISO.
Advanced (unattended) Windows Installs
You can specify your own unattend.xml file for Easy2Boot to use (Vista/WIn7/SVR2K8R2/Win8/Server2012) or unattend.txt files (for XP WinPE install method).
Note: If you delete all .xml files from the Vista/7/8/SVR2012 folders, then the default E2B unattend.xml will be automatically used and the user will not be prompted to select an xml file.
Unattend.txt files for XP installs
Add your unattend.txt files (any name ending in .txt) to the \_ISO\Windows\XP folder. Use the 'Install XP from an ISO using WinPE' menu option.
Unattend.xml files for Vista\Win7\SVR2K8R2 installs
Add these into the appropriate folder and you can choose one when prompted. Any name ending in .xml will do.
If you want to specify a product key for Win7 installs, copy the Sample Win8 Pro.xml file to the \_ISO\WINDOWS\Win7 folder, rename it and change the product key to your own key.
IMPORTANT: You must also add the special E2B RunSynchronous entry to your .XML file (see below for details). If you don't, then the blue console LOADISO window will not run and the ISO will not be loaded - Windows Setup will then complain about a missing CD drive driver as it will not be able to see the DVD (ISO)!
Loadiso.cmd will prompt you to repair the drive - if you don't want this prompt, copy \_ISO\e2b\firadisk\loadiso.cmd to loadiso1.cmd (for example) and then edit your unattend.xml file to load loadiso1.cmd. Then edit \_ISO\e2b\firadisk\loadiso1.cmd and add 'exit' to the file here:
exit
echo.
echo ********** REPAIR WINDOWS? ************
echo.
If you don't want the 'Press a key to boot from CD/DVD' prompt, you must remake the Windows ISO and delete the \boot\bootfix.bin file.
If you use a configuration set in your xml file, include the path to the drivers folder - e.g.
<component name="Microsoft-Windows-Setup" processorArchitecture="amd64" publicKeyToken="31bf3856ad364e35" language="neutral" versionScope="nonSxS" xmlns:wcm="http://schemas.microsoft.com/WMIConfig/2002/State" xmlns:xsi="http://www.w3.org/2001/XMLSchema-instance"><UseConfigurationSet>true</UseConfigurationSet> </component> <component name="Microsoft-Windows-PnpCustomizationsWinPE" processorArchitecture="amd64" publicKeyToken="31bf3856ad364e35" language="neutral" versionScope="nonSxS" xmlns:wcm="http://schemas.microsoft.com/WMIConfig/2002/State" xmlns:xsi="http://www.w3.org/2001/XMLSchema-instance"> <DriverPaths> <PathAndCredentials wcm:action="add" wcm:keyValue="1"> <Path>%configsetroot%drivers\</Path> </PathAndCredentials> </DriverPaths> </component>
and place the drivers folder on the root of the USB Flash drive (not the USB hard disk if you are using one for booting E2B) - e.g. \drivers\video, \drivers\audio, \drivers\net, etc.
If you want to use the drivers inside the ISO file, try using <Path>%USBDRIVE%\drivers\</Path> (note there is a \ after %USBDRIVE%)
Note: I have not personally tested the configset driver path setting and it is rumoured not to work! You may have to define the path. e.g. <Path>F:\drivers>/Path> but the drive letter must match the USB drive that contains your drivers which will vary from system to system!
Unattend.xml files for Win8\SVR2012 installs
If you or your company use your own unattend.xml files to automate installs, then you can add them into the correct folder and can be selected instead of the default ones.
If you have a Windows 8 unattend.xml or a Server 2012.xml file, then you can also define a 5x5 (29 character) product key in your .xml file.
IMPORTANT: You must also include the special RunSynchronous entry that Easy2Boot requires to your .XML file. If you don't, then the blue console LOADISO window will not run and the ISO will not be loaded - Windows Setup will then complain about a missing driver as it will not ba able to see the DVD (ISO)!
See here for details of what can go in an xml file to automate the installs.
Note: If you delete all .xml files from the Vista/7/8/SVR2012 folders so there is no choice to be made, then the default unattend.xml will be automatically used and the user will not be prompted to select an xml file.
Modifying User Unattend.xml files to work with Easy2Boot
Note that your xxxx.xml files must contain both x86 and amd64 entries if the same .xml file is use for both 32 and 64-bit ISOs.
The entry below must go in the settings pass="windowsPE" section of the .XML file under component name="Microsoft-Windows-Setup".
You should also define a product key or use a configuration set (see a sample file for details).
<RunSynchronous>
<RunSynchronousCommand wcm:action="add">
<Order>1</Order>
<Path>cmd /q /c "FOR %i IN (C D E F G H I J K L N M O P Q R S T U V W X Y Z) DO IF EXIST %i:\_ISO\E2B\FIRADISK\LOADISO.CMD cmd /k %i:\_ISO\E2B\FIRADISK\LOADISO.cmd"
</Path>
<Description>Detecting usb drive</Description>
</RunSynchronousCommand>
</RunSynchronous>
Note: You must balance the XML text - every <xxx> section must be closed with a </xxx>. Look at the following xml file - can you see the mistake?
Example .xml file with a deliberate mistake:
<?xml version="1.0" encoding="utf-8"?>
<unattend xmlns="urn:schemas-microsoft-com:unattend">
<settings pass="windowsPE">
<component name="Microsoft-Windows-International-Core-WinPE" processorArchitecture="amd64" publicKeyToken="31bf3856ad364e35" language="neutral" versionScope="nonSxS" xmlns:wcm="http://schemas.microsoft.com/WMIConfig/2002/State" xmlns:xsi="http://www.w3.org/2001/XMLSchema-instance">
<SetupUILanguage>
<UILanguage>en-US</UILanguage>
<WillShowUI>OnError</WillShowUI>
</SetupUILanguage>
<UILanguage>en-US</UILanguage>
<SystemLocale>de-DE</SystemLocale>
<UserLocale>de-DE</UserLocale>
<InputLocale>0407:00000407</InputLocale>
</component>
<component name="Microsoft-Windows-Setup" processorArchitecture="amd64" publicKeyToken="31bf3856ad364e35" language="neutral" versionScope="nonSxS" xmlns:wcm="http://schemas.microsoft.com/WMIConfig/2002/State" xmlns:xsi="http://www.w3.org/2001/XMLSchema-instance">
<RunSynchronous>
<RunSynchronousCommand wcm:action="add">
<Order>1</Order>
<Path>cmd /q /c "FOR %i IN (C D E F G H I J K L N M O P Q R S T U V W X Y Z) DO IF EXIST %i:\_ISO\E2B\FIRADISK\LOADISO.CMD cmd /k %i:\_ISO\E2B\FIRADISK\LOADISO.cmd"</Path>
<Description>Detecting usb drive</Description>
</RunSynchronousCommand>
</RunSynchronous>
</component> <------------ end of component section - this line should be deleted
<UserData>
<AcceptEula>true</AcceptEula>
</UserData>
</component> <------------ another end of component section but no <component> section before it!
</settings>
<settings pass="specialize">
<component name="Microsoft-Windows-Shell-Setup" processorArchitecture="amd64" publicKeyToken="31bf3856ad364e35" language="neutral" versionScope="nonSxS" xmlns:wcm="http://schemas.microsoft.com/WMIConfig/2002/State" xmlns:xsi="http://www.w3.org/2001/XMLSchema-instance">
<ProductKey>11111-22222-33333-44444-55555</ProductKey>
</component>
</settings>
<settings pass="oobeSystem">
<component name="Microsoft-Windows-Shell-Setup" processorArchitecture="amd64" publicKeyToken="31bf3856ad364e35" language="neutral" versionScope="nonSxS" xmlns:wcm="http://schemas.microsoft.com/WMIConfig/2002/State" xmlns:xsi="http://www.w3.org/2001/XMLSchema-instance">
</component>
</settings>
</unattend>
Adding 'Install Windows ISO' menu entries into the Main menu
If you want to add a Main menu entry to install a specific Windows Vista\7\8 ISO directly from the Main menu (to save having to go to the Windows menu and then the Windows 7 menu), you can add a .mnu file to the \_ISO\MAINMENU folder. Use \_ISO\docs\Sample mnu files\$$AddWin2Main.mnu as a template and change the Win7/Win8 entries or add to them as required.
# Use this for Vista/SVR2K8R2/Win7 ISOs
iftitle [if exist /_ISO/WINDOWS/Win7/Win7_32_SP1.iso] Install Win7 SP1 32-bit \n Install from the ISO
set MFOLDER=/_ISO/WINDOWS/Win7
set ISO=Win7_32_SP1.iso
/%grub%/RunVista.g4b Win7
boot
# use this for Win8/8.1/SVR2012 ISOs
iftitle [if exist /_ISO/WINDOWS/Win8/Win8.1_32.iso] Install Win8.1 32-bit \n Install from the ISO
set MFOLDER=/_ISO/WINDOWS/Win8
set ISO=Win8.1_32.iso
/%grub%/RunWin8.g4b Win8
boot
You can add or delete entries or make small .mnu files for each Windows ISO.
You can specify the full path to an XML file so that the user is not prompted to select one, by specifying an extra parameter on the command line - e.g. If you want to have a separate Windows 8.1 folder (\_ISO\FRED\Win81) then just change the folder name (the xml file is optional and should be in the \_ISO\FRED\WIN81 folder in this example):
iftitle [if exist /_ISO/FRED/WIN81/Win8.1_32.iso] Install Win8.1 32-bit \n Install from the ISO
# suppress return to Windows Install menu
set NOWMENU=1
set MFOLDER=/_ISO/FRED/WIN81
set ISO=Win8.1_32.iso
/%grub%/RunWin8.g4b %MFOLDER% myspecial.xml
boot
Menu entries will be arranged alphabetically according to their filenames, so change the name to ZZZZZZ.mnu if you want it added last in the Main menu. You can also add a hotkey for each one by adding it to the title line (search this page for 'hotkey').
$$AddWin2Main.mnu also contains entries for XP install ISO menu entries (note that menu entries for each individual XP ISOs are not supported) and the XP PE install menu entry. You can delete any menu entries that you don't want.
To prevent a Windows XP/Vista/7/8 sub-sub-menu from loading the Windows Install sub-menu, use this setting in your MyE2B.cfg file (v1.14 and later):
# NOWMENU causes a Windows Install sub-sub menu to return back to the Main menu rather than return to the Windows Install menu
set NOWMENU=1