147 - ventoy
How to Patch and compile
Introduction
Ventoy v1.0.28 and later versions will only run on a USB drive which has been prepared by using the official Ventoy USB tool.
This means that 1.0.28 and later versions will no longer work with E2B+agFM v2.
Instructions below tested on Ventoy 1.0.29 and 1.0.31.
This article contains some brief notes on how to download, change and compile Ventoy so that it will work on E2B USB drives.
Note that Ventoy expects a MBR+UEFI-bootable USB drive to have an MBR partition structure (for BIOS\Legacy booting):
Partition 1 - formatted as NTFS for E2B (see here for options) - Ventoy expects payload files here
Partition 2 - formatted as FAT16 or FAT32 for E2B - Ventoy expects it's boot files to be here.
Partition 3 - may or may not exist and can be used by user.
Partition 4 - E2B expects there to be no Partition 4!
Make a CentOS 7 Virtual Machine
I used Virtual Box 5 on a Windows 10 system.
I created a new Ubuntu x64 VM with a 20Gb dynamic vdi hard disk.
I attached the CentOS 7 ISO as a virtual CD.
CentOS-7-x86_64-Everything-2009.iso
When installing CentOS, I added the Gnome desktop and some other libraries. I did not use a Minimal Install because I am not a linux guru and I find using the Desktop GUI easier!
Remember to enable networking during CentOS Setup (first screen).
I setup the root account with a password (toor), and a User account (Steve) with no password.
The Ventoy GitHub page gives more details here.
Installation Instructions - See https://www.ventoy.net/en/doc_start.html for detail
Compile Instructions - See BuildVentoyFromSource.txt
Ensure it boots to the CentOS Desktop.
Once the CentOS Desktop is running, click VBox - Devices - Insert Guest Additions CD and run the script when offered. Then restart CentOS. Now you can go to Applications - System Tools - Settings - Devices - Displays and set a more appropriate Monitor resolution.
Install Packages
Use a browser to visit the Ventoy GitHub page and find section 1.2
Currently this says (it may change!):
yum install \ libXpm net-tools bzip2 wget vim gcc gcc-c++ samba dos2unix glibc-devel glibc.i686 glibc-devel.i686 \ mpfr.i686 mpfr-devel.i686 zlib.i686 rsync autogen autoconf automake libtool gettext* bison binutils \ flex device-mapper-devel SDL libpciaccess libusb freetype freetype-devel gnu-free-* qemu-* virt-* \ libvirt* vte* NetworkManager-bluetooth brlapi fuse-devel dejavu* gnu-efi* pesign shim \ iscsi-initiator-utils grub2-tools zip nasm acpica-tools glibc-static zlib-staticIn CentOS - cut and paste the text from the BuildVentoyFromSource.txt file into the terminal and allow it to install all these packages.
I had to first run
su -
to get root permissions (you are prompted for the root password - in my case toor).
Download Ventoy source files
Now follow step 2 in the Ventoy page.
You will need to download Ventoy-master.zip and then unzip it - it will make a new folder called Ventoy-master.
Make sure the Ventoy-master folder is located at /home (not your Home folder - which is at /home/steve in my case).
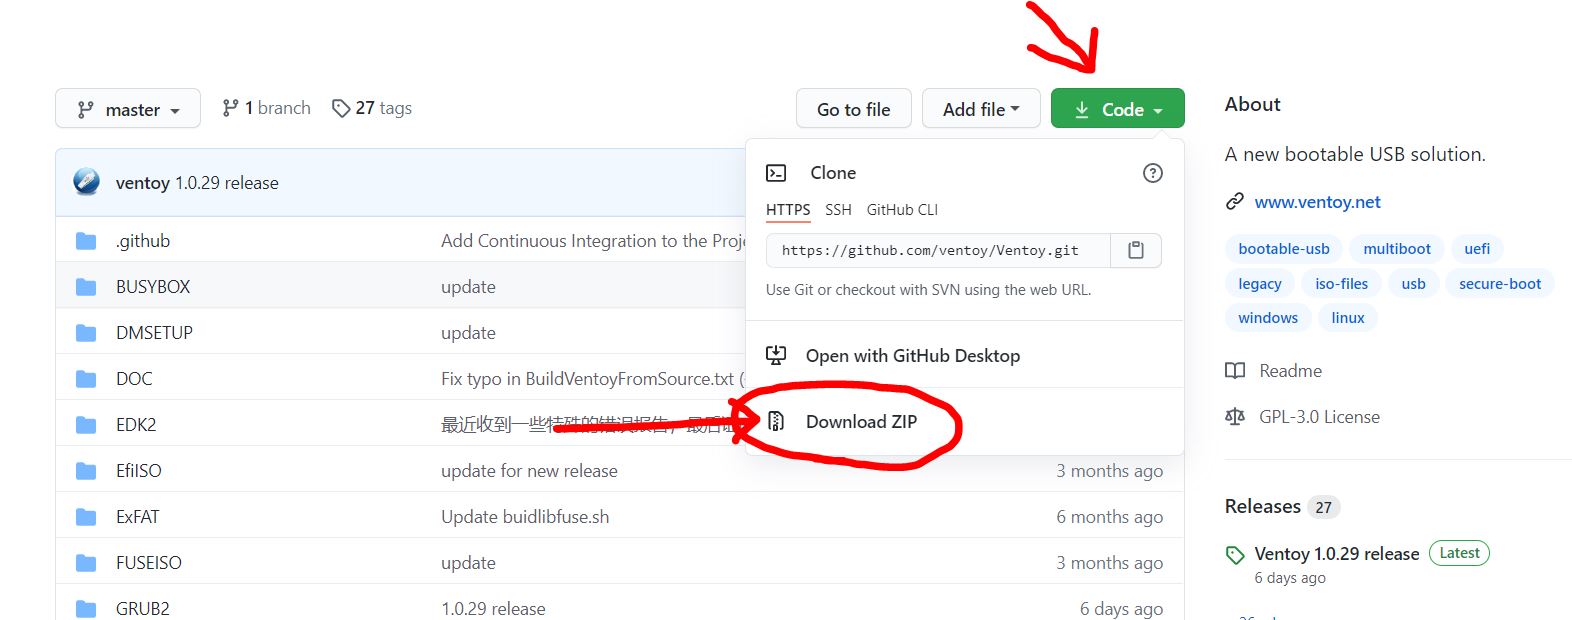
Currently the text on github says:
2.1 Download Ventoy source code from github and decompress it. Next I assume that you have unzipped the code into the /home directory (check /home/Ventoy-master/README.md file for the directory level).2.2 Download third-part source code (check on website - this list may change!)https://www.fefe.de/dietlibc/dietlibc-0.34.tar.xz ===> /home/Ventoy-master/DOC/dietlibc-0.34.tar.xz https://musl.libc.org/releases/musl-1.2.1.tar.gz ===> /home/Ventoy-master/DOC/musl-1.2.1.tar.gz https://ftp.gnu.org/gnu/grub/grub-2.04.tar.xz ===> /home/Ventoy-master/GRUB2/grub-2.04.tar.xz https://codeload.github.com/tianocore/edk2/zip/edk2-stable201911 ===> /home/Ventoy-master/EDK2/edk2-edk2-stable201911.zip https://codeload.github.com/relan/exfat/zip/v1.3.0 ===> /home/Ventoy-master/ExFAT/exfat-1.3.0.zip https://codeload.github.com/libfuse/libfuse/zip/fuse-2.9.9 ===> /home/Ventoy-master/ExFAT/libfuse-fuse-2.9.9.zip https://releases.linaro.org/components/toolchain/binaries/7.4-2019.02/aarch64-linux-gnu/gcc-linaro-7.4.1-2019.02-x86_64_aarch64-linux-gnu.tar.xz ===> /opt/gcc-linaro-7.4.1-2019.02-x86_64_aarch64-linux-gnu.tar.xz https://toolchains.bootlin.com/downloads/releases/toolchains/aarch64/tarballs/aarch64--uclibc--stable-2020.08-1.tar.bz2 ===> /opt/aarch64--uclibc--stable-2020.08-1.tar.bz2
You may need to use the mv command if you get permission errors, e.g.
su -mv filex /opt/filexYou will need to cut and paste each of the URLs listed and then copy each file to the locations shown in list 2.2 (the list shown above may change - so use the one on the GitHub page). Tip: Highlight each link - right-click - Save Link As ...
Other steps are also required - see the compile instructions for full details.
Edit the source files
Tip: Before you edit any files, try to compile it first. Once it is compiling without errors, then try editing the source files.
The background wallpaper is a 1024x768 .PNG file which can be changed or it can be edited using gimp:
/INSTALL/grub/themes/ventoy/background.png
There are two Ventoy.c code files which test for an 'official' Ventoy USB drive:
GRUB2/MOD_SRC/grub-2.04/grub-core/ventoy/ventoy.c (approx. 105kb) - makes
EDK2/edk2_mod/edk2-edk2-stable201911/MdeModulePkg/Application/Ventoy/Ventoy.c (approx. 32.8kb) -
Note: Be very careful to get the correct paths, especially for the EDK2 file as it can be quite confusing! if you edit the wrong Ventoy.c it may be overwritten by the source Ventoy.c when you compile!
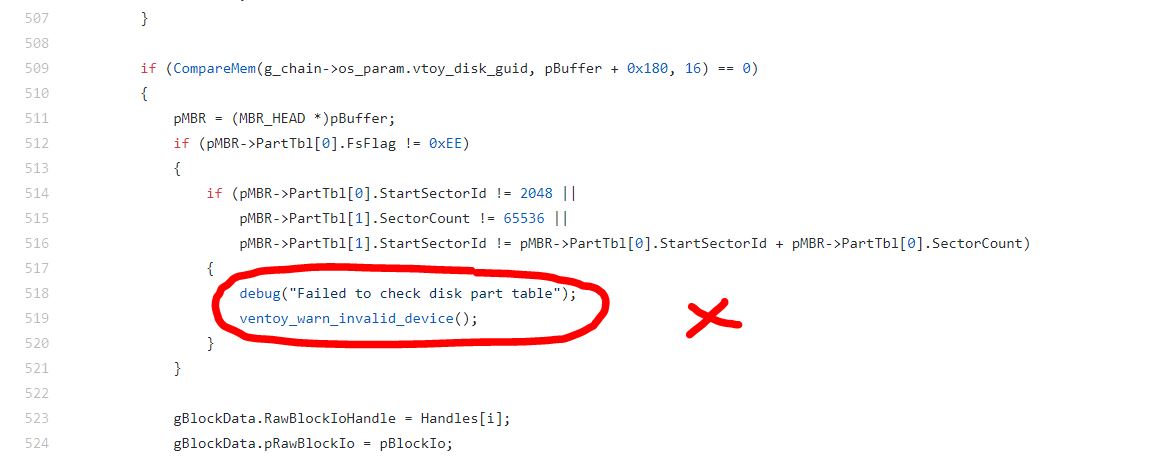
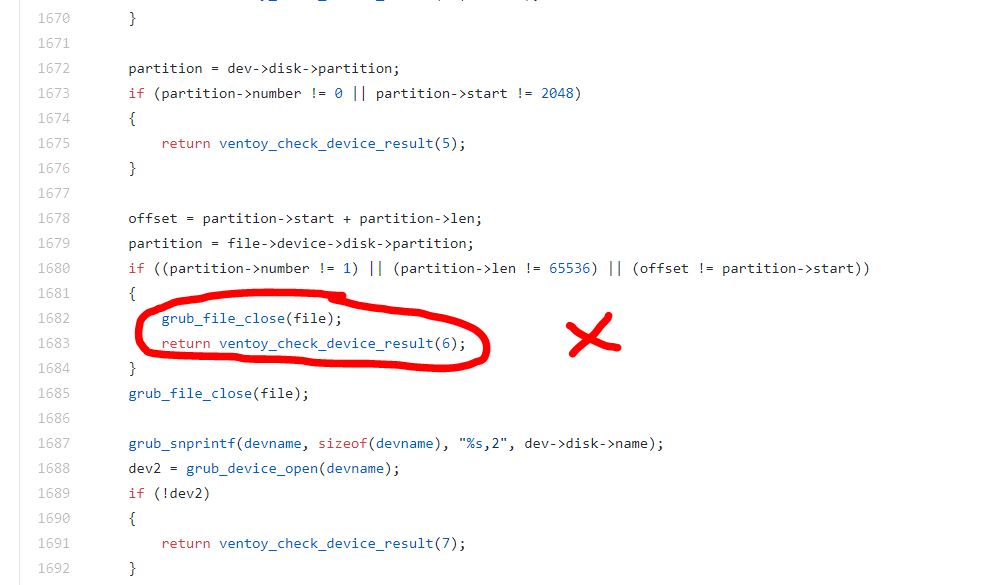
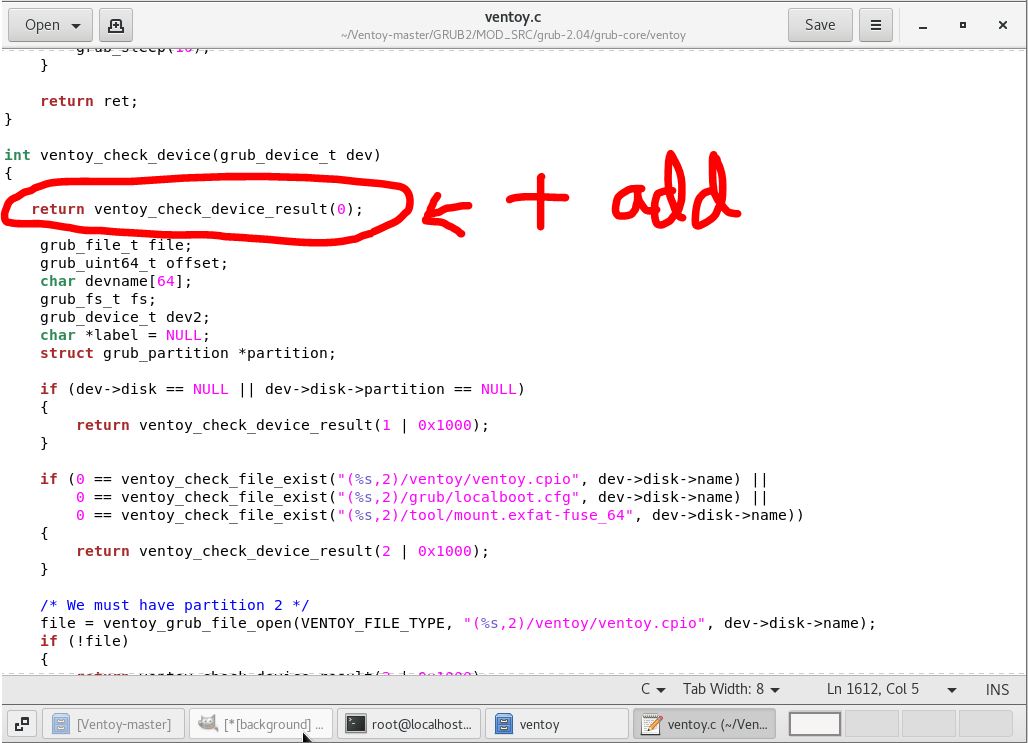
You can remove the lines which are executed when a test fails or you can add in a line to return a 0 result.
For the grub-core version (screenshot 1 below) I just removed two lines - this caused an 'Unofficial Ventoy' to be displayed (presumably because the partition volume name was wrong).
For the EDK2 EFI ventoy.c file, I added an extra line just below ventoy_check_device so it returned 0 (screenshot 3 below) - the effect was that no 'Unofficial Ventoy' message was displayed at all when UEFI64-booting.
VTOY_CHKDEV_RESULT_STRING should be '0' or else an 'Unofficial Ventoy' string is displayed.
VTOY_TEXT_MENU_VER is set in the file /home/Ventoy-master/INSTALL/grub/grub.cfg...
if [ "$grub_platform" = "pc" ]; then set VTOY_TEXT_MENU_VER="Ventoy $VENTOY_VERSION BIOS www.ventoy.net"else set VTOY_TEXT_MENU_VER="Ventoy $VENTOY_VERSION UEFI www.ventoy.net"fi
You may wish to change the website URL as this is displayed at the bottom of the Ventoy standard menu by the Ventoy theme (note: this only works for the text menu not for a gfxmenu/theme). See Tips section at end of page.
Compile
Once you have changed the two ventoy.c files (and anything else you wish), you can compile as follows:
su -cd /home/Ventoy-master/INSTALLsh all-in-one.shMake sure that the su - command works or else you will get file permission errors!

During compilation (which takes a while!) you may be prompted to press A to continue...
Go and get a cup of coffee for 10 minutes...
WARNING: The compile script does not always stop on an error (e.g. the GRUB2 buildgrub.sh script) - if you see any error text in a red colour then stop the build and investigate! All warnings may be treated as errors. If a variable in a function is defined but not used (because you have deleted that line) then you will get an error and it will not compile correctly! Tip: Edit the all_in_one.sh script to add a line with the command read just after the GRUB2 buildgrub.sh line - that way you can check for errors easily.
Check
Check the dates and timestamps on the new files. In particular, check the files:
/ventoy/ventoy.cpio
/ventoy/ventoy_x64.efi (made using EDK2)
/EFI/BOOT/grubx64_real.efi (made from GRUB2)
If you also want the UEFI32 files, check for /ventoy/ventoy_ia32.efi and /EFI/BOOT/grubia32_real.efi (Ventoy 1.0.32 and later).
If the compilation just stops without any error message, check the github page to see how to compile just the failing portion. For instance, if the compile stops on grub2, then follow the grub2 section instructions:
4.1 == Build grub2 ==
cd /home/Ventoy-master/GRUB2
sh buildgrub.sh
Copy files
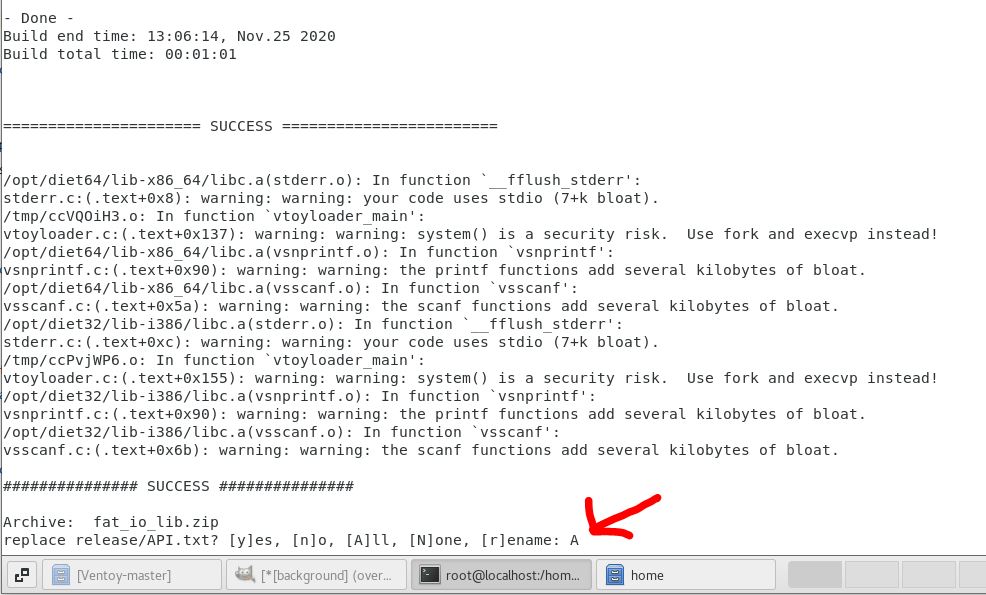
If the .zip file was successfully generated, you should see a nice message after 10-20 minutes:
========= SUCCESS ============
Now use the Desktop File Manager to copy the following files to a USB drive. You can attach a USB drive to the VM via the Devices - USB tab in the VM window.
In Centos VM (e.g. VirtualBox):
Attach USB drive using VBOX - device - USB tab
Copy /home/Ventoy-master/INSTALL/grub/i386-pc/core.img to a USB folder (I used \e2b\Update agFM folder for convenience)
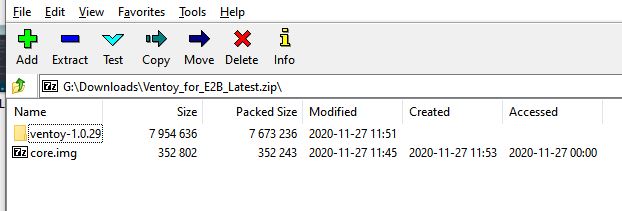
Copy /home/Ventoy-master/INSTALL/ventoy-1.0.29-windows.zip to a USB folder
Open ZIP file using Centos Archive Master (double-click on file) and drag-and-drop in the core.img file
Quit Archive Master
Eject the USB drive using Centos File Explorer (large up-arrow in left border on USB volume) - IMPORTANT!
Detach USB device from VBOX
The 'Ventoy for Easy2Boot' .ZIP file requires the addition of the core.img for Add_Ventoy.cmd to work correctly.
Add Ventoy to E2B USB drive
To test your new version, go to the \e2b\Update agFM folder on the second FAT32 partition of your E2B USB drive and drag-and-drop the zip file onto the Add_Ventoy.cmd file in that folder - it should extract and copy the necessary files.
Note: if the Add_Ventoy.cmd script also downloads the latest (unpatched) version of core.img then it was not in the ZIP file and Legacy Booting may not work.
The files that are required to be on the E2B 2nd partition are (perhaps some others too?):
\ventoy\ventoy.cpio
\ventoy\core.img
\ventoy\ventoy_x64.efi
\ventoy\memdisk
\ventoy\ipxe.krn
\EFI\BOOT\ventoyx64.efi (this was grubx64_real.efi originally)
Other folders: /grub for main grub files, and /tool folder (??)
/grub/grub.cfg is the main boot .cfg file for all versions.
Testing
Ventoy will check for a 'valid' USB device when booting, when running the /grub/grub.cfg file AND when running payload (ISO) files. You will need to check that you can actually boot an ISO in both Legacy and UEFI64 mode (and UEFI32 if applicable).
Tip: If Ventoy basically works after compiling, but you see an 'Unofficial Ventoy' string displayed at the bottom of the menu, try adding these lines to the /grub/grub.cfg file around the vt_load_part_table line:
set VTOY_CHKDEV_RESULT_STRING=0
export VTOY_CHKDEV_RESULT_STRING
#Load Partition Table
vt_load_part_table $vtoydev
set VTOY_CHKDEV_RESULT_STRING=0
export VTOY_CHKDEV_RESULT_STRING
You should not need to do this if you have patched the files correctly though.
Tips
The file /home/Ventoy-master/INSTALL/grub/grub.cfg ends up on the USB drive as /grub/grub.cfg) and can be changed to set different defaults and modify the text displayed on the menu.
You can change the default mode to TreeView mode...
############################################################################################################################################################################################## Main Process ##################################################################################################################################################################################################set VENTOY_VERSION="1.0.29"
#ACPI not compatible with Window7/8, so disable by defaultset VTOY_PARAM_NO_ACPI=1
# Default menu display mode, you can change it as you want.# 0: List mode # 1: TreeView modeset VTOY_DEFAULT_MENU_MODE=1
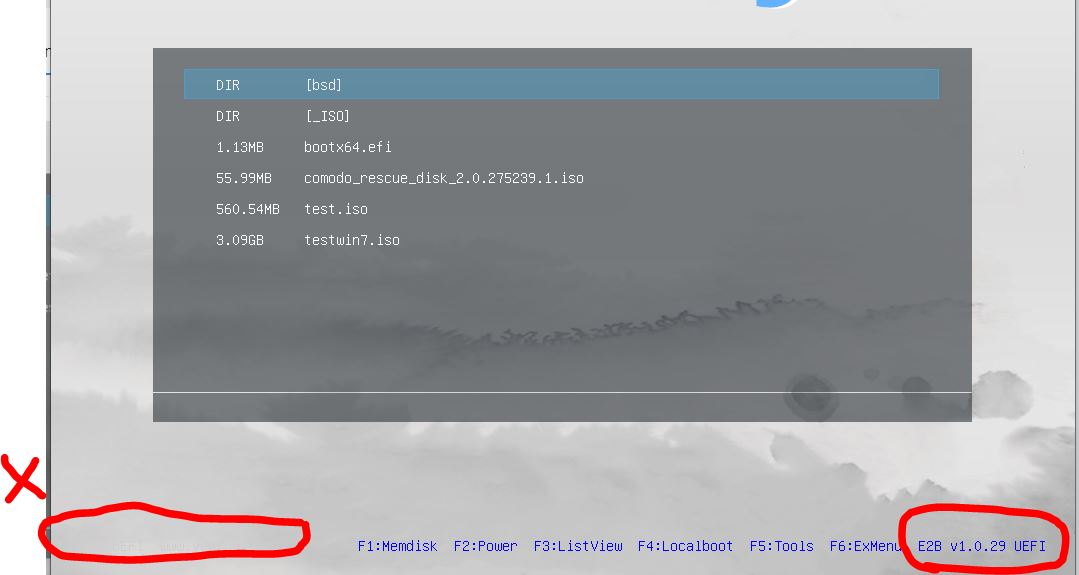
You can change the colour of the bottom left info text that currently appears as:
'1.0.29 UEFI www.ventoy.net'
so that it is invisible against the grey cloud background by adding a line to set VTLE_CLR which determines the colour of that string (must be at this location in grub.cfg and not before)...
#export necessary variableexport themeexport gfxmodeexport gfxpayloadexport vtoydevexport vtoy_pathexport vtdebug_flagexport vtoy_iso_partexport vtoy_efi_partexport VENTOY_VERSIONexport VTOY_CUR_VIDEO_MODEset VTLE_CLR=#cccdce
Change the string to remove the www.ventoy.net URL in the text mode menu..
if [ "$grub_platform" = "pc" ]; then
set VTOY_TEXT_MENU_VER=" E2B v$VENTOY_VERSION BIOS"
else
set VTOY_TEXT_MENU_VER=" E2B v$VENTOY_VERSION UEFI"
fi
and also add the same string to the end of the gfxmenu/theme menu hotkey tip string...
if [ $VTOY_DEFAULT_MENU_MODE -eq 0 ]; then set VTOY_F3_CMD="vt_dynamic_menu 1 1" set VTOY_HOTKEY_TIP="F1:Memdisk F2:Power F3:TreeView F4:Localboot F5:Tools F6:ExMenu $VTOY_TEXT_MENU_VER"else set VTOY_F3_CMD="vt_dynamic_menu 1 0" set VTOY_HOTKEY_TIP="F1:Memdisk F2:Power F3:ListView F4:Localboot F5:Tools F6:ExMenu $VTOY_TEXT_MENU_VER"fiThe menu below shows invisible grey text on a grey background of the same #cccdce grey colour (X), TreeView mode and the version number and UEFI\BIOS mode string is displayed at the end of the hotkey tip line.
Tip: If you get a 'No files found' error on the Ventoy menu - you have probably made a mistake in the grub.cfg file! Try the original \grub\grub.cfg file to see if that works.
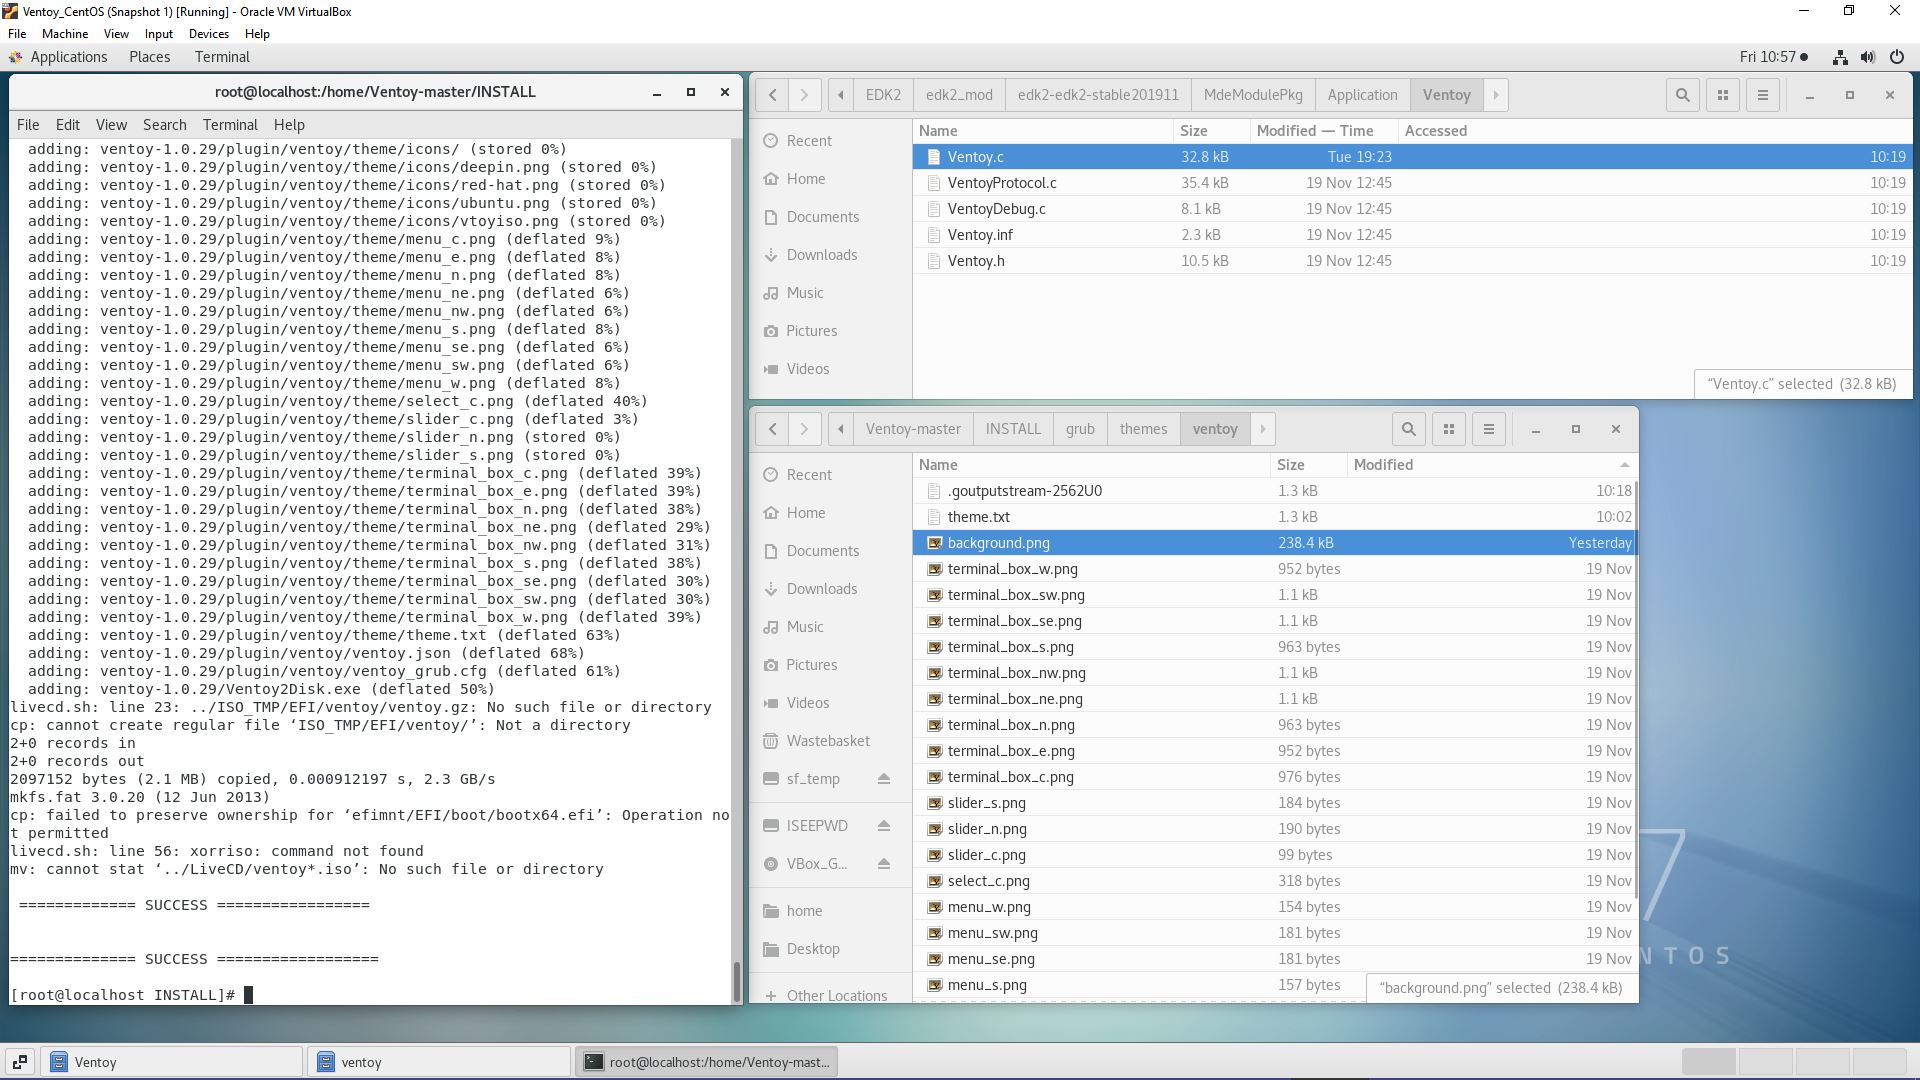
The theme.txt file can be changed at /home/Ventoy-master/INSTALL/grub/themes/ventoy/theme.txt.
You can quickly test any changes to the grub.cfg file or the theme.txt file by editing those same files on the 2nd partition of the E2B USB drive and then booting to agFM and then Ventoy.
/grub/grub.cfg
'grub/themes/ventoy/theme.txt
Once they work OK, you can copy them to the correct folders in the CentOS Ventoy-master folder structure and recompile.
Updating to a newER version of ventoy
The new version may have many new changes to the Ventoy.c files and the other files such as grub.cfg and the theme files, so you cannot just overwrite the new file with the old modified version of the file.
Because you have to add a load of other files (.zip, .xz, .bz2 archives) into the source folder structure, the easiest way to update is to copy the new Ventoy sources files directly over the old source files (but first make a backup of the old modified folder).
Then I use the linux utility Meld to compare the two folders and update the new files. Meld is similar to WinMerge for Windows - it allows me to add/delete specific lines into the new source files.
Resources
Public - Latest Betas folder https://1drv.ms/f/s!AqlrQcdsFA-KeES7GUgcjXrRvWY (inc. sample patch source files)
Easy2Boot blog https://rmprepusb.blogspot.com/
