
02 - How to create a USB drive that will install one of many choices of Windows OS's (Vista/Win7/Server 2008/XP)

unique hits
Note: The instructions have been tested and seem to work OK using a Vista, Win 7, Server 2K8, Server 2008 R2 install DVDs and Win 7 PE 32bit. Let me know if you have tried it with any others. See other article for how to add XP Setup CDs.
ATTENTION: This tutorial is now superseded/replaced by Tutorial #43 if you want to keep all the DVDs as ISO files instead OR better yet (and much easier), you can make an Easy2Boot MultiBoot USB drive and just copy all your Windows Install ISO files (and 100's of others) to it.
See http://www.boot-land.net/forums/index.php?s=&showtopic=8043&view=findpost&p=68050 for the discussions about this method.
Note: If you want to install any one of 11 different versions of Windows 7, you can simply combine all the Win 7 WIM images into one big Install.Wim file see here for details (use RMPrepUSB to prepare an NTFS USB drive for Win7 booting and copy over the entire E:\AIO\DVD folder).
This tutorial allows you to choose from Vista/Win7/Server 2K8 all from the same bootable USB drive.
Aim
You wish to create a single USB boot key/drive that will install any version of Vista, Windows 7 or Server 2008 to a system's hard disk - i.e. just as if you had all the Micro$oft Windows install DVDs in your pocket. This tutorial has been written so that you can adapt it to install as few or as many as you wish (or have room for on your USB drive!).
Note: You can also install Windows XP as well as the other OS's. To install from a Setup CD (just like booting from an XP install CD) see Tutorial #30 here.
To install XP from an image file, you first need to boot to WinPE v3 (see menu option below) and also have a copy of the XP CD files on your USB drive (or a ZIP file containing all the files) - see here for details.
This tutorial will allow you to boot from a USB flash drive (or USB hard disk) and choose from a menu:
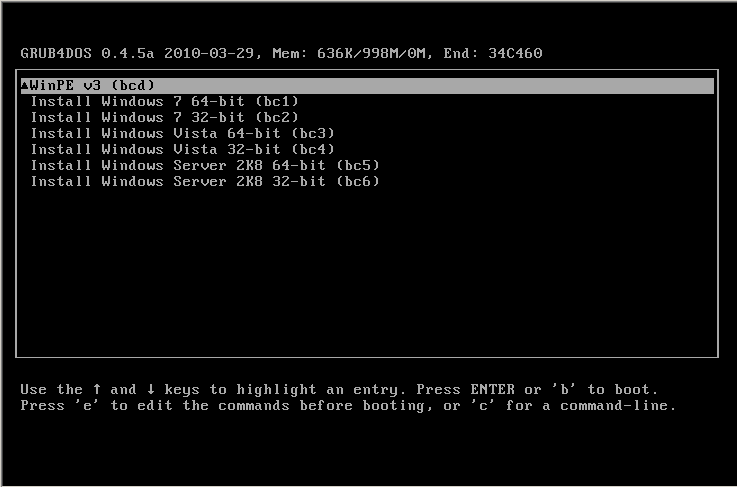
Fig. 1 This menu was made using menu2.lst (renamed to menu.lst).
Equipment required
Source Microsoft DVDs or ISOs for Vista/Win7/Server 2008 (note OEM DVDs will usually not work) (Win7 ISOs here - use Digital River links, some other links may be broken)
A USB drive large enough to fit all source files onto (min 4GB for one DVD, 32GB+ for all DVDs)
RMPrepUSB v2.1.617 or later
Windows 7 WAIK (click to download)
A Windows Vista/Windows 7 computer to prepare the USB drive files (Win7/Vista required as BCDEdit.exe is required)
The MultiWin9.Zip file (click the link to download from the Tutorials download section)
Method
Outline
Download and install the Windows 7 WAIK to obtain ImageX utility and WinPE OS (you MUST use Windows 7 RTM WAIK version or the menu.lst patches to bootmgr will not work)
Make a new folder called C:\MYUSB
Copy bootmgr (or make multiple copies of bootmgr)
Copy the BCD files from each DVD and modify them
Copy the boot.wim file from each DVD (a .WIM file is like a .ZIP file)
Modify each boot.wim file
Copy over the Windows source file(s) from each DVD (usually sources\install.wim)
Partition, format and create the USB drive using RMPrepUSB
Boot from the target system using your new USB install drive
Final structure of C:\MYUSB folder (note: folder names must not contain spaces):
\MYUSB
menu.lst
bootmgr
bootmgr1
bootmgr2
bootmgr3
bootmgr4
bootmgr5
bootmgr6
changeBCD.cmd (does not need to be copied to the USB drive)
zbootmgr.exe (does not need to be copied to the USB drive)
ModBootWim.cmd (does not need to be copied to the USB drive)
grldr (only on USB drive after running grub4dos install in step 8)
\MYUSB\Sources
boot.wim
boot1.wim
boot2.wim
boot3.wim
boot4.wim
boot5.wim
boot6.wim
\MYUSB\Boot
boot.sdi (BSOD if not present!)
bcd
bc1
bc2
bc3
bc4
bc5
bc6
\MYUSB\W732
Install.wim
\OEM folder (optional)
unattend.xml (optional)
\MYUSB\W764
Install.wim
\OEM folder (optional)
unattend.xml (optional)
\MYUSB\V32
Install.wim + all other files from DVD \Sources folder
\OEM folder (optional)
unattend.xml (optional)
\MYUSB\V64
Install.wim + all other files from DVD \Sources folder
\OEM folder (optional)
unattend.xml (optional)
\MYUSB\SVR2K832
Install.wim (+ all other files from DVD \Sources folder if not RC2 version)
\OEM folder (optional)
unattend.xml (optional)
\MYUSB\SVR2K864
Install.wim (+ all other files from DVD \Sources folder if not RC2 version)
\OEM folder (optional)
unattend.xml (optional)
How it works:
PC boots from USB -> grub4dos loads -> menu.lst presented -> bootmgrx selected -> \boot\bcx selected -> \sources\bootx.wim loaded -> winpeshl.exe -> winpeshl.ini -> mysetup.cmd runs -> windows setup directed to correct install.wim file by mysetup.cmd file.
Step-by-step instructions
1. Download and install the Windows 7 WAIK to obtain the ImageX utility
For instructions on how to do this, please refer to the first part of my tutorial here.
Follow the instruction up to the point where a WinPE folder has been created (Step 1)
You can create either an x86 version or an amd64 (64-bit) version (x86 recommended as 64-bit WinPE will not boot on 32-bit only CPUs such as Atom N270/netbook CPUs).
2. Create a new folder called C:\MYUSB on you hard drive.
Copy and extract the contents of the latest version of MultiWin9.ZIP file in the Beta Downloads - Miscellaneous Tutorials section of this website to the C:\MYUSB folder.
Latest version of zbootmgr.
Note: If you delete menu.lst and rename menu2.lst to menu.lst you can omit step 3.1 below (recommended).
3. Copy bootmgr from the c:\pe86\ISO folder made in step 1 above to your new C:\MYUSB folder.
(before you follow the next 3 instructions in section 3.1 below, read the footnote at the bottom of this page to save you some work - you are recommended to use menu2.lst and skip section 3.1 but you MUST use the Win7 RTM version of bootmgr with a CRC32 value of EE471B58!)
3.1 Now run the program zbootmgr.exe and select the \MYUSB\bootmgr file.
Click the Save button and save the modified bootmgr as bootmgr1.
Repeat this 5 more times to save 6 versions (bootmgr1, bootmgr2, bootmgr3... bootmgr6) of the file.
4. Copy the \boot\BCD file from each different source Windows install DVD to C:\MYUSB\boot\bcx as follows:
From the Windows 7 64-bit DVD, copy the file \boot\bcd to C:\MYUSB\boot\bc1
From the Windows 7 32-bit DVD, copy the file \boot\bcd to C:\MYUSB\boot\bc2
From the Windows Vista 64-bit DVD, copy the file \boot\bcd to C:\MYUSB\boot\bc3
From the Windows Vista 32-bit DVD, copy the file \boot\bcd to C:\MYUSB\boot\bc4
From the Windows Server 2008 64-bit DVD, copy the file \boot\bcd to C:\MYUSB\boot\bc5
From the Windows Server 2008 32-bit DVD, copy the file \boot\bcd to C:\MYUSB\boot\bc6
Now run the WAIK Deployment Tools Command prompt from
Start Menu - All Programs - Microsoft Windows AIK - Deployment Tools Command Prompt (right-click and choose Run as Administrator) - it should show a command prompt like:
C:\Program Files\Windows AIK\Tools\PETools>
Now type the characters in bold print below (press the Enter key to execute each command):
C: (type the drive letter where you have stored the MYUSB folder - in this case C:)
CD C:\MYUSB (change to the folder where you placed the source folder)
--> should now say C:\MYUSB> as prompt
ChangeBCD
this changes the current location to the same folder as your source folder and runs ChangeBCD.cmd from the C:\MYUSB folder. You will be asked for a BCD number.
Enter 1 (if you have a bc1) - it should modify the existing bc1 file so that it looks for boot1.wim instead of boot.wim.
Repeat this for all bcx files that you have added.
(Tip: leave the command prompt window open - you will use it again in Step 6).
4.1 Copy the boot.sdi file from C:\PE86\ISO\boot folder to C:\MYUSB\boot\boot.sdi - if not present you will get a BSOD error before it starts to load the boot.wim file.
5. Copy the \sources\boot.wim file from each DVD to the MYUSB\Sources folder as follows:
copy (Win7 64 dvd)\sources\boot.wim to C:\MYUSB\sources\boot1.wim
copy (Win7 32 dvd)\sources\boot.wim to C:\MYUSB\sources\boot2.wim
copy (Vista 64 dvd)\sources\boot.wim to C:\MYUSB\sources\boot3.wim
copy (Vista 32 dvd)\sources\boot.wim to C:\MYUSB\sources\boot4.wim
copy (server2008 64 dvd)\sources\boot.wim to C:\MYUSB\sources\boot5.wim
copy (server2008 32 dvd)\sources\boot.wim to C:\MYUSB\sources\boot6.wim
Note: It is important to keep the same numbering, even if you are only installing one or two of these OS's.
6. We now need to add two files from the multiwin.ZIP file you downloaded to each OS bootx.wim file (a wim file is like a zip file) as follows, so that Windows setup will find the correct install.wim file:
This now involves typing some tricky commands (but I have automated this for you - read the Tip section below):
Right-Click on Start Menu - All Programs - Microsoft Windows AIK - Deployment Tools Command Prompt (opens command prompt window) (right-click and Run as Administrator)
type MD C:\MOUNT to create an empty MOUNT folder
type IMAGEX /mountrw C:\MYUSB\sources\boot1.wim 2 c:\mount to mount the 2nd image in the wim file onto your C:\mount folder*
type copy C:\myusb\w764\*.* C:\mount\windows\system32\*.* to copy over the winpeshl.ini and mysetup.cmd files
type IMAGEX /unmount /commit C:\MOUNT to save the changes
(*if image #2 does not exist then use image #1)
You would need to change the highlighted portions for each one as appropriate - but I have automated this for you so you can use the ModBootWim.cmd script as follows:
Tip: I have included the file ModBootWim.cmd in the ZIP download which will automate this for you. Run the WAIK Deployment Tools Command prompt from
Start Menu - All Programs - Microsoft Windows AIK - Deployment Tools Command Prompt (right-click and choose Run as Administrator)
and change to the C:\MYUSB folder (or whatever folder you have used instead - see step 4 for example commands).
Now type ModBootWim and it will run the above commands for you.
Do this for each bootX.wim file that you have present.
Note: Before you run ModBootWim, I strongly suggest that you close all Explorer windows and other shell windows and apps, disable any file synchronising apps (e.g. Dropbox) and temporarily disable virus scanning and Windows file indexing, etc. This will help to speed up the ImageX /mount and /unmount commands.
Troubleshooting: If ImageX returns an error, please check the following:
The C:\MOUNT folder exists and is empty
Close all open Shell command console windows, open apps, systray apps and all Explorer windows
Try the single command line IMAGEX /unmount C:\mount and press Enter and then ImageX /cleanup
If all else fails, Reboot and try the /unmount and /cleanup commands above again! Also try deleting the C:\mount folder and then running ImageX /cleanup.
7. Finally we need to copy the very large WIM source file from each DVD over to the C:\MYUSB folder. (Note: If you prefer, you can copy these files over from each DVD directly to the USB drive after the final step).
Create a folder for each OS DVD (if not already present) and copy the \Sources\install.wim file from each DVD into the correct folder. The folder names must exactly match.
C:\MYUSB\W764\install.wim
C:\MYUSB \W732\install.wim
C:\MYUSB \V64\install.wim*
C:\MYUSB \V32\install.wim *
C:\MYUSB \SVR2K864\install.wim *
C:\MYUSB \SVR2K832\install.wim *
*IMPORTANT NOTE: If you have VISTA DVDs or Server 2K8 DVDs (non-RC2) then you must copy the entire contents of the \Sources folder over (including the boot.wim and install.wim and all subfolders) and not just the large Install.wim file.
You should delete any ei.cfg file if present, so that you are prompted for all Windows editions contained in the install.wim file.
If you have Win 7 or Server 2K8 RC2 DVDs then you only need to copy the one large install.wim file.
7.1 Automated installs and adding extra files and folders
In addition, you can add a $OEM$ function which means setup will copy over any additional files that you place in the \xxx\OEM folder. e.g. if you place extra files (e.g. drivers) in the \SVR2K832\OEM\$1 folder on the USB drive, setup will copy any files or folders in this folder to the systemdrive during installation. See http://technet.microsoft.com/en-us/library/cc766446(WS.10).aspx /m parameter in table for more details. So you can place your drivers in say \SVR2K832\OEM\$1\MYDRV and place an unattend.xml file in \SVR2K832\unattend.xml which contains a DriverPaths entry which points to \MYDRV - then the drivers will be installed automatically. Details on how to modify the unattend.xml are covered in the Windows WAIK .chm help files.
7.2 Adding WinPE boot files
If you want the WinPE v3 boot option to work:
copy C:\PE86\ISO\Boot folder contents to C:\MYUSB\Boot
copy C:\PE86\ISO\sources\boot.wim to C:\MYUSB\sources\boot.wim
copy C:\PE86\ISO\bootmgr to C:\MYUSB\bootmgr (should already be present from step 3)
8. Now we need to prepare the bootable USB drive (for speed of testing, I would recommend you use a USB Hard drive first, if you have one available).
Partition and format the USB drive using RMPrepUSB v1.2.600 or later as follows:
Select your USB drive then set 1=MAX, 2=WinInst, 3=WinPE,4=FAT32+Boot as HDD or NTFS+Boot as HDD, 5=set to C:\MYUSB and tick the box - then click 6= Prepare Drive
After the copy has finished (may take 10 mins to 2 hours depending on how many files you have!), click on the Install grub4dos button and say OK to everything (if formatted as NTFS you must use MBR install). If you get a flashing cursor on boot then use the PBR option!
Check the folder structure and file contents - see list at the top of this page. If you did not copy over the DVD \sources files in step 7, do it now direct from each DVD. If any install.wim is over 4GB you must use an NTFS formatted USB drive.
Tip: To test that the USB drive is bootable, try using the RMPrepUSB QEMU button (F11) and see if you get a menu. If you create a virtual hard disk, you can even check that the Windows Setup menus work too!
9. Now try booting from the USB drive on your target system (I recommend that you do not set USB drive as first boot device but use the F10/F12 key to invoke the BBS Boot selection menu to select the USB key as the boot device ) and running through Windows Setup. Keep the USB drive in at all times if you have an xxx\OEM folder.
Note: If setup hangs at the 'completing Setup' stage, you may need to disconnect the USB drive at the 'Completing installations' phase when the Windows setup phase starts . If you have used an \OEM folder, you will need to remember to re-connect the USB drive after the next reboot or the OEM files will not be copied over.
Note: if a system does not show the grub menu but you just get a flashing cursor, reformat using RMPrepUSB v2.1.600+ and use FAT32 (not NTFS) and click on the
'install grub4dos' button Note: If you have files over 4GB in size you cannot use FAT32. and select the PBR (answer 'No' to MBR question).
IMPORTANT: When testing your new Multi-Windows-Install USB drive, remove all Windows DVDs from the target system's DVD drives - otherwise you will not be prompted for the OS SKU. For instance, if you have used a Win 7 64-bit Ultimate install DVD to prepare the USB drive, you will be given a choice of Starter, Home Premium, Professional or Ultimate. However, if the DVD is still present in the DVD drive, you will not be given any choice as the install will default to Win 7 Ultimate.
If you have a multiple partitioned USB (Removable) drive, the files must be on the first partition or you will get a 'Please insert disk into drive' error and the Install.wim file will not be found. You can however add a driver to the boot.wim file so that Removable drives are seen as Fixed drives and thus you can have multiple partitions - see here for details.
Footnote for Step 3.1
Note that you can improve this and save some work and filespace by using grub4dos to modify bootmgr on the fly - this saves having multiple versions of bootmgr1-6. See http://www.boot-land.net/forums/index.php?s=&showtopic=8043&view=findpost&p=68050. I have included the alternative version as menu2.lst in the download. So if you wish to save all the work in Step 3.1 above, then only copy the single WinPE v3 (win7) file bootmgr (IMPORTANT: must use the WinPE v3 version of bootmgr from the Windows 7 WAIK) to the C:\MYUSB folder (no need to use zbootmgr.exe or create bootmgr1 - bootmgr6 files) and then overwrite menu.lst using menu2.lst (filename on USB drive must be menu.lst). This will also save approx. 2MB of space on the UFD. You will need the later version of grub4dos 0.4.5a or later for this to work (as used by later versions of RMPrepUSB e.g. v2.1.600+).
Many thanks to JFX, sushil1576 and others at Boot-Land for helping to work out this scheme.
far.in.out has also made a tutorial here which may interest you.