38 - Create an iGel Universal Desktop Converter (UDC) installer USB Flash pen
Unique hits
As well as offering Thin Client hardware for RDP or ICA sessions, iGel also offer a linux Thin Client which will run on most hardware platforms (if the hardware is not too recent). You can install the iGel linux OS (which they call 'Firmware') from a USB flash drive onto your tired old PC. iGel call this the Universal Desktop Converter and it replaces the OS on your hard disk with it's own linux OS and converts any old x86-based PC or notebook into a thin client.
Note: this Tutorial is old and may not apply to the latest versions of UDC2Stick.
If you wish to evaluate iGel, they can supply you with a free evaluation licence (it is fixed to the MAC address of your PC or notebook that you are going to install it to and you need to tell them the MAC address when you apply for the licence). You can install iGel onto an (x86-based) computer without a licence, but it will not run any remote session without installing a licence (the menu items will be missing until the software is activated).
You can use the iGel USB tool UDC2Stick.exe to create an OS installer USB flash drive, but this may not work on a 64-bit OS. The installation manual can be read here. Here is how to do it using RMPrepUSB under any Windows OS...
Note: Recent versions 4 and 5 not tested!
Note: you will need a 1GB USB Flash drive or larger for the latest version.
1. Download the latest UDC2Stick_x.xx_xxxx.zip file (e.g. UDC2Stick_4.06.110.zip) from here (do not download the ISO file as it does not contain the required syslinux.exe file).
2. Unzip the file and extract the contents to an empty/new folder on your Windows system
3. Copy the file syslinux.exe located in the \Software & Documentation\Software\UDC2Stick folder, to the RMPrepUSB application folder on your Windows hard drive and overwrite the syslinux.exe file that is already there (tip: press F3 to open the RMPrepUSB source folder). We have to use the iGel version of syslinux.exe with RMPrepUSB and not the version that is already the in RMPrepUSB folder. If we don't use the iGel version then we won't get a nice menu when the USB drive boots!
4. Find and mount the UDC iso file igel_udc_cd.iso (e.g. using ImDisk or Virtual CloneDrive to mount it)
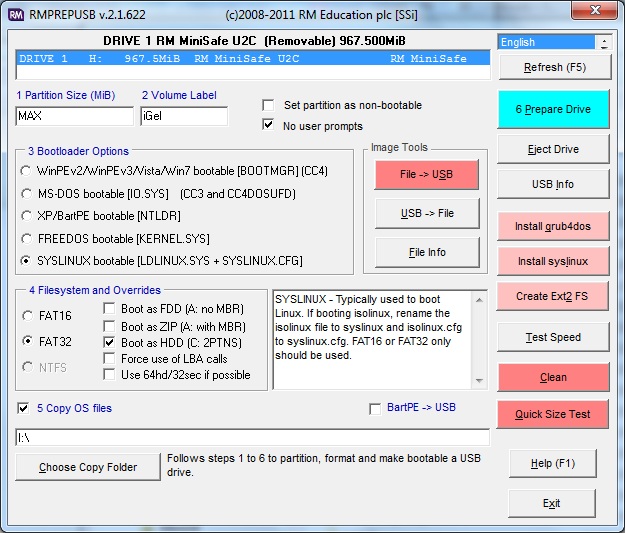
5. Run RMPrepUSB and set up the options for Syslinux, FAT32, Boot as HDD and set the Copy Files folder to the drive letter of your mounted ISO file (e.g. G:\ )
6. Click on Prepare Drive and RMPrepUSB will format your USB drive, copy over the files and apply Syslinux (choose Option 1 for the Syslinux boot folder option when prompted).

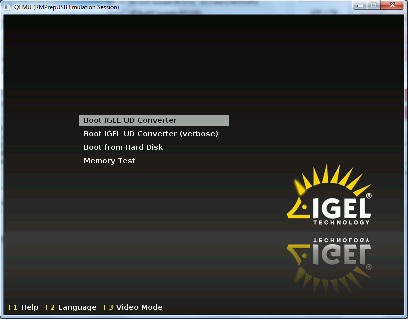
You can test the USB drive by pressing F11 in RMPrepUSB to run the built-in QEMU emulator. You should see a menu like this:

The boot menu used to install the iGel linux thin client OS onto your hard disk.
Note: it may not boot fully under QEMU!
Now you can use the USB flash drive to install the UDC linux 'firmware/OS' onto any x86 system you have spare and test it out. If your hardware is not compatible, you will receive an error message similar to 'MAC address not found' which means that it does not have the correct network driver for your hardware. See here for more details.
Don't forget that you may need to restore the syslinux.exe file in the RMPrepUSB folder with one of the original ones in the Syslinux folder (press F3 to open Explorer at the RMPrepUSB folder) if you use the syslinux option to create a different USB drive in the future.

