
72b - DPMS2 - XP 32-bit SRS/AHCI driver auto-detection for E2B
I have put 100's of hours of hard work into making Easy2Boot work for you!
<- If you enjoy using E2B, please consider making a donation, it would be much appreciated.
IMPORTANT: This Tutorial is now largely obsolete.
The full XP 32-bit Mass Storage drivers are already included in the E2B+DPMS2 download.
Please go to the www.easy2boot.com site - the text below is mostly outdated now!
What is an AHCI driver and why doesn't XP install to my SATA drive system - see here for a nice diagram and explanation.
How to add DPMS2 to Easy2Boot
The E2B+DPMS2 zip file downloads already contain the 32-bit DPMS drivers - you only need to follow instructions 1-4 below if you downloaded the E2B files which did not already contain the mass storage drivers.
To use DPMS2 in E2B, you need to add all of the DriverPack XP 32-bit Mass Storage drivers (approx 30-40MB). If these are not present, E2B will not use DPMS2 and auto-driver detection.
64-bit XP is not supported by DPMS2 (64-bit XP Install ISOs must contain the number '64' in the ISO name).
1. Use E2B v1.03 or a later version
2. Download an XP x86 32-bit Mass Storage Driver Pack (x86 NT5) from http://driverpacks.net/driverpacks/windows/xp/x86/mass-storage
e.g. Sep. 24 2012 Windows 200/XP/2003 x86 Mass Storage version=12.09
Click on the Download button which will download a Torrent file (e.g. DP_MassStorage_wnt5_x86-32_1209.7z)
Use BitTorrent (or your favourite Torrent app) to download the .7z file
3. Unpack the contents of the Driver Pack zip file to your USB pen's \_ISO\E2B\grub\DPMS folder (see folder tree below)
4. Rename the INI file at \_ISO\E2B\grub\DPMS\DriverPack_MassStorage_wnt5_x86-32.ini to \_ISO\E2B\grub\DPMS\DriverPack.ini
E2B Folder structure for DPMS is:
\_ISO\E2B\grub\DPMS\DriverPack.ini driverpack ini file - renamed by you!
\_ISO\E2B\grub\DPMS\dpms2.bat main grub4dos batch file
\_ISO\E2B\grub\DPMS\chkpci grub4dos executable
\_ISO\E2B\grub\DPMS\fat grub4dos executable
\_ISO\E2B\grub\DPMS\inifile grub4dos executable (new version!)
\_ISO\E2B\grub\DPMS\E2B_DPMS_ReadMe.txt (help file - can be deleted)
\_ISO\E2B\grub\DPMS\TestDPMS2.g4b For developers only - will test DPMS2.g4b using many different PCI IDs - can be deleted
\_ISO\E2B\grub\DPMS\FIRA Firadisk driver folder
\_ISO\E2B\grub\DPMS\WINV WinVBlock driver folder
\_ISO\E2B\grub\DPMS\D Driver folder (no files)
\_ISO\E2B\grub\DPMS\D\M driver folders go here (e.g. I3, I4, V, etc.) extracted from the DP_MassStorage_wnt5_x86-32_XXXX.7z)
Note:
The files oem0.txt and oem1.txt in the DPMS folder will contain copies of the two oemsetup.txt files after running DPMS2
The files dir0.txt and dir1.txt will contain directory listings of the two floppies generated by DPMS2.
These files can be inspected or sent to me for problem solving - do not change their size or delete them or you will lose the logging feature.
Introduction
DPMS2 adds automatic SATA/RAID/SCSI (SRS) driver detection to E2B when installing XP from an XP ISO file (DPMS2 is a modified version of the DPMS grub4dos batch file originally writtten by chenall).
Why do I need to add Mass Storage Drivers to E2B?
When installing from a 'vanilla' (unaltered) XP ISO using Easy2Boot, you will find that if the hard disk in your system is not a standard IDE drive (e.g. AHCI controller with SATA hard disks), XP Setup will not be able to detect the hard disk (or may just crash/Blue Screen of Death/BSOD).
In order to access hard disks attached to a SCSI, RAID or SAS controller you need to add the correct driver to both the XP PE (Setup) environment and the WIndows XP environment.
A typical situation is that you have a computer with a SATA Hard Disk attached to an AHCI controller. If the BIOS is set to AHCI Mode (and cannot be set to 'Legacy IDE Mode') then you will need to add the correct SRS Mass Storage Driver to XP during installation.
Typically, there are two ways to fix this problem:
1. Use an F6 Floppy disk containing the correct drivers for your disk controller
2. Integrate the SRS drivers(s) into the CD or ISO file that you are using. This can be done using software such a nLite and downloading the correct drivers from a driver website such as driverpacks.net.
DPMS2 automatically detects which driver you need and then copies that driver to a virtual F6 floppy disk for XP Setup to automatically detect and use.
In fact, two virtual F6 floppy disks are made, one for the OEM SRS storage driver and the other for FiraDisk or WinVBlock (these are RAMDisk drivers which are required for the install of XP from an ISO file). The disks are 99% identical, the only difference is that each disk will have a different 'default' driver set so that Setup will load a different driver from each disk automatically as it detects each virtual floppy disk in turn.
Easy2Boot DPMS2
The DPMS2 package for E2B is a set of grub4dos files which allows you to automate the choosing and loading of the correct SRS driver. It detects the PCI ID of your SRS controller, selects the driver files (which must be present on the E2B drive), copies the files to a 'Virtual Floppy' that is stored in system memory and automatically generates the correct txtsetup.oem file for the 'default' SRS driver. In addition, the DPMS2 batch file also generates a second F6 Virtual Floppy disk that contains a RAM Disk driver - this is necessary because E2B can install Windows directly from an ISO file and this requires a RAMDisk driver (either FiraDisk or WinVBlock or both can be used).
Note: If more than one SRS driver is required for your system, you must press F6 during XP Setup and install all the drivers listed by Setup that are on the virtual F6 floppy disks. The DPMS2 package makes a maximum of two F6 floppies (one SRS + one Ram Disk Driver) and thus a maximum of two drivers by default can be automatically loaded - however all the matching (correct) drivers will be on the virtual disks and so you can use F6 to load them all manually.
How to Install XP using E2B
Installing Windows XP directly from an ISO requires 3 boots, the first two boots must be from the E2B USB drive:
1. Boot from the E2B USB drive and choose STEP 1 for first text-mode Windows XP Setup stage (formats and copies file to hard disk)
2. Re-boot to the E2B USB drive again after Windows text-mode Setup stage resets and choose STEP 2
3. Re-boot after Windows GUI-mode Setup stage has completed (if it reboots to E2B press F7 to reboot to the hard disk)
Note: For the most reliable installation experience (less chance of BSOD!), load the ISO into memory in both STEP 1 (Alt+1 and answer Y) and then reboot and choose STEP 2 (use Alt+2). Loading the ISO into memory on each boot is not always necessary however - it depends on what mass storage driver is required and what BIOS/chipset the system has.
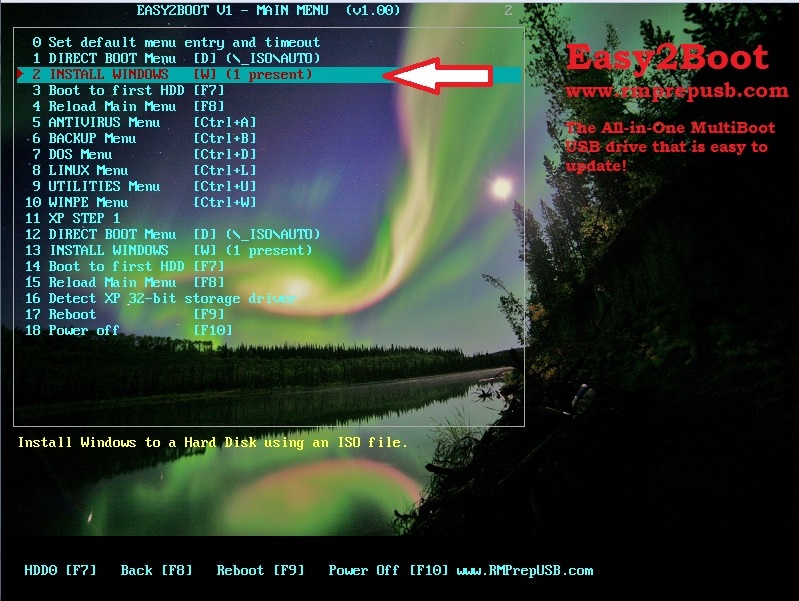
1. Press W to select the Windows Menu
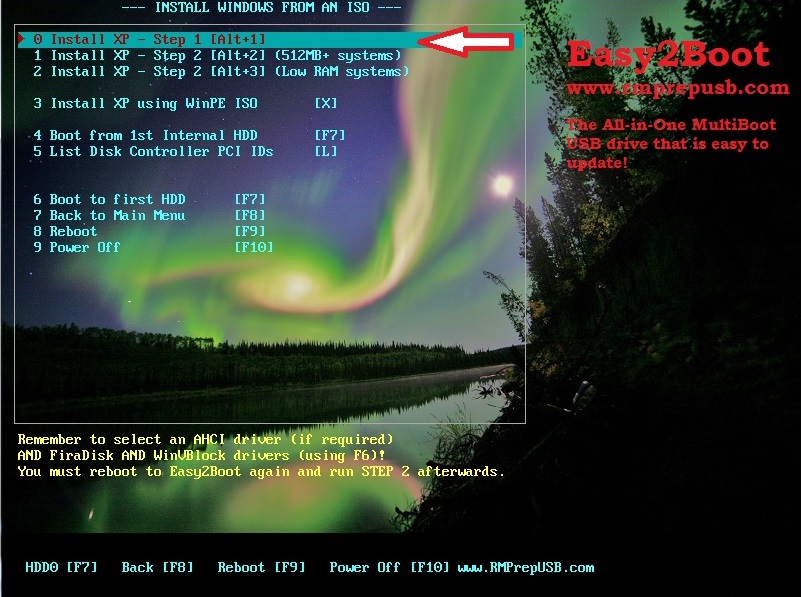
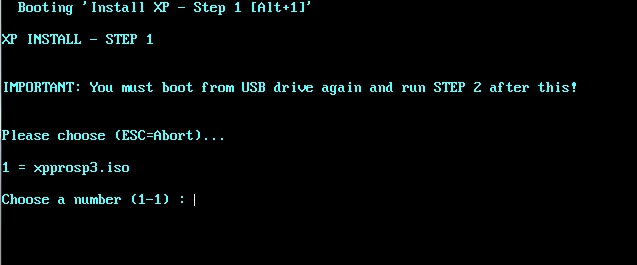
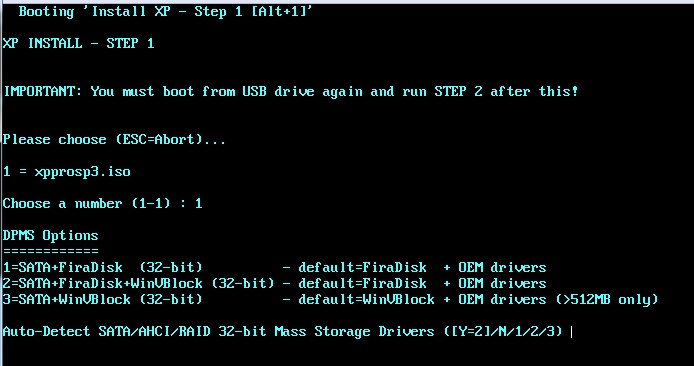
2. Press Alt+1 to run step 1
3. Choose your XP ISO file
4. At the DPMS Options prompt - hit [ENTER] for Y (equivalent to option 2). The two F6 SRS floppy images will automatically be made for you.
(if you have problems with the Windows installation - e.g. Windows BSOD or resets just before T-3 stage or have a SCSI controller, try option 3=WinVBlock instead followed by Alt+2 for the 2nd stage)
Note: If booting from an E2B USB-HDD and using FiraDisk (default) then you need to answer Yes to the 'Load XP ISO into memory' question or else you will get a BSOD 0x0000007B error when Setup switches to Windows protected mode!
If using an E2B USB-HDD, you cannot install to AHCI/SCSI systems having less than 512MB of memory, because you need to load the ISO into memory for these systems. You can use WinVBlock instead, but WinVBlock requires loading the ISO into memory in STEP 2. For this reason, if you have AHCI/SCSI/RAID systems with 512MB or less, use E2B on a USB 'Removable' Flash drive.
5. Wait for XP Setup to start - or press [ENTER] if you are impatient
Note: you can enter A for Abort or C for Command prompt (or D for Debug at command prompt) at this last prompt and then press [ENTER]. C/D drops you to the grub4dos command shell - pressing ESC from within the shell will continue where you left off and start Windows Setup).

6. Now go through the normal XP install options (there is normally no need to use F6). Format the drive and allow XP Setup to copy the files to the hard disk as usual.
7. When the system restarts, boot back to the E2B USB drive again (if the system boots to Windows you will get an '.asms files not found error - just reboot back to E2B again and carry on as below:
8. Press W to select the Windows Menu again
9. Press Alt+2 - this is the safest and most reliable option for XP Step 2 (or use Alt+3 but you must leave the USB drive connected - if you used OEM+WinVBlock you MUST use Alt+2 and not Alt+3)
Now choose the SAME ISO XP install file that you chose in step 1
10. Windows Setup GUI Mode will run and you can complete the installation of Windows XP (after it reboots)
Note: If the FiraDisk RAMDisk driver was installed, it will be removed if you answer Y for Yes to the prompt that will appear when you get to the Desktop.
Although the FiraDisk driver does no harm, it does show up as as 'Unknown Device' in Device Manager. If you want to keep FiraDisk, answer N for No.
The two Virtual Floppies that are generated will contain identical files (all driver files will be on both disks). The only difference is that one disk will contain a txtsetup.oem file with a different default driver setting from the other. ie. one txtsetup.oem file will be set to load an AHCI driver and the other will be set to load the OEM driver.
If you have an IDE system and no OEM driver is required, both WinVblock (fd0) and Firadisk (fd1) will be loaded.
E2B DPMS2 Options
1 = OEM+FiraDisk - does not add the WinVBlock driver to the F6 floppies
2 = OEM+FiraDisk+WinVBlock - THIS IS THE DEFAULT = Y = FiraDisk will be loaded
3 = OEM+WinVBlock+FiraDisk - the default Ram Disk driver that will be loaded will be WinVBlock
If you just press the [ENTER] key then Option 2 will be selected = FiraDisk.
If you choose 1 then it is the same as Option 2 (except that the WinVBlock drivers will not be copied to the Virtual F6 floppy disks)
If you choose 3 then both FiraDisk and WinVBlock drivers are copied to the Virtual F6 floppy disks, but Windows will load the WinVblock driver automatically instead of the FiraDisk driver.
The best option to use is option 2. Only use option 3 if option 2 does not work.
FailSafe: If you have a particularly difficult system that seems to crash use Step 1= Alt+1 - then DPMS2 option 2 = FiraDisk - then Y=load ISO into memory - then Press F6 and load all 3 drivers (OEM+Fira+WinV) - reboot - then choose Alt+2
IMPORTANT: If the Option 3 (WinVBlock driver) is used, you can only use it on 512MB+ systems because in STEP 2, you must use the 'STEP 2 - Install XP [Alt+2] (512MB+ systems]' option.
NOTE: You can use both FiraDisk and WinVBlock and an OEM SRS driver, just press F6 at the start of XP Setup and load all the drivers listed.
Known Issues
s2k32.cat missing - If using the D/M/L driver pack, you need to unzip the s2k32.zip file.
0x00007B as Setup loads Windows at start of text-mode Stage 1 phase - try loading the ISO into memory (answer Y before the question times out!) or select the WinVBlock driver instead of the FiraDisk driver.
If the E2B USB drive is a USb Hard Disk, load the ISO into memory when asked.
If you have a DELL PC and no matter what you try you always get BSOD 0x0000007B error - re-make the XP ISO and use a special version of \i386\ntdetect,com.
VBox Scsi (symmpiv driver) install resets at approx T-3 (almost at end of stage 2) - use WinVBlock rather than FiraDisk
VBox SAS (symmpiv driver) IRQ_NOT_LESS_OR_EQUAL at approx T-12 - use Alt+1 (loads ISO into memory) for Step 2.
For a description of the various Setup phases and what happens at each stage see here.
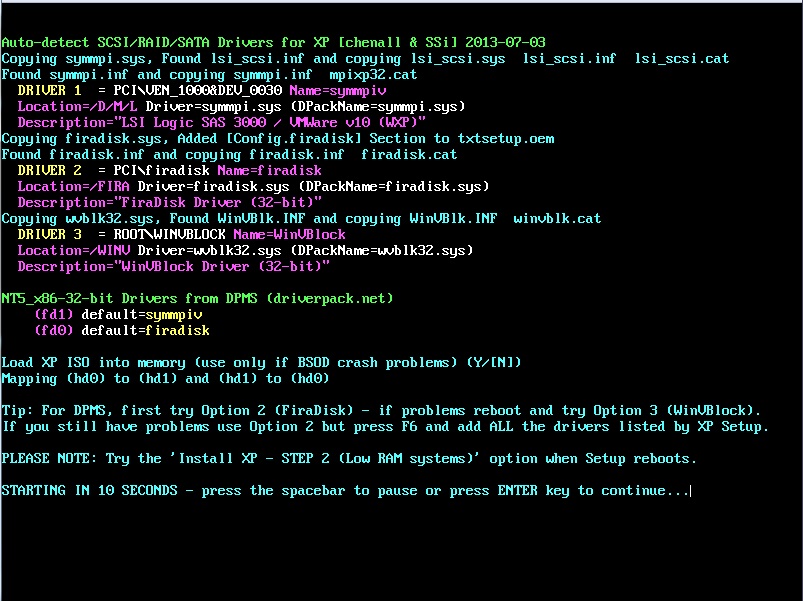
DPMS2 Output text
The colourful text displayed by DPMS2 will show you what drivers were selected and what two drivers will be loaded by default if you do not press F6.
If more than one OEM (SRS) driver is required, you will be asked to choose which one you want to be the default. If you are unsure, then pick any of the OEM drivers.
If more than one OEM driver is required you MUST PRESS F6 at the start of Setup and load ALL the drivers manually from the list presented. This is because the maximum number of drivers that DPMS2 can install automatically (without pressing F6) is 2 (one for each virtual floppy).
Using DPMS2 in your own grub4dos menu
If you wish you can use the DPMS2 package in your own application. The DPMS driver folders (\D\M\) must be located directly below the folder that contains the DPMS2.g4d batch file. If you wish to generate a Ram Disk driver floppy, you must specify a value for the grub4dos environment variable FIRA (1=Firadisk only, 2=FiraDisk(default)+WinVBlock, 3=WinVBlock(default)+Firadisk. If you do not set the FIRA parameter before calling DPMS2.g4b then only the SRS F6 virtual floppy (or floppies) will be made.
If there is no SRS driver required and you asked for two floppies and use FIRA=2 or FIRA=3, then one floppy will have a default driver=FiraDisk and the other default=WinVblock.
If you use FIRA=2 or 3 and ask for just one disk you will be asked to choose which driver you want loaded by default.
The DPMS2.g4b batch file also takes a parameter (optional)
(no parameter) = create maximum of two floppies
0 = create fd0 only
1 = create fd1 only
2 = create maximum of two floppies (same as no parameter)
e.g
#create two F6 floppies (one SRS, one default=Firadisk)
set FIRA=2
/mypath/DPMS2.g4b 2
or
#create one SRS OEM driver F6 floppy on fd0
set FIRA=
/mypath/DPMS2.g4b 0
or
#create one SRS OEM driver F6 floppy on fd1 + WinVBlock as default on fd0
set FIRA=3
/mypath/DPMS2.g4b
Note that some special commands are also required in your grub4dos menu - see the ..\grub\XPStep1.g4b, ..\grub\XPStep2.g4b and ..\grub\XPStep2LowRam.g4b batch files for help.