
Table of Contents
Hardware
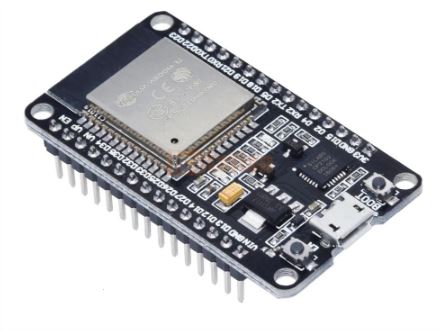
The esp32 has now replaced the MEGA. It is cheaper and gives you far more features and speed too.
Note that the esp32’s are 3.3V devices and so expect to be connected to other 3.3V devices. Many 5V devices will not work if they use 5V I/O (i.e. intended for use with the 5V Arduino ATMEGA devices). Some devices will work with both 3.3V and 5V I/O signals (e.g. ILI9342+Touch Screen).
There are many different hardware platforms available.
The cheap and common ESP32 -DevKit boards can vary in pin count and width. For instance the DevKitC board is 38-pins (2×18) and contain WROOM ships which have no PSRAM, whereas the DevKit WROVER boards are 40-pin (2×20) (compatible pinout but have an extra VCC and GND pin nearest to the USB socket). So if you think you may upgrade to a WROVER board (FreeNove WROVER+camera recommended), make sure you leave space for the extra 2 pins (e.g. leave one hole free on each side on a breadboard so you can use either a 38-pin or 40-pin esp32 board).
Also the 28mm 38/40-pin boards do not fit in a 5-row breadboard. You must by a wider breadboard or fit two breadboards together. Even the smaller 26mm esp32 board only leaves one row of breadboard holes free unless you use a wider board!
ESP32-S3 (<-intro and info video link) is a better, more recent chip. Lilygo have a range. Note that only boards with a 2 parallel rows of pins each side are suitable for breadboards!
AliExpress and Bangood are usually cheaper than Amazon. LilyGo have very reasonable pricing and postage costs and have good quality modules. For a trouble-free experience, I strongly suggest that you buy a branded product (LilyGo, FreeNove, Mouser, DigiKey, AZDelivery, etc.) to start with as some cheaper, unbranded versions can be unreliable and can give upload and run problems.Once you have a good working project, you can try ordering cheaper boards but some may have inherent quality and reliability issues.
If your project requires a VS1053 audio board, use the blue or green board with a 5×2 header. The red board with a single row of header pins produces clicks and noises.
Software
Check YouTube and GitHub for projects (many manufacturers have github example projects).
Also p.schatzman blogs
Mischianti blog (inc. power saving on esp32)
espressif website (e.g. wifi FAQs)
IDEs
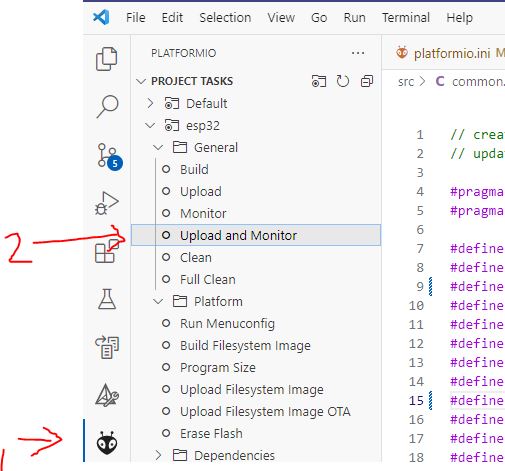
PlatformIO (Visual Code) or the Ardiuno IDE can be used.
Tip: To see the serial output, you must click on the tiny ‘Serial’ icon in the bottom screen bar! Also set the baud rate in platformIO.ini.
Projects
Mikro Pavleski – Internet Radio
I built this on a breadboard. I used…
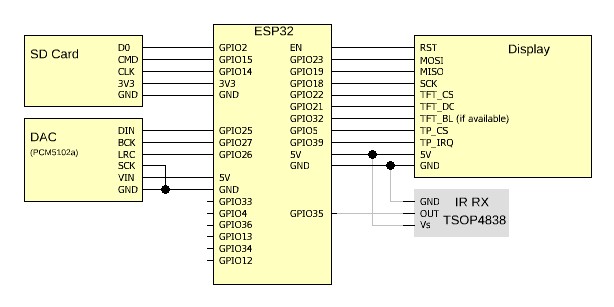
ESP32-WROOM-32D DevKitC (no PSRAM, 38-pin DIL with wide body so need wide breadboard or two locked together. Later I upgraded to a FreeNove WROVER ESP32+PSRAM (which had a webcam connector which is not used).
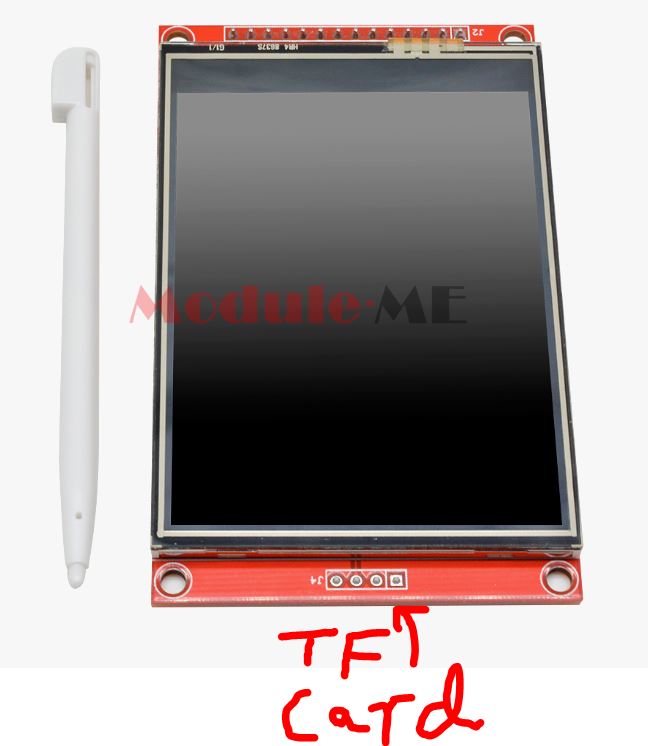
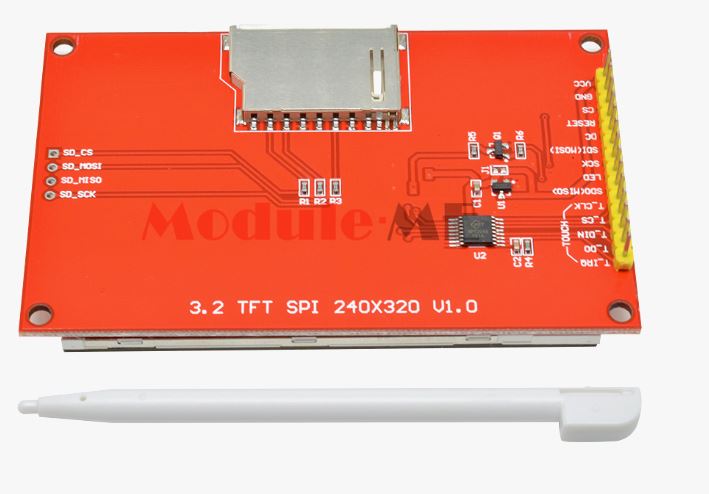
ILI9341+Touch 3.2″ 240×320 – the TF card socket on the back of this display was used with an SD card. The CS signal was not connected and no pullups were required so only three wires were connected to the 4-pin CS connector. Note: If using an SD card holder with no extra circuitry – VCC should be 3.3V NOT 5V – SD\TF cards max voltage is 3.5V.
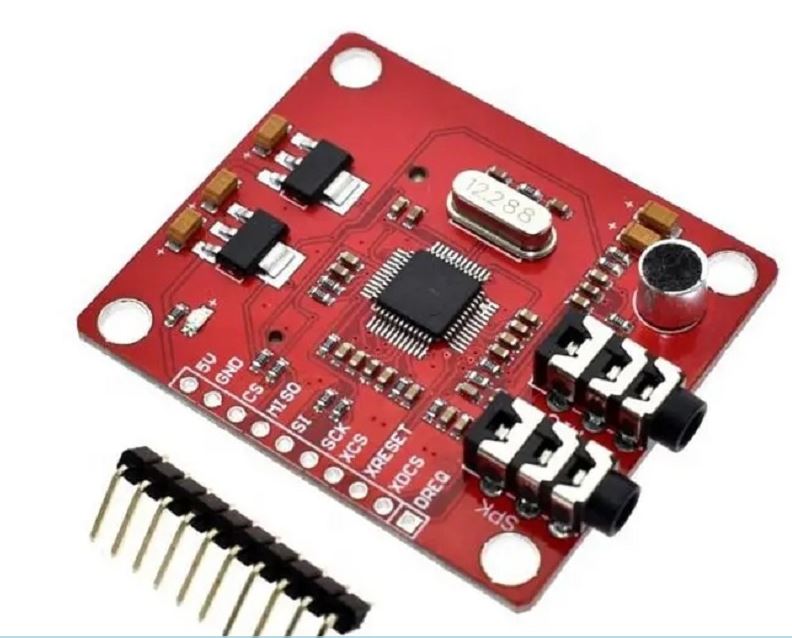
This red card with single in-line header pins and SD card holder on reverse is not recommended due to clicks/noises on audio output.
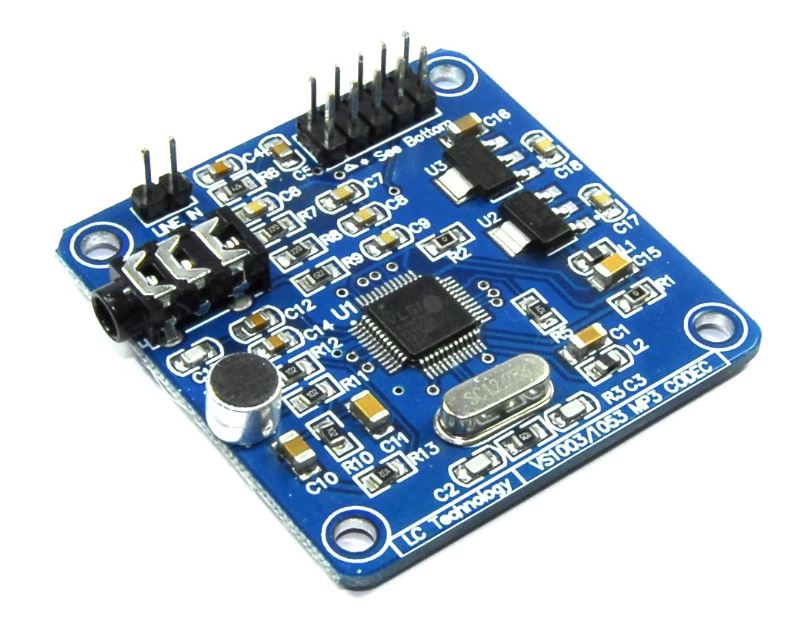
The blue LC Technology VS1053 board (sometimes green) is recommended for better sound (I got unwanted audio clicks/noises on red card which also has SD card slot). Make sure chip fitted is a VS1053 not VS1003 before buying. The CS terminal on the red VS1053 was not connected (for empty SD card slot). IMPORTANT: A 1K resistor to GND was needed on the SCLK line VS1053_SCK 12 for red board – this is mentioned in the common.h file. If not fitted the system just seems to not boot or be very erratic and give errors, etc. If you disconnect the VS1053 SCK line then it will boot – so this indicates the boot problem is with that line!
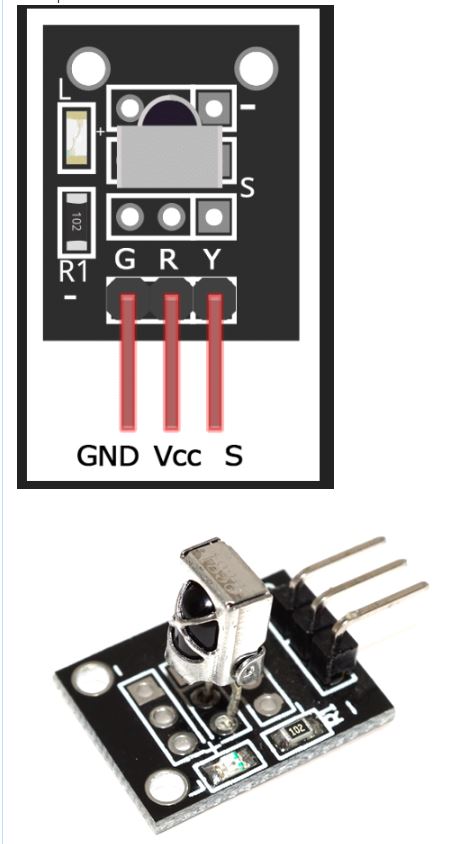
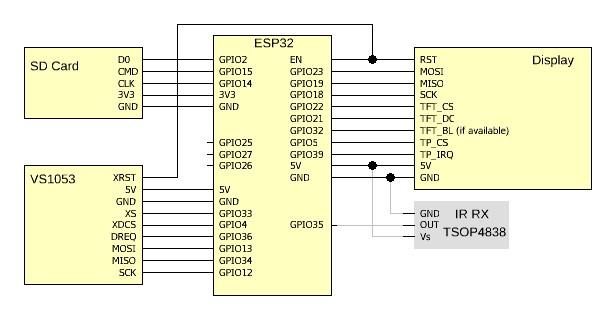
The Infra-red receiver (TSOP4838 or 5V shield shown below) can also be connected (to GPIO35).
The current VS1053 code seems to have problems playing m4a files. Flac files can be played (latest version has #define LOAD_VS0153_PLUGIN // load patch (FLAC and VU meter) in vs1053_ext.cpp (ESP32-MiniWebRadio.pio\libdeps\esp32\ESP32-vs1053_ext\src).
I would recommend avoiding the VS1053 if you want to play long files from the SD card (unless mp3 which seem to be OK). Use PCM5102 board and esp32 with PSRAM.
Platform.ini must be configured for the esp you are using. Use a good quality USB cable (charging cables are not suitable and will give an error in Windows Device Manager). A serial driver should be installed for uploads and serial monitor support. How to install.

My pin connections are the same as in github diagram. Build and Test as follows:
- Compile and download to esp32 only (no added boards) – use PlatformIO – Upload and Monitor. Set common.h as appropriate. check Serial Monitor stream says cannot detect SD card (as not yet connected)
- Add the SD/TF card slot wires (you can instead use the SD card holder on the TFT board) – check it now sees the files on the SD card OK on boot. You must extract the files from the zip file and copy them all to the FAT32 SD card first.
- Add the TFT Screen wires and check you get a picture – then add touchpad wires and test.
- Add the VS1053 or DAC wiring – plug in earphones to output socket
- Check touchscreen works and orientation is correct.
- Add amplifier (use a 47uF capacitor in series to connect common GND signal – or just dont connect it)
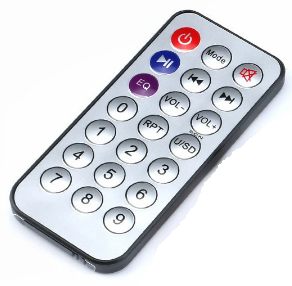
- Add 3-pin IR receiver component if desired.
Common.h settings (for ILI9341+VS1053)
#define DECODER                     0                               // (0)VS1053 , (1)MAX98357A PCM5102A... (2)AC101 (3)ES8388 (4)WM8978
#define TFT_CONTROLLER      0                               // (0)ILI9341, (1)HX8347D, (2)ILI9486a, (3)ILI9486b, (4)ILI9488
#define DISPLAY_INVERSION   0                              // (0) off (1) on
#define TFT_FREQUENCY       40000000                 // 27000000, 40000000, 80000000
#define TFT_ROTATION            1                               // 1 or 3 (landscape)
#define TP_VERSION                0                               // (0)ILI9341, (1)ILI9341RPI, (2)HX8347D, (3)ILI9486, (4)ILI9488
#define TP_ROTATION              3                               // 1 or 3 (landscape)
#define AUDIOTASK_CORE      1                               // 0 or 1
#define AUDIOTASK_PRIO        2                               // 0 ... 24  Priority of the Task (0...configMAX_PRIORITIES -1)
#define SDMMC_FREQUENCY     20000000             // 40000000, 2000000, 10000000, not every SD Card will run at 40MHz
#define FTP_USERNAME        "esp32"                      // user and pw in FTP Client
#define FTP_PASSWORD        "esp32"
Try a higher TFT_FREQUENCY to improve display update speed. Try also SDMMC_FREQUENCY at 40MHZ. The touchscreen (TP) x/y response may be inaccurate (e.g wrong button is activated sometimes). You can adjust the calibration in the tftLib/src/tft.cpp file in setVersion code (approx line 4557 onwards. If you have a Raspberry Pi ILI9341 you can try TP_VERSION=1 instead of 0.
Set DECODER to 1 if using PSM5102 DAC. ESP32 with PSRAM is recommended – ensure platform.ini build flags enable PSRAM
Tips and Troubleshooting MiniWebRadio
Use a good quality esp32 board from a reputable manufacturer. I found a cheap unbranded eBay ‘ESP32-WROVER-DEV’ board with webcam to be unreliable. It had problems when trying to upload and when trying to run the code. Use either a ‘esp32-devkitc-v4’ ESP32-WROOM-32D board (no PSRAM) or a FreeNove ESP32-WROVER board (includes webcam which must be disconnected) which includes 4MB PSRAM.
If using a cheap WROVER+CAM board (not FreeNove) then see article 151. So far I cannot get the cheap esp32 copy to work with the MiniWebRadio project on PlatformIO however (my branded FreeNove board works fine though!).
If Radio Stations do not appear on the TFT display or they do not play when using a new esp32 board but SD card is read OK and TFT screen works and mp3 files can be played, simply delete the settings.json file from the SD card and switch it on again. If using FileZilla, delete the settings.json file and then press the reset button on the esp32.
Various audio boards are supported. The code+VS1053 seems to have problems playing M4A files. You also may need to play an MP3 file before you can play any radio stations or media files to ‘initialise’ the VS1053 (I suspect a problem with the code?). The best combination seems to be to use an esp32 with PSRAM (e.g. FreeNove ESP32-WROVER board) and a DAC such as the PCM5102 board. This also reduces the amount of wiring somewhat too. You can connect both the VS1053 board and the DAC board to the esp32 and then compile the code for one or the other without needing to change anything on the breadboard except plug the speakers into the correct audio board.
Power: If you are powering the whole circuit from a USB port, be aware that the 5V pins on the esp32 boards may actually be between 4.5V and 4.75V because most esp32 boards have a diode between the USB 5V wire and the 5V pins on the esp32 board. I put a small electrolytic capacitor (value 4u7 to 100uF) between 5V and Gnd at each board (esp32, audio board, TFT). Make sure the 5V wires make a good connection and use two wires instead of one if you are using a breadboard and thin or long 5V and Gnd wires. It may help to connect a capacitor between the EN\RST pin on the esp32 board and GND. Try values between 220nF and 10uF.
Removing the SD card whilst the esp32 is on can cause file corruption. Always switch off the esp32 first before removing the SD card. If using an SD card adaptor for a micro SD card and it is not working, try a different adaptor (use a FAT32 partition of 4GB or less to reduce memory usage).
If you use FileZilla on your PC, you can add/change the files on the SD card without needing to remove the SD card. Download the NON-SERVER VERSION of FileZilla. Press Ctrl+S for Site Manager and set it up as shown here.
the Web UI Info page allows you to set the correct country timezone.
If using the magnifying glass (station finder) web GUI page, make sure you do not have any ad blocker enabled or else it may fail to fetch the station icon file. It is best to use an Incognito/private browser to avoid any browser extension issues. Do not open multiple instances of the esp32 web UI page – only one will work!
Configure WiFi SSID and Password
Example of how to set SSID using Smart Phone. Select ‘MinWebRadio’ access point instead of minifabs_ap in video..
Error: No WiFi router found!
Please either:
1. Edit file networks.csv on SD card to add your router SSID and password.
   - OR -
1. Use smart phone to connect phone WiFi to SSID 'MiniWebRadio'
2. Ignore any 'no internet' warning.
3. Load smart phone browser app and type in '192.168.4.1' in top address field
    - new web page should now load (if not use refresh).
5. Set SSID and password of your WiFi router.
6. SSID and password will be stored on this device.