If you have an SD card or USB drive (or any storage media even your main hard disk!), you can recover the files (if the data is still there!) using PhotoRec_Win.exe and any Windows computer. PhotoRec_Win will try to recover all types of files, mp3, mp4, doc, etc., not just photos.
There are graphical Windows GUI utilities which are easier to use, but they tend not to be free or as good as this one.
If you want to try another Windows recovery tool, then I suggest the free (to try) version of Recuva (it costs £20 now if you want to actually recover any files but it is very useful in finding slightly older versions of files on your disk if your current version has become corrupt). Recuva has a nice Windows GUI interface and is easy to use. If this does not manage to recover all of your files (or you are too mean to fork out £20!) however, then PhotoRec is the way to go!
P.S. A friend of mine was working on a large Serif PagePlus PDF when he had a power cut. The file was corrupted and it contained a whole months work, but Recuva managed to find a slightly earlier version and recovered it. My friend said it was the best £20 he had ever spent!
I have personally used TestDisk to repair/recover corrupt flash media files in real situations three times now – again it performed very well and most of the files were recovered.
TestDisk runs under Windows 7 64-bit as well as other versions of Windows. TestDisk.exe is also included in the download which is useful if you need to restore/repair the drive or media, but I would always advise using PhotoRec_Win first.
Instructions are included with this utility, but here is my quick guide.
PhotoRec documentation can be found online: – http://www.cgsecurity.org/wiki/PhotoRec
TestDisk documentation can be found online: – http://www.cgsecurity.org/wiki/TestDisk
P.S. If you have corrupt files on an SD card or Flash drive, after you have repaired it or copied off any files, don’t forget to test it using FakeFlashTest in case it is a fake!
If your hard disk has disk read errors, you may find the process stops or is very very slow – if so try using HDD Regenerator first (see Tutorial #64).
- Download the PhotoRec_Win utility from here
- Open the zip file (e.g. using 7zip) and extract the contents to a folder on your hard disk (e.g. C:\PhotoRec).
- Now insert you storage device (SD card or camera USB lead, etc.) or connect your USB Flash drive to your Windows computer. The Windows computer should be able to ‘see’ the storage device. Do not worry if you see a ‘Format’ pop-up box for the drive – just Cancel it (DO NOT FORMAT IT!)
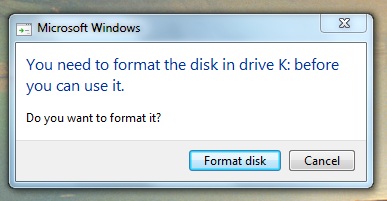
- Press Cancel if you see this message – do NOT format it!
- Now right-click on the photorec_win.exe file which was included in the files you extracted in step 4 and choose ‘Run as Administrator‘. If you have Windows XP, just double-click photorec_win.exe.
If you have damaged partitions then use testdisk_win.exe and run as Admin (read the instructions here).
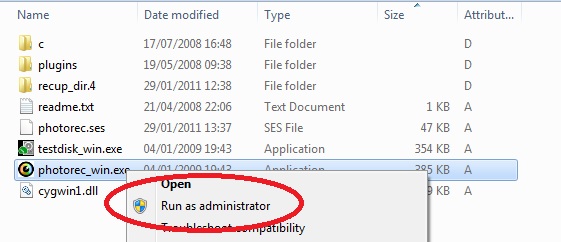
- You should see a Command Prompt window open.
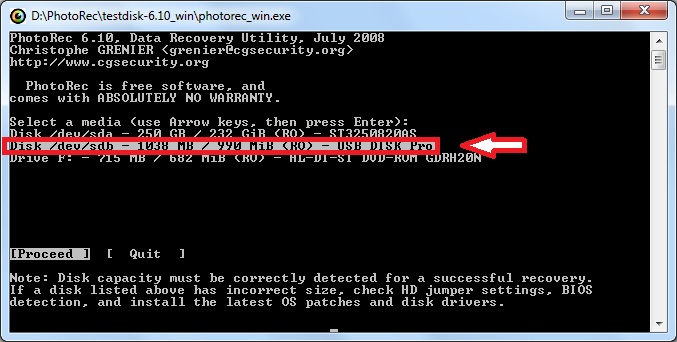
- Use the Up/Down cursor keys to select the correct drive. In my case it is a 1GB USB flash drive. Then hit the {Enter} key to Proceed.
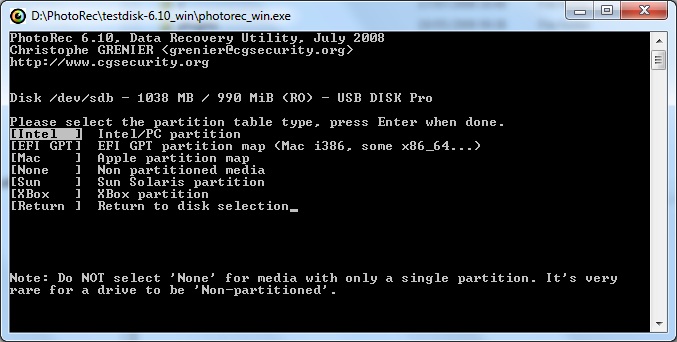
- On the next screen, you will need to choose the partition table type that the media had BEFORE it went wrong. This will usually be ‘Intel’ for any media that you could read using a Windows PC. If you are unsure, always choose ‘Intel‘.
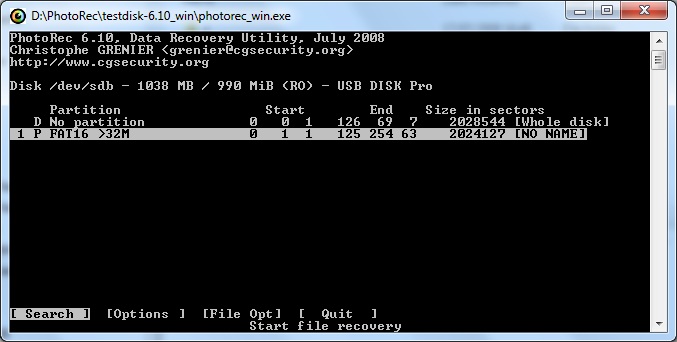
- The next screen allows you to choose a partition. There may be more than one choice here. If you think you may have tried to ‘fix’ or ‘format’ the storage media after it went wrong, then choose ‘no partition’. If you are sure you have not altered the media at all and a partition is listed, then choose the partition. If in doubt, choose ‘no partition‘.
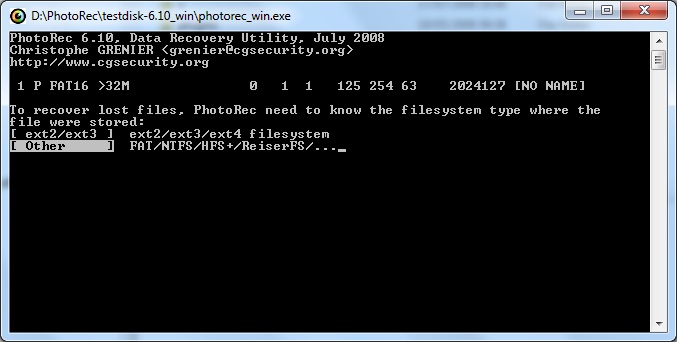
- At the next screen, you need to choose a filesystem type. If the media was compatible with Windows choose ‘Other – FAT/NTFS/HFS+‘. If the media was only accessible under linux or you know it had an ext2/3/4 filesystem then choose ‘ext2/ext3’.
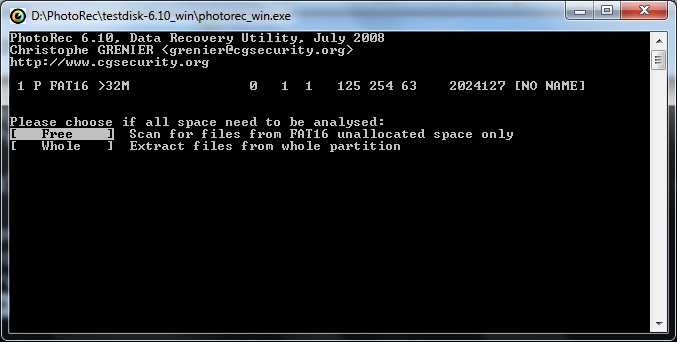
- Finally, you need to decide if all the space should be analysed or just the partitioned space. If in doubt, choose ‘Whole‘.
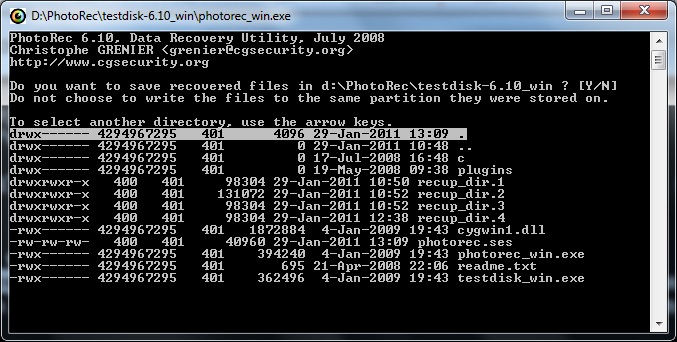
- PhotoRec will need to save the recovered files onto your Windows hard disk. The next screen asks you where to save the recovered – just type ‘Y‘ to save them in a new folder located under the same location as Photorec_win.exe.
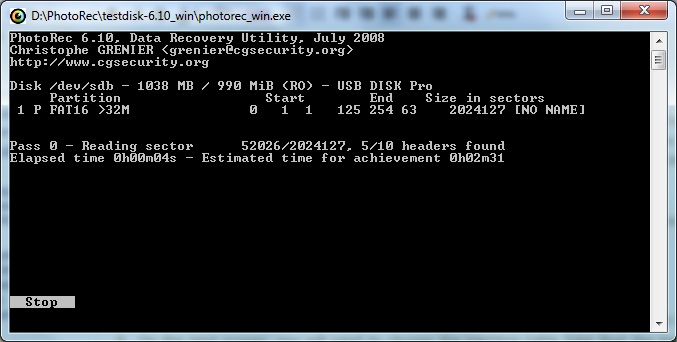
- PhotoRec will now start to analyse the corrupt media and copy any files it can find to a new folder on your hard disk which will be called recup_dir.1 (or .2 or .3 etc.). When it has finished, you can view the files to see what it has managed to recover. I would suggest you look at the photo’s first (if any) as it will be obvious if any of these are incomplete or corrupt.
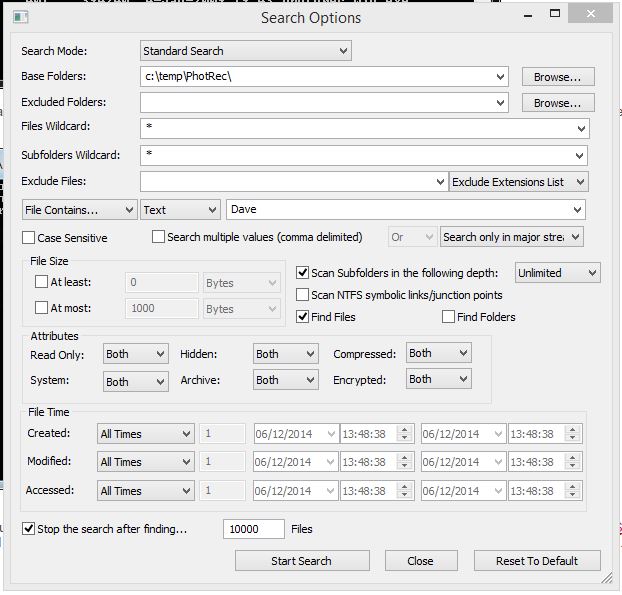
PhotRec/TestDisk may not know the name of the original file, so if you wish to recover a file which contains text (such as a .cmd, .txt, .bat, Excel, Word or other type of document file), use a search utility such as NirSoft SearchMyFiles. Set the search folder to that used by PhotRec to save the files and set the Text field to some text that you know is within your file. Once you have found a file that contains the text, you can make a copy of it and rename the file extension to the original type (e.g. .xls or .docx) and then try to open it by double-clicking it and see if it works (e.g. .docx should open in MS Word). If the file is encrypted (e.g. password protected Excel file) a text search will not work however. In this case, look at the length of each file recovered by PhotoRec to find one of approximately the correct size (you can use SearchMyFiles to find all files of a certain size range) – then rename it to the correct file extension (e.g. .xlsx) and see if you can open it. The file date of the recovered file cannot be relied upon, so there may be more than one version of the same file, so you may need to open and examine each one to find the latest version.
