
Table of Contents
INTRODUCTION
You can buy a Flash Drive with a write-protect switch – e.g. Netac U335 USB 3.0 or Kanguru SS3 USB 3.0 Flash Drive (Amazon) or some of the PQI Flash drives.
If it is an NTFS-formatted volume, you could use the NTFS Drive Protection utility to write-protect from Windows malware.
If your USB Flash Drive (UFD) has a Silicon Motion Inc. (SMI) controller inside it (such as many of the UFDs from Lexar), then you can use the SMI_UFDiskUtilities application (hereafter called SMIUFD.exe) to make a CD/DVD partition, write-protect the mass storage area, or even split the mass storage area into two and password protect and hide the 2nd area.
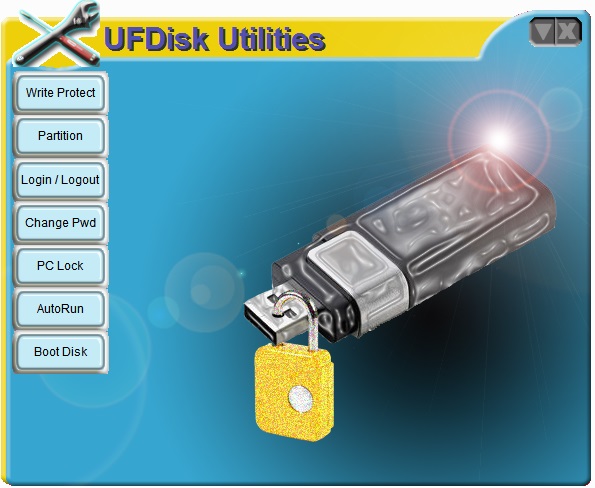
Main SMI.exe menu
If you have a compatible UFD (such as a Lexar JumpDrive), here are some of the very useful things you can do with this utility
- Split it into a read-only CDROM device and a read/write flash drive
- Create a secret hidden r/w area which can be accessed via a password
- Change the physical size reported by the UFD – this is useful if you want to have a 256MB UFD to use on an old BIOS that does not like large UFDs
- Write-protect the UFD
Some more advanced SMI controller reprogramming tools can be found here. Use these with caution! You must set up all the Settings fields before you reprogram (password is 320) and you may destroy your USB flash drive!Unsupported embed
TESTED UFDS
- SMI controller UFDs that work with SMI_UFDiskUtilities.exe
- Lexar FireFly JumpDrive VID = 05DC PID = A731
- Lexar JDVE 16GB VID=05DC PID=A795
- Lexar 4GB (with capacity meter) VID = 05DC PID = A788
- UFDs with an SMI controller that don’t work
- Lexar 16Gb VID = 05DC PID = A010 (slide button with blue X LED in LeXar logo)
- Netac U2C 512MB VID = 0DD8 PID = F607
- Microsoft 1GB ‘Freebie’ VID = 090C PID = 1000
- Lexar 512Mb JD Secure VID = 05DC PID = A701
Note: Many other UFDs were tested which did not have SMI controllers and they all did not work: e.g. Kingston, HP, Corsair, Patriot, many unbranded ones, Maxell, SanDisk, Intenso, Verbatim, Pretec.
SOME IMPORTANT NOTES BEFORE YOU BEGIN
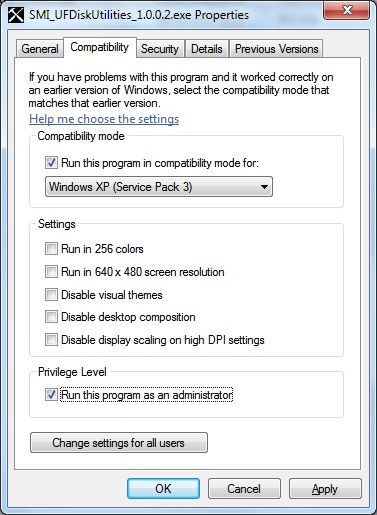
- SMI_UFDiskUtilities_1.0.0.2.exe works on XP through to Windows 8. Note: different versions work with different USB controllers – try both older and newer versions if this one does not work on your flash drive.
- Close all applications and save all work before using this utility!
- BEWARE OF VIRUSES! It is common for this type of download to be infected with viruses (esp. from Russian/Chinese sites), unfortunately even ones that are not really infected may be falsely detected as positive by some AV programs, so it is very difficult to tell if it really has a virus or not!
- IMPORTANT: If you do not have a suitable SMI UFD present, then the utility will ‘freeze’ your system – the mouse pointer and keyboard will freeze and only CTRL-ALT-DEL will work, and as you have no mouse you cannot quit the utility to regain control! So it is very important that you check that you have an SMI controller in your UFD and that it is connected first before you run the utility!
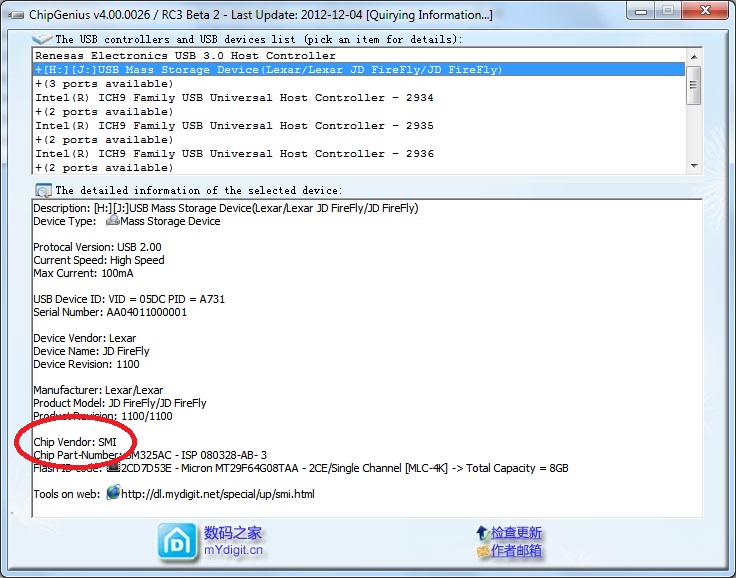
- Check you have an SMI controller inside your UFD using ChipGenius (included with the download)
- When quitting the application – there is a bug and it does not quit correctly when you click the cross at the top-right (sometimes this isn’t even displayed!). To quit the utility, double-click on the Kill_SMI_UFDisk.cmd file provided in my download.
- I recommend you right-click on the .exe file and set the properties to XP SP3 compatibility mode and Privilege Level to Administrator
- IMPORTANT: Ensure you only have one external USB drive connected at a time – you could accidentally format or destroy a different drive!
- VERY IMPORTANT: I cannot accept any responsibility if anything goes wrong! I did not develop these utilities and they could make your UFD completely unusable! I suggest you first try it on a spare (non-essential) PC or notebook first!
FUNCTIONS IN THE UTILITY
Here is an example of what you will see if you have used this utility to format an 8GB Lexar Jumpdrive UFD to have a Public and Security Disk as well as a CDROM partition.
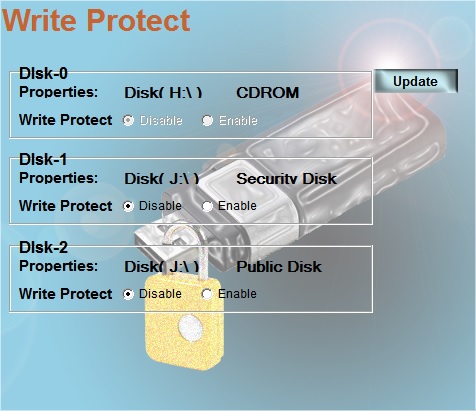
Example of the ‘Write Protect’ form
The 7 buttons are:
- Write Protect – can set one or more ‘disks’ on the UFD to a WP status
- Partition – can divide the UFD into to ‘disks’, one public and one secure
- Login / Logout – allows a user to login and use the secure partition
- Change Pwd – changes the password required by ‘Login’
- PC Lock – ????
- AutoRun – divides the UFD into a storage area and a read-only CDROM area
- BootDisk – will format the public storage area and copy MS-DOS files to it
I will explain what each of the 7 buttons do in detail below:
WRITE PROTECT
This allows you to Write Protect one or both of the mass storage ‘disks’. If you start with a UFD that has never been used with this utility before and just contains one normal partition, this will allow you to write protect it. To remove the write protection status, re-run the utility and set the radio button to Enable. Note that no password is required, so anyone can un-write-protect the ‘disk(s)’. The CDROM/DVD ‘disk’ is always write-protected.
If you have split the storage area into a public and secure area, you can write-protect one or both areas.
PARTITION
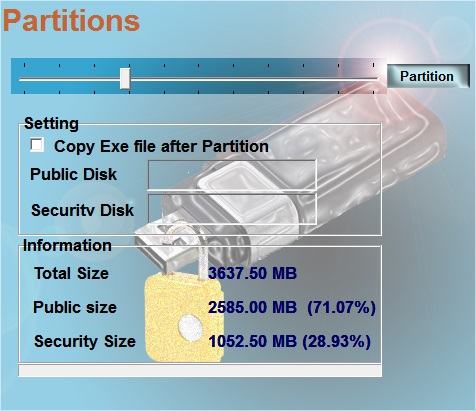
Note that this is an 8GB UFD, but 4.5GB were allocated to the CDROM ‘disk’ partition
This button allows you to partition the current flash memory flash disk area into two ‘disks’. One is public and will be seen as the only UFD when the UFD is first inserted into any system. Note that this also affects the Physical Size of the device – so Windows Explorer (and RMPrepUSB) will report a 3GB device if you have made the public disk 3GB in size. If a user runs the SMIUFD.exe application and Logs in with the correct password (see below), then the public ‘disk’ will disappear and be replaced by the ‘secure’ disk (you may need to click F5 in Windows Explorer to see the new files (if any). The Physical Device Size reported by Windows or any application will now be the size of the ‘secure disk’ – e.g. 1GB. You cannot boot from the ‘secure disk’ because as soon as you remove power from the UFD, the ‘public disk’ will be shown when power is next applied.
Set the Volume names that you want for each of the ‘disks’ in the boxes provided before you click on the Partition button.
If you have set a password, you will be prompted for it – this prevents unauthorised users from deleting any files in the ‘secure disk’.
If you are unsure of the password – try 0000 (four Zero’s).
Note: You cannot use a blank password – if you attempted to remove the password by leaving it blank in the Change Pwd function, then you will not be able to partition the UFD – go back to the Change Pwd functions and set a new password (leave the ‘Old Password’ field empty to change the password)!
If the Copy Exe file after Partition checkbox is ticked, then the SMI_UFDiskUtilities_1.0.0.2.exe file will be copied to the ‘Public disk’ after it(they) have been formatted. This allows a user to run the utility to gain access to the ‘secure disk’ area.
- If you already have a CDROM ‘disk’ defined, then the remaining memory will be used for the public and secure disks.
- If you already have public and secure disks, you can reformat and remove the secure disk by moving the slider fully to the left.
- If you want to remove the CDROM ‘disk’ completely, use the AutoRun button.
Note: Some old BIOSes will not boot from ‘large’ UFD devices. They may boot from UFD devices that are 256MB (or possibly 512MB or 1GB). If you have such an old BIOS, you can test this splitting your UFD into a 256MB ‘public’ disk and the rest as the ‘secure disk’. Then prepare the UFD with RMPrepUSB to make it bootable and see it it boots. If it does, repeat but make a 512MB ‘public disk’ and test that – if it still works try 1 GB ‘public disk’. I have seen several Intel 945/845/830 chipset BIOSes which had a 512MB limit and I have also heard of some BIOSes refusing to ‘see’ any UFD over 1GB.
LOGIN / LOGOUT
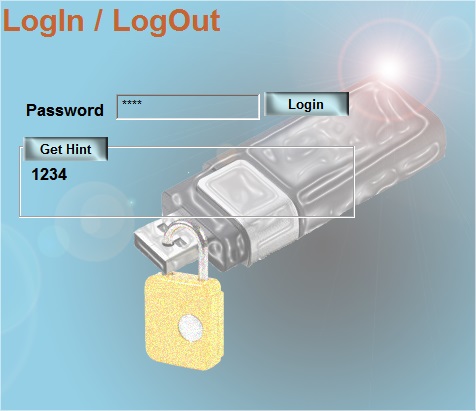
This allows you to Login, which will then replace the ‘public disk’ with the ‘secure disk’. You will also see the hint phrase that you set previously as a reminder of the password. Note that Logout does not seem to work! To get access to the ‘public disk’ area again, you will need to remove the UFD and re-plug it.
Once you Login, the ‘public disk’ volume in Windows Explore will be replaced by the ‘secure disk’ volume – you may need to hit F5 to refresh the contents in Explorer when this occurs.
CHANGE PWD
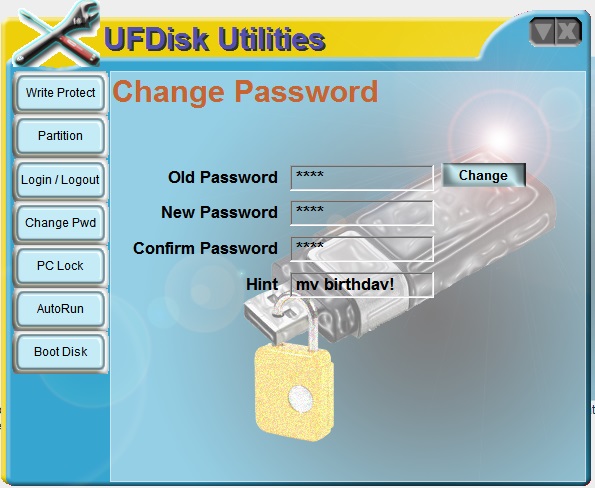
THIS ALLOWS YOU TO CHANGE THE PASSWORD AND SET A HINT PHRASE. THIS IS REQUIRED IF YOU HAVE SPLIT THE UFD INTO A ‘PUBLIC DISK’ AND A ‘SECURE DISK’. YOU CANNOT LOGIN WITH A BLANK PASSWORD.
PC LOCK
Locks the UFD. If removed and re-inserted it will be locked. To unlock, run the utility and choose UnLock. (I could not get this to work!)
AUTORUN
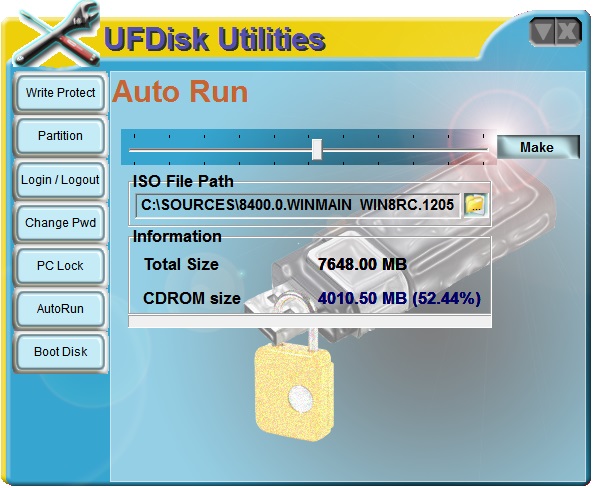
This badly-named button actually allows you to split the UFD into a pseudo-optical drive and a flash memory area by moving the slider. Set a path to an ISO file (not a folder) in the ISO File Path box (you can browse using the folder icon). Click on the Make button to reformat the entire UFD into two disks, one for mass storage and one for the CDROM.
You can use a DVD ISO or CDROM ISO – for instance a Windows 8 Installation ISO will work. If there is an autorun.inf file in the root, then XP will autorun when you insert the USB pen into a USB port (this is suppressed on Vista/Win7/8).
Windows Explorer will show two devices, a removable mass storage device (e.g. K:) and a CDROM device (e.g. L:). Note that if you previously had a ‘public disk’ and a ‘secure disk’ – these will both be destroyed when you format the UFD with ‘Autoruns’. If you want a CDROM+public disk+secure disk, then you must first use the AutoRun button and then use the Partitions button.
IMPORTANT: Before you click the Make button, you must first set a CDROM Size that is larger than the size of the ISO file – after you click on Make, the CDROM disk size will be automatically reduced to the smallest possible size, dependant upon the size of the ISO that you picked.
You can then boot from this CDROM disk as if it was a USB CD/DVD device (e.g. Windows 8 installation DVD). The Bios Boot Selection screen will list two devices (usually both have the same name – e.g. “USB: Lexar JD FireFly”). You will have to guess which one is the CD device! This may also be useful for testing out any ISO files you have, without needing to actually burn a CD/DVD.
To remove the CDROM disk area and return the UFD to be a normal mass storage device, move the slider to the extreme left and do not set an ISO File Path and then click Make – note that this may produce an error because there is no ISO file specified – the error can be ignored. All data on the entire UFD will be destroyed when you do this.
You may need to use the Kill_SMI_UFDisk.cmd script to quit the utility!
BOOTDISK

This button allows you to format and transfer files to the ‘public disk’ area – it expects you to point it at a folder or drive containing MS-DOS floppy disk files. You will see a warning if it does not detect the MS-DOS system files in the folder you select. The file SMI_UFDiskUtilities_1.0.0.2.exe will also be copied to the public disk.
Note that the volume created will contain an MS-DOS Volume Boot Record and expect to be booted as a floppy disk (so you will need to set the BIOS that you boot it from to boot from a USB Floppy device!). For this reason this option is of limited use for most people. The volume will still appear as a ‘Removable Disk’ in Windows Explorer (and not as a floppy drive).
CHIPGENIUS AND FLASHGENIUS
ChipGenious will identify what type of Flash device you have and what controller and flash memory chips it contains.
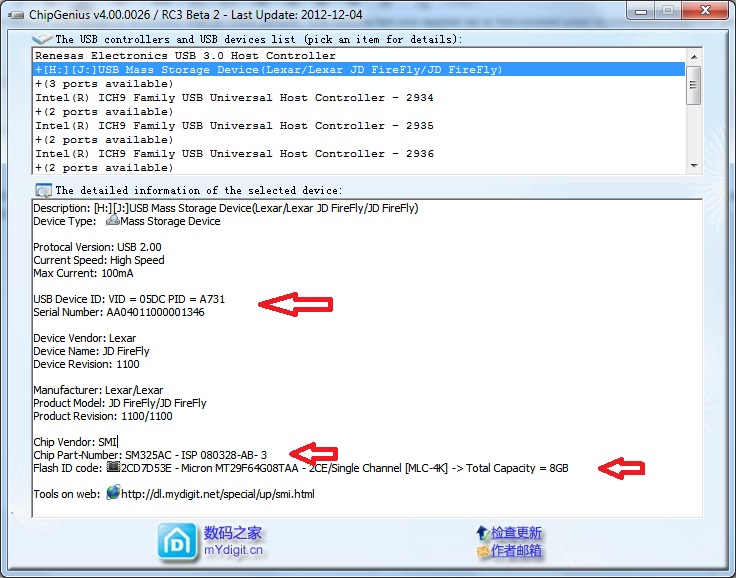
IMPORTANT: before you start any tests, take a screenshot of the ChipGenius data for your USB flash drive and keep the file. This tells you the original VID\PID and serial number, etc. These will be erased if you use a Mass Production (MP) tool to reprogram your USB device!
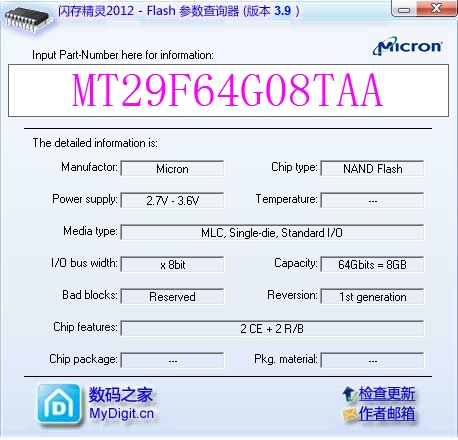
FlashGenius just displays information about the type of flash memory for any specfic flash memory part number (if it is in the database). Look at the Flash memory part number displayed by ChipGenius – e.g. MT29F64G08TAA – and enter this in the Part Number box:
Download files
Click here (OneDrive folder) if you cannot find any file mentioned in the articles on this site or Contact Me.