
Table of Contents
NEW! THIS TUTORIAL IS NOW RATHER OUTDATED. YOU MIGHT LIKE TO TRY WINTOUSB WHICH MAKES IT VERY EASY TO PREPARE A BOOTABLE USB DRIVE CONTAINING WIN7/8/10 TO GO. FOR ‘REMOVABLE’ USB FLASH DRIVES, BE SURE TO CHOOSE THE VHD OPTION (FOR WIN8/EARLY WIN10) OR IT WON’T BOOT!
INTRODUCTION
Windows 8 (and Win 8.1/10) is able to boot directly from a USB 2.0 or 3.0 drive (USB Flash memory – fixed disk type, or USB Hard Disk).
Microsoft Technet reference here.
Although Win8ToGo will run from a Removable USB Flash drive, it is best to use a ‘Fixed Disk’ type of USB Flash drive or USB Hard Disk. There are problems if running Win7/8ToGo from a Removable USB drive (such as some Updates not working).
IMPORTANT: Win8.1ToGo will not boot from a Removable-type of USB Flash drive unless you use a VHD, Win 8ToGo will boot from a Removable-type of USB Flash drive. Win10 1703 and later versions can boot from ‘flat-files’ on a Removable USB drive however.
This feature is only officially supported in the Windows 8 Enterprise Volume Licence version – see here for details of how to make Win8ToGo Using Enterprise.Unsupported embed
You can however make a Win8ToGo USB boot drive from any Windows 8 version (though you will need to activate it if you want to keep using it and so you will need a volume licence version if you want to move it from system to system).
Also, as Windows 8 supports most USB 3.0 controllers natively, why not make a USB 3.0 Flash drive with Win8ToGo on it and see how fast it can boot from a USB 3.0 port.
- Note that your BIOS must support booting from it’s own integral USB 3.0 ports (if it has any) – a BIOS will not boot from a USB drive connected to the USB port of an added USB 3 adapter card.
With an integrated USB 3 port and a good USB 3 Flash drive, you should find that the speeds are about as fast as internal HDD booting!
Even if you only have USB 2 ports on your system, a USB 3 Flash drive on a USB 2 port is generally faster than a USB 2 Flash drive on the same USB 2 port (compare the USB Flash pen’s read/write speeds in the manufacturers specs).
PLEASE NOTE: A normal USB 2.0 Flash drive will be very slow and is not recommended (a super-fast one may be just tolerable).
If you want to install Win8 to a VHD on a USB drive (which means you can easily copy the VHD to any other USB drive or system) – please follow Tutorial 90 (but read the warnings!).
Note: You can use the instructions below to install Win8ToGo to a VHD if you have Vista or Windows 7 installed as your main OS – just use Disk Manager to create a virtual hard disk on the USB drive, attach it as a drive volume and install Win8 to the VHD using ImageX, instead of installing to the USB volume. You will then need to use bcdboot as in step 7, but specify J:\Windows /s K: where J: is the VHD volume and K: is the USB partition volume letter.
The Developer Preview was released in late 2011 and expires on 16th January 2013. The new completed full Consumer Preview Beta release version was released on 29th February 2012 and expires on 15th January 2013. The Release Preview was released on 31st May 2012 and expires on 16th January 2013. This will reboot every 2 hours but you can continue to use it.
Ed Bott’s report on the Feb 2012 Consumer Preview release can be read here.
OR watch the video from the BUILD 2011 developers conference here (it is quite long!).
Notes on the Developer version (these do not apply to the latest Consumer version which does work): The 2011 Developer preview worked fine for me on the non-public 64-bit Server version (image 3), but the 64-bit Desktop version which anyone can publicly download did not seem to boot (it just got stuck detecting hardware for 4 hours on my Asus 1011PX N455 Atom netbook until I gave up and switched it off). I tried this same 64-bit Desktop version both on a USB HDD and a USB Flash drive. I also had problems with ImageX when Applying the wim file to a USB IDE 2.5″ hard disk (I used two different USB disks and caddies – Windows 7 reported delayed write errors). The 32-bit version works, though I could not get IE to run without erroring!https://www.youtube.com/embed/1WAAZ76cSEw
HOW TO MAKE A ‘WINDOWS 8 TO GO!’ USB BOOTABLE DRIVE:
This method of using ImageX /Apply on a USB 2.0 flashdrive can take at least 40mins (Lexar 16GB USB2.0 Jumpdrive), but on a USB HDD or a USB 3.0 Flash drive and USB 3.0 USB port only about 10 minutes for the 32-bit Desktop version. Therefore a USB HDD disk or USB 3.0 Flash drive is recommended (unless you have plenty of time to spare!).
IMPORTANT: The USB drive must have an Active (bootable) partition. Use RMPrepUSB to prepare the USB drive or use DISKPART to make the partition is bootable. To check, use RMPrepUSB – Drive Info and check it is listed as ‘ACTIVE’.
1. Download the 32-bit version (or 64-bit) ISO of Windows 8 Release Preview (32-bit = 2.5GB, 64-bit 3.3GB).
NEW! The ReleaseToManufacturing (full release) version is here but it is the Developer version and is limited to 90 days only. If you have an MSDN subscription then get the full RTM version(s) from here. The 32-bit (x86) version is recommended if you are installing Win8ToGo on a USB Media Flash drive as it will run on both 64-bit and 32-bit systems
I also successfully booted Win8.1 9600.16384.WINBLUE_RTM.130821-1623_X86FRE_ENTERPRISE_EVAL_EN-US-IRM_CENA_X86FREE_EN-US_DV5.ISO Enterprise 90-day eval version using these instructions (on a Fixed-disk type of USB drive).
2. Mount the Windows 8 ISO file as a virtual drive letter using ImDisk or Slysoft Virtual CloneDrive or any similar ISO mounting program. If you are doing this from a Windows 8 OS, just double-click the ISO file to mount it as a drive letter (Win8 supports ISO mounting!).
3. Wipe and partition and format a 32GB+ USB 3.0 Flash or USB HDD drive (recommended) using RMPrepUSB as NTFS+Bootmgr+Boot as HDD or use Windows Format if you have already formatted the drive and it has an active (bootable) partition.
4. Download and Install the 1.3GB (!!) Windows WAIK to obtain ImageX.exe. Imagex.exe can be obtained after Windows 7 Automated Installation Kit is installed on Windows 7, Vista or XP. ImageX can be found in C:\Program Files\Windows AIK\Tools\amd64 or C:\Program Files\Windows AIK\Tools\x86.
OR – Much Quicker Alternative! – see Tutorial #83 for a method of obtaining these files in about 30 seconds without needing to download and install the whole 1GB+ WAIK. I recommend you use the Windows 8/8.1 WAIK files for this tutorial.
If you have Win8.1 install ISOs, then you will need DISM instead of ImageX.
5. Open up a command console (CMD prompt) as Administrator (or if the WAIK is installed use the Start Menu – Deployment Tools Command Prompt entry). Make sure your current directory is the folder with imagex and the other downloaded WAIK files in it and ensure that you have the correct (x86 or amd64) version. If the Windows that you are currently using is 32-bit, then you need the x86 files, if you are currently running 64-bit Windows then use the amd64 set of files.
If your ISO had install.esd instead of install.wim, you will need to use DISM instead of ImageX.
e.g. cd C:\GetWaikTools\Waik_4_1\x86\Dism (if the system you are running on is a 32-bit Windows system).
6. Assuming that your Windows 8 ISO is mounted at K: and the USB drive has the drive letter of U:, type the command:
Imagex /Info K:\Sources\Install.wim
or
Dism /Get-WimInfo /WimFile:K:\Sources\install.esd
or
Dism /Get-ImageInfo /ImageFile:K:\Sources\install.esd <– use for Win8.1
(Tip: if there are a lot of images and you cannot see them all, add | find “Description” to the end of the line – e.g. Dism /Get-WimInfo /WimFile:K:\Sources\install.esd | find “Description”)
and check what images you have present inside the wim or esd file – let us assume that you want image #1 (usually only one image present unless you have the Server download), then type
Imagex /Apply K:\Sources\Install.wim 1 U:
or
Dism /apply-image /WimFile:K:\Sources\install.esd /index:1 /ApplyDir:U:\
or
Dism /apply-image /ImageFile:K:\Sources\install.esd /index:1 /ApplyDir:U:\
The command may vary depending on what version of DISM you have – see here for the syntax
7. When the image has been successfuly applied to the USB drive, type
BCDBOOT U:\Windows /s U: /v
if this fails it may be because you have an EFI Windows system, in which case try the following command:
BCDBOOT U:\Windows /s U: /f ALL /v
Note: If this fails to recognise the /f ALL switch, use the Win8 version of bcdboot that is on the USB drive – U:\Windows\System32\bcdboot.exe, e.g.
U:\Windows\System\BCDBOOT U:\Windows /s U: /f ALL /v
8. Use the Safely Remove Device System Tray icon to Eject the USB drive
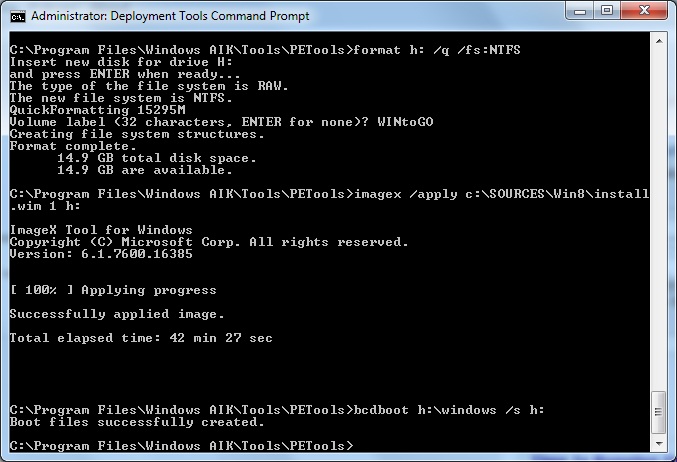
Putting Windows 8 to Go! onto a USB 2.0 16GB Lexar Jumpdrive using
a Windows 7 system (install.wim was from a 32-bit version 2.8GB Developer Preview)
Note that I had copied the install.wim to a folder on my C: drive first.
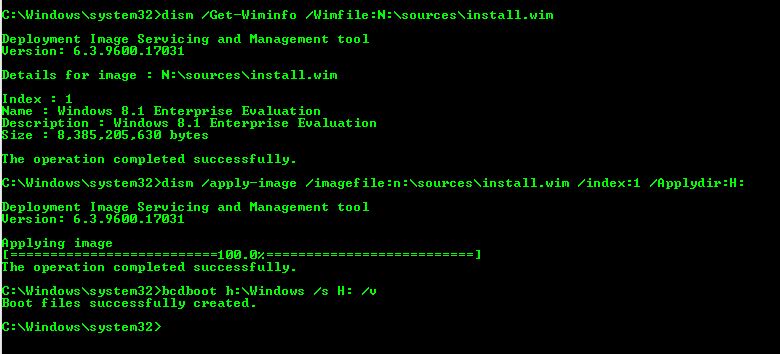
Preparing a USB HDD drive (H:) from a mounted ISO on N:
Now go boot it on something!
It may reboot several times during kernel and driver detection, so remember to make it boot from the USB drive each time (it may quickly reboot back to your internal HDD the first time!).
It is preferable to install the correct Windows 8 bootmgr by re-running bcdboot.exe – see the next section below for details.
“Windows could not complete the installation. To install Windows on this computer, restart the installation.”
If you see this error message: The USB drive must have an Active (bootable) partition. Use RMPrepUSB to prepare the USB drive or use DISKPART to make the partition is bootable. To check, use RMPrepUSB – Drive Info and check it is listed as ‘ACTIVE’.
PRODUCT KEYS
The Release Preview 2012 version Product key is TK8TP-9JN6P-7X7WW-RFFTV-B7QPF,
Skip the Product Key entry if asked on the 2011 early Developer Preview version or use 6RH4V-HNTWC-JQKG8-RFR3R-36498.
The Beta Consumer Preview 2012 version needs to have a Product Key entered and this cannot be skipped – the Beta trial key is DNJXJ-7XBW8-2378T-X22TX-BKG7J.
Always shutdown Windows before booting the USB drive on a different computer (you do not need to run sysprep).
The USB drive will reboot much faster once the ‘Metro’ desktop has been reached and all the driver detection has taken place on the first boot on a new system.
If you enable Hibernate, do not Hibernate Windows and then try to boot it on a different computer or it will crash!
If the Metro Apps don’t seem to run, try changing the screen resolution to a larger size – Metro apps only run at a screen resolution of 1024×768 or larger! If Internet Explorer won’t run from a Metro icon due to a low screen resolution, run IE from the Windows Desktop IE shortcut instead.Unsupported embed
SLIGHTLY IMPROVE THE BOOT SPEED
Once you have the USB drive successfully booting to Windows 8, you can change the bootloader (bootmgr) to the Windows 8 version as follows. This allows it to boot slightly faster (by about a second or two).
1. Boot from the USB drive to Windows 8 as usual
2. Use Windows Explorer to find the C:\Windows\System32\CMD.exe file and right-click on the file and choose Run As Administrator
3. Type the following command in the shell console window:
bcdboot C:\windows /s C: /f ALL
UEFI BOOTING
The USB drive must be of the ‘Fixed disk’ type (not Removable type).
You can make a WinToGo USB hard drive boot to both UEFI and MBR by creating a FAT32+NTFS partitioned drive.
See http://technet.microsoft.com/it-it/library/jj592685.aspx#stg_firmware – Roaming between different firmware types. (thanks to DevaDev for the tip).
Extract the wim file to the NTFS partition, then run the BCDBOOT command.Unsupported embed
T: U:
Use the U:\Windows\system32\BCDBOOT U:\Windows /s T: /f ALL /v command.
To add this to an Easy2Boot USB multiboot drive – see here.
For UEFI-only booting
If you want to enable UEFI booting as well as MBR booting, you will need to reformat the USB disk with a GPT partition structure and use the 64-bit version of Windows 8 as the ISO source.
The USB drive must be of the ‘Fixed disk’ type (not Removable type).
Instead of using RMPrepUSB to format the USB drive, use Windows Vista/7/8 Diskpart.exe. You will need to create a 100MB EFI System partition, a 128MB MSR partition and then the basic data partition(s) according to the size of your USB drive. You must add the partition types using the correct GUID identifier in the diskpart script.
The EFI partition and basic data partition(s) will need drive letters.
Use the command:
diskpart /s diskpart.txt
and use notepad to make a diskpart.txt script similar to the one below (change the disk number and volume size, which is in MB, as required):
rem === create GPT disk with two partitions, system and data ===
select disk 1
clean
convert GPT
create partition EFI size=100 offset=1024
format quick fs=fat32 label=EFI
assign letter=S
set id=”C12A7328-F81F-11D2-BA4B-00A0C93EC93B”
create partition MSR size=128
create partition primary size=80000
format quick fs=ntfs label=System
assign letter=U
set id=”EBD0A0A2-B9E5-4433-87C0-68B6B72699C7″
create partition primary
format quick fs=ntfs label=Data
assign letter=V
set id=”EBD0A0A2-B9E5-4433-87C0-68B6B72699C7″
exit
Once partitioned, install the Windows files using ImageX to the data partition and then run the BCDBoot command on the 100GB EFI partition – e.g. bcdboot U:\windows /s S: /f ALL (where S: is the EFI partition and U is the OS partition). See here for more details. Note that you must use the BCDBoot.exe from the Windows 8 WAIK (which can be downloaded using JFX’s GetWaikTools utiity).
Imagex /Apply K:\Sources\Install.wim 1 U: /norpfix
4. When the image has been successfuly applied to the USB drive, type
BCDBOOT U:\Windows /s S: /f ALL /v
Note: I have not tested this EFI installation method as I do not currently have an EFI system. See here for more details.
Comment from William (USA) who tried the above EFI install:
‘I managed to get windows to boot using MBR with an EFI partition using the method you listed and adding the boot files to the main windows partition (marked as active) as well as the ALL command on the EFI to create a bootable flash drive for both BIOS and UEFI machines. ‘
USING A REMOVABLE USB DRIVE
If you do run WindowsToGo from a Removable-type USB flash drive, it is best to install a hard-disk filter driver such as cfadisk so that Windows will treat the USB drive as a Fixed-disk.
WARNING: I do not recommend that you use this driver on Windows 64-bit systems – it can seriously mess up your OS and make it unbootable and unrepairable!
Note: Windows 8.1 will not boot from a Removable-type of USB drive – it must be listed as a Fixed or ‘Local’ disk.
Windows 10 1703 and later will boot from a Removable USB drive.
ADD MULTIPLE WINTOGO IMAGES TO AN EASY2BOOT DRIVE
see the blog here. Make sure the E2B drive appears as a Fixed Disk and not a Removable Disk.