
Table of Contents
For RM Education CC3 Network Managers – This method is not currently endorsed by RM Education, changes to your server are at your own risk (though a very minimal risk in my opinion)! This method has been tested on a CC3 server and used to build a CC3 Station.
INTRODUCTION
- Add new CC3 Build Disk Images in less than a minute
- No Floppy Disk or Floppy Drive is required
- Use one USB Flash drive for all CC3 Build Floppy disks
- Simply copy the floppy disk image files to your USB Flash Drive
This tutorial shows you how to make a MultiBoot USB CC3 Build Disk so you can have all of your CC3 Build disk images on one single USB Flash drive and so install any CC3 Station that you want using the one USB drive. It also shows you how you never need to play with another floppy disk again!
You can build a CC3 Build ‘Disk’ image in less than a few seconds and the initial stages of building a Station from a USB drive is much quicker than using a floppy!
Works on most systems that support USB booting such as old RM nBook 4000/CL51 (works even if the system boots to USB as a floppy drive, ZIP drive or HDD).
Even if you only use one Build Disk, this method will be quicker to rebuild a Build Disk and the USB pen created should boot on more systems than any other USB pen method.
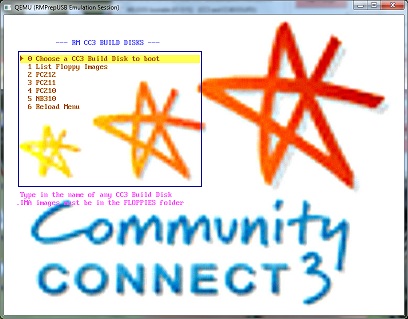
Boot the USB pen to see this CC3 Station Build Menu
and choose from a selection of CC3 Build Disks
REQUIREMENTS
- RMPrepUSB– install this onto your Build Server (no reboot is required)
- ImDisk– install this onto your Build Server (no reboot is required) – home page is http://www.ltr-data.se/opencode.html/#ImDisk
- A blank USB Flash drive (any make or size, but a 128MB up to 512MB stick is recommended as some very old systems will not boot from a USB stick over 512MB)
MAKING THE USB FLASH DRIVE
1. Download the CC3_Multi.zip file (see bottom of this page) and unzip to a convenient folder on your Build Server – e.g. D:\CC3_Multi
2. Run RMPrepUSB and ‘Prepare’ your USB Flash Drive (note: this will destroy all it’s current contents) – use the settings as shown below (items 1-5) and click on the 6 Prepare Drive button to format the USB drive and copy over the CC3_MULTI files.Unsupported embed
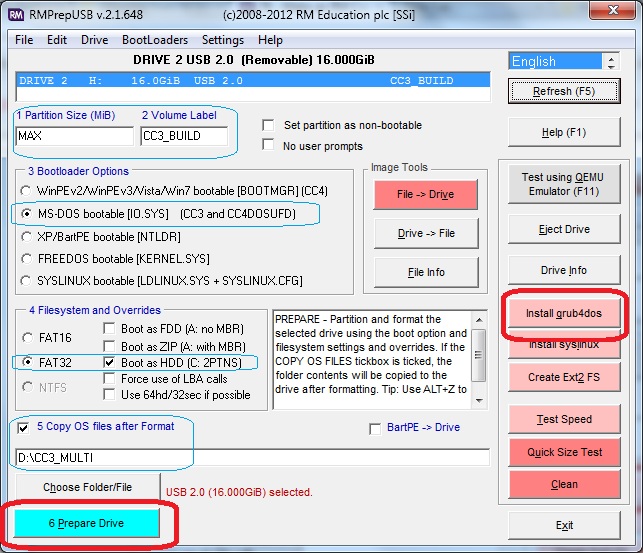
Note: Don’t forget to check the Boot as HDD + FAT32 boxes!
Click Prepare Drive first (and afterwards Install grub4dos – see step 3).
3. Now click on the Install grub4dos button – choose the MBR option (Yes) and hit ENTER when prompted to copy over the grldr file to the USB drive. For best compatibility, repeat step 3 but choose PBR (No) option.
4. (optional) Test that the drive will boot by clicking on the Test using QEMU Emulator (F11) button – you should see a small menu appear, similar to the one shown at the beginning of this article, but containing fewer entries.
5. Now quit QEMU and RMPrepUSB.
MAKING A CC3 BUILD DISK IMAGE (WITHOUT USING A FLOPPY DISK)
1. On the CC3 Build Server, locate the \FLOPPIES folder on the USB pen drive and the BLANK_FLOPPY.IMA file.
2. Make a copy of this file in the same \FLOPPIES folder on the USB drive and rename it to the name of your intended target system – e.g. PC210.IMA
3. Right-click on the new IMA file and, if you have installed ImDisk, you should see a ‘Mount as ImDisk Virtual Disk’ entry…

4. You should now see the ImDisk form pop-up (see below) – set the drive letter to A: (note: it does not matter if you already have a physical drive A: floppy drive present in the system – ImDisk will replace it with it’s own virtual drive), and tick the AUTO radio button (or Floppy radio button) and then OK it.
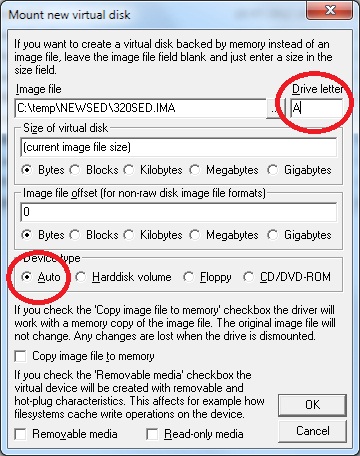
5. The floppy disk IMA file will now be mounted as a virtual floppy drive A:.
6. IMPORTANT: If you have any Windows Explorer windows open, close them all now or the CC3 Build Disk Manager may not be able to access the new ‘floppy drive’.
Now create your CC3 Build Floppy disk using the CC3 Create Build Disk function in the normal way – the whole build will take just a second or two!
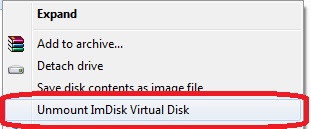
7. Now open Windows Explorer and find the virtual A: drive – right-click on the A: drive and select the Unmount ImDisk Virtual Disk option.
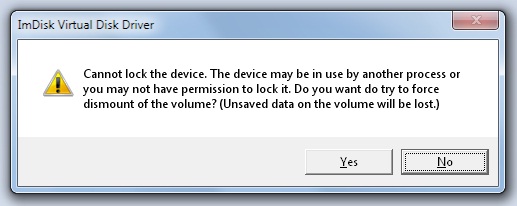
DO NOT CLICK YES IF YOU SEE THIS MESSAGE!
If you are warned that the disk needs to be forcibly dismounted, do NOT click OK or you may lose all changes and the disk image may be unchanged!
Instead click on No and then ensure that Windows Explorer has not expanded the drive contents on A: and that the only Explorer window you have open just shows an unexpanded drive A: – then try to unmount it again.
If you still have trouble unmounting the drive, close ALL Explorer windows and go to the command prompt and find ImDisk.exe and run the commands:
imdisk -l (to list all mounted ImDisk devices – usually the only device will be device 0)
imdisk -d -u 0 (sustitute the number of the mounted device for the number 0 in this example)
If you have anti-virus protection software installed such as Symantec that scans floppy disks, it may be trying to scan the new ‘floppy’ drive – sometimes if you wait a minute or so, it will finish the scan and you can unmount the virtual drive successfully. If you are still having problems, try temporarily quitting the virus protection application, dismount the virtual drive A: (right-click or use the command line) and then restart your virus protection app. again.
If you have to forcibly dismount the image then do so and then try re-mounting it again using ImDisk and check that the changes have been saved (look at the file dates, etc. in the image).
8. (optional) You now have the new build image on the USB drive in the \FLOPPIES folder and with it you can select any IMA image file using the menu option.
However, if you wish, you can create a new menu entry for it by adding a new special entry in the menu.lst file.
In RMPrepUSB, select the USB drive in the top drive list box and press F4 – the menu.lst file will be loaded into NotePad.
Now copy the PC211 menu (shown below) and change the three entries shown in red to match the name of your new floppy image:
- iftitle [if exist (bd)/FLOPPIES/PC211.IMA] PC211\n Load this CC3 Build Disk as Floppy Drive A:
- set FLOPPY=PC211.IMA
- errorcheck off
- if exist (hd0,0)/FLOPPIES/%FLOPPY% map (hd0) (hd32) && echo mapping USB drive to HD32
- if exist (hd0,0)/FLOPPIES/%FLOPPY% map (hd1) (hd0) && echo mapping System Hard Disk to HD0
- map (bd)/FLOPPIES/%FLOPPY% (fd0) && echo mapping %FLOPPY% as FD0
- map –hook
- rootnoverify (fd0)
- chainloader /io.sys
- map –floppies=1
- map –harddrives=1
- pause –wait=1
Note that if the IMA file does not exist, then the menu entry will not be listed. You need a 2012 or later version of the grldr file of grub4dos (as included with RMPrepUSB) that supports this function.
9. Rinse and Repeat steps 1-8 for all your other Build Disks, it should not take very long once you get the hang of it!
USING THE CC3 MULTIBOOT USB FLASH DRIVE TO BUILD A SYSTEM
Just like building a Station from a floppy disk (but much faster!), you must boot from the USB Flash drive twice…
1. Boot the target system that you want to rebuild from the USB Flash drive
2. Select the CC3 Build Disk image that you need. An easy way to select a menu entry is to type the menu item number – e.g. type ‘1’ and then ‘2’ to select item 12 and then hit ENTER.
If there is no menu option for it, then use the ‘Choose a CC3 Build Disk’ option and type in the name of the image (you do not need to specify the .IMA extension but you can if you want to).

Choose a CC3 Build Disk image
3. Now start the Phase 1 build as normal – when it has partitioned the target systems Hard Disk, it will reboot.
4. Make sure that you reboot back to the USB Flash drive again.
5. Choose the SAME Build Disk image as you chose before – this is important. If you don’t choose the same image, you will be presented with the first ‘build’ menu again (for the wrong build disk).
6. Proceed with the quick 2nd stage as normal.
7. When prompted to ‘Remove the Floppy Disk’, remove the USB Flash drive and allow the system to reboot from the Hard Disk and start the main XP build sequence.
Click here (OneDrive folder) if you cannot find any file mentioned in the articles on this site or Contact Me.