
Table of Contents
Here is how to install Windows 8 onto an existing XP, Vista or Windows 7 PC/notebook/tablet device without affecting your existing OS or needing to re-size your hard disk partitions or create new hard disk partitions. It can be easily removed at a later date.
Windows 8 Consumer Preview ISO Downloads (2012-02-29)
When you install Windows 8 Consumer Preview you’ll be asked for a product key. You can use DNJXJ-7XBW8-2378T-X22TX-BKG7J for the 32-bit or 64-bit versions of Windows 8 Consumer Preview. This key will most likely expire after Microsoft officially launches Windows 8 later this year.
Windows 8 Release Preview (2012-05-31) – key = TK8TP-9JN6P-7X7WW-RFFTV-B7QPF
See here for a taster video of the Samsung Tablets with Win8 on them handed out at the Build 2011 Developers Conference.
Useful (hack) tips here.
MAKE A WINDOWS 8 INSTALL USB DRIVE
You can burn the ISO to a DVD or extract the contents to make a bootable USB drive:
Either:
Run RMPrepUSB, set the boot option to NTFS, Boot as HDD (2PTNs), BOOTMGR and set Option 5 Copy files to EXTRACT files from the downloaded Windows 8 ISO, and finally click 6 Prepare Drive
– or –
1. Download and mount the ISO using Virtual CloneDrive or ImDisk
2. Run RMPrepUSB and format a USB drive with the BOOTMGR option (FAT32 or NTFS)
3. Copy the contentsof the ISO from the mounted drive in step 1 to the USB drive using Windows ExplorerUnsupported embed
So now you can boot from the USB drive and install Windows 8 onto your hard disk, but the question is – what if you want to keep your original OS too?
One option is to use a virtual machine such as Oracle VM Virtual Box (note that Microsoft Virtual PC does not seem to work with Windows 8 32-bit or 64-bit!). However, this means you do not get the full hardware features of Windows 8 or the full speed. To appreciate Windows 8, you really need to run it without a virtual machine or emulator getting in the way, especially if you want touch or multi-touch to work!
HOW TO CREATE A DUAL BOOT WIN7 AND WIN8 SYSTEM
Note: You will need 16-60GB of free space on drive C: (or some other HDD drive). If you do not want to use as much as 60GB, change the 60000MB value in step 1 to a lower size (min. 16000).
1. Create a new file called MakeVHD.scr on your Windows 8 install USB drive that you have just made, and place in it the following text:
If you prefer, you can boot to Win7 or Vista and use the Disk Managament MMC to create a VHD manually using – Action – Create VHD.
2. Now connect the USB drive which has the Windows 8 files on it to your target system (which can be the same system you are using now or a different system).
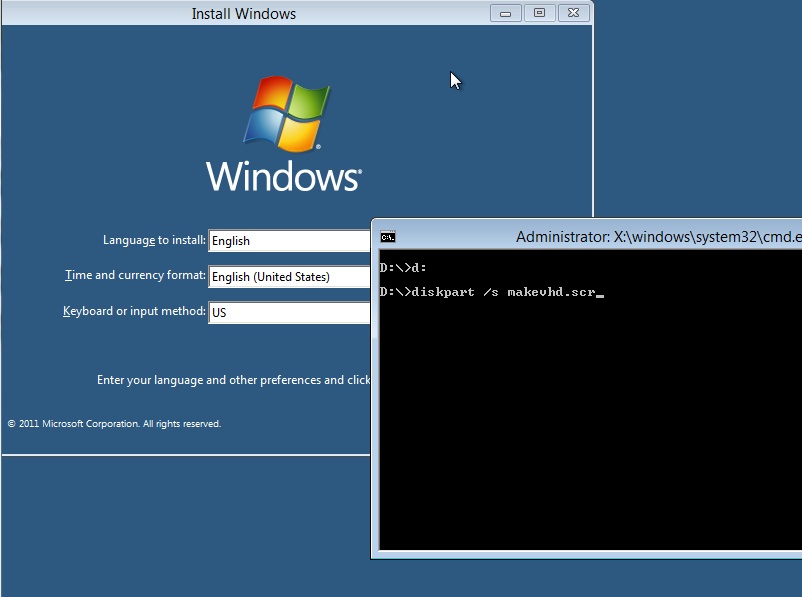
3. Boot from the Windows 8 install USB drive. Once the first screen is presented, type SHIFT+F10 to open a command console (see screenshot below).
4. Find the drive letter of the USB drive by typing dir D:, then dir E:, then dir F:, etc. until you can see the USB drive files and the MakeVHD.scr file that you made earlier. Let us assume that you have found the USB drive at D:
5. Type D: (assuming D: is your USB drive) and then press the {Enter} key
6. Now type:
This will make a 60GB VHD file on your drive C: (if you prefer you can type the commands in manually instead of using a .scr script file.)
If you had already made the VHD manually using Windows Disk Management MMC in step 1, then just run DISKPART and type:
select vdisk file=c:\win8.vhd
attach vdisk
exit
to attach the virtual disk
create vdisk file=c:\win8.vhd type=expandable maximum=60000
select vdisk file=c:\win8.vhd
attach vdisk
cre par pri
rescan
exit
DISKPART /s MakeVHD.scrUnsupported embed
7. Now type EXIT to close the console window.
8. Proceed as normal and select your Country settings. When you get to the UPGRADE or CUSTOM window – click on CUSTOM.
9. Your drives and partitions will now be listed (if not click on ‘Refresh’). You need to pick the 60GB partition (probably listed as 58GB). Ignore the ‘Windows cannot be installed to Disk x Partition y. (show details)’ warning message. It will be OK, honest! Click OK and the installation should start.
10. Allow the system to reboot. It may do this once or twice. Eventually you will be at the Windows 8 ‘Welcome’ screen.
If you previously had Windows Vista or Windows 7 installed, on rebooting, you should find that you will be offered the choice to boot to either your previous OS or the new Windows 8 VHD automatically. You do not need to use BCDEdit or EasyBCD to make the boot choice menu, it will have been automatically done by Windows 8 for you.
MAKE A BOOT MENU FOR XP AND WINDOWS 8
Note: The new Consumer Preview seems to add XP to the boot menu just fine, so you should not need to use these instructions!
If you previously had Windows XP installed, then you will NOT see a choice to boot to XP any more, but do not despair – XP is still there. You can create a boot menu to give you the choice.
Boot to Windows 8 and go to System Properties – Advanced tab – Start-up & Recovery – Default Operating System – Select Earlier Version of Windows.
Another way to do this would be to add the XP ntldr boot option to the newly installed bootmgr/BCD configuration manually as follows:
Download and install EasyBCD 2.1 under Windows 8 and set the Windows XP entry as the default, boot first (boot drive in Advanced Settings should be D: – the real hard disk). EasyBCD does work under Win8 but you need to download .Net too.
If you cannot get the methods above to work, what you can do instead is to install grub4dos to your hard disk as follows:
1. Download and install RMPrepUSB latest version (or run it from a USB drive) on the booted Windows 8 system
2. Type ALT+F5 to go to ALLDRIVES mode.
3. Select the real hard drive (e.g. D:) (you may get a warning about it being a large drive) – do NOT select the 58GB virtual drive C:!
4. Now install grub4dos by hitting the Install grub4dos button and press Enter when prompted to copy over the grldr file.
5. Now press F4 and click ‘yes’ to create a new menu.lst file.
6. Copy and paste in the following contents:
timeout 5
default 1
title Windows Boot Menu
root ()
title 1 Boot to XP
chainloader /ntldr
title 2 Boot to Windows 8
chainloader (hd0)+1
7. Save the menu.lst file to D:\menu.lst (i.e the real hard drive boot volume).
Now when you reboot, you should see a grub4dos boot menu, type 1 and Enter to boot to XP or type 2 to boot to Windows 8.
RE-INSTALLING WINDOWS 8
When you wish to try the next Beta release of Windows 8, you can repeat this process, but do not create a new vdisk using diskpart, just run DISKPART and type:
select vdisk file=c:\win8.vhd
attach vdisk
list vol
format quick (check the 58GB virtual disk is selected)
rescan
exit
and then install the new version of Win8 to the same VHD.
REMOVING WINDOWS 8
To remove the Windows 8 boot option, if your original OS was Win 7 or Vista, boot to Win7/Vista and use EasyBCD to remove the Windows 8 option and then simply delete the VHD file. Note: I had problems installing EasyBCD on Windows 8, so I would recommend using it within Vista/Windows 7 first, but this should work under either OS.
If you don’t want the Windows 8 boot manager, boot to Windows 7 or a Win7 Recovery DVD (bootsect.exe is usually in the \boot folder) and type bootsect /nt60 D: /MBR where D: is the Windows 7 drive letter.
If you originally had Windows XP installed and had grub4dos installed, you can boot to XP and remove the Windows 8 menu entry from the menu.lst file, set the timeout to 1 and delete the VHD file. This will leave grub4dos installed though which you may not want. To remove the grub4dos bootloader completely, first boot to Windows 8 (or from the Win8 Install ISO) – run an Administrator command console (right-click on C:\Windows\System32\cmd.exe and choose Run as Administrator) and type:
bootsect /nt52 D: /MBR
where D: is the real hard drive boot partition (do not use C: as this will be the VHD volume). You can then reboot to XP and delete the VHD file C:\win8.vhd and the menu.lst file.
DISABLE THE METRO GUI
Download the registry fragment here to disable or enable Metro (may not work on the Consumer versions).
ADDING THE WIN8 VHD TO ANOTHER SYSTEM
Win8 is portable. So you should be able to move the VHD from one system (Vista/Win7/Win8/SVR2K8R2) to another system containing a different chipset.
The steps would be:
1. Copy VHD to target system hard disk C: drive
2. Open Command Console and run DISKPART to mount the VHD temporarily
3. Run BCDEDIT to add an entry to the current OS boot menu
Full instructions can be found here.
I have not personally tried this on Windows 8 yet however…