
Table of Contents
If you just want to install any Windows version via PXE and set up a PXE RIS & WDS server VERY EASILY – see Tutorial #76
Other Tutorials you might like:
76 – Quickly setup PXE booting to install any Windows OS!
80 – How to retrieve files from a computer without booting it to an OS
69 – Boot over the internet with iPXE
INTRODUCTION
If you have an Ethernet network and a hub or router, you can boot to a grub4dos menu directly over the Ethernet wire without needing any boot device or even a hard disk in the computer. Nearly every modern x86 (Wintel) Windows PC, notebook or netbook has a BIOS which supports PXE booting. Normally you just need to press a key just after switch-on (e.g. F12) to start the computer looking for a PXE boot server on the Ethernet network (or configure the boot order in the BIOS and enable the ‘network boot/ROM’ option in the BIOS setup menu first).
Once you have a PXE server working (which can be your Windows 7/Vista/XP main PC), you can then boot any other PC/netbook on the same Ethernet network even if there is no Operating System on the hard disk of the target/client PC. You don’t even need a USB drive! For instance, you can boot to WinPE via PXE booting, connect via the network to a shared folder on another computer and run Windows 7 Setup to install Windows onto the target computer.
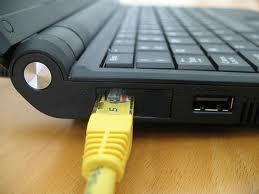
Note: Some LAN interfaces will allow a direct connection between computers with no need for a router – i.e. [PC] <—> [Notebook] and most will only require a normal Ethernet cable and not a special ‘cross-over’ cable. So you can just omit the router and connect your two systems together with just one Ethernet cable and see if it works (check you have a link light and see if tftpd32 is seeing PXE packet requests) – if it does not work then try connecting the router in and disabling DHCP as detailed in Step 2 below.
How PXE booting works
The case I am going to describe is for a simple home network (no server) which consists of a simple Ethernet network as shown below:
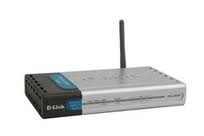
Windows PC <——> Dlink ADSL router + 4 port hub <——-> any other PXE-boot capable computer
(PXE & TFTP Server) (PXE client)
<——————> <——————>
This is a typical home network (though you may have more PCs on the wire or on WiFi). If you have a server, then the instructions below will need to be changed accordingly as your server will probably be acting as your DHCP server. If you have a more complex network setup, then make sure you have read and completely understand this tutorial first – you could ‘break’ your network and internet connectivity!
Let us assume I have a netbook (say an Asus EeePC) which I want to PXE boot over the network from my Windows 7 PC…
PXE booting works as follows (simplified!):
1. The netbook (the PXE client or ‘target’ PC) requests an IP address from a DHCP server which should be on the network somewhere
2. The DHCP server replies with an IP address that the netbook can use – it ALSO includes in the reply, the name of a boot file which is available and the IP address of a TFTP server.
3. Because the netbook is PXE booting, it now makes a TFTP request for this file using the IP address information in the last DHCP packet
4. A TFTP server receives the request for the boot file, gets the file data and starts to send it to the netbook in chunks
5. The netbook loads the boot file into memory and starts to execute the code in it when it has received all of it.
From the five steps above, you can see that we need to have both a DHCP server which can send this boot filename out and also a TFTP server which will respond to file requests.
In the typical home network shown above, the (Dlink) router will normally be acting as your DHCP server. This means that it will be assigning IP addresses to any computer that is connected to the network. However, most home routers are not capable of supporting PXE booting and so we must disable the DHCP service on the DLink router and replace it with a DHCP server of our own. We also need a TFTP server too. Luckily, there is a free open-source project called tftpd32 here which, when tftpd32 is running on your PC, will provide both DHCP and TFTP services (on any Windows computer).
The instructions below will disable the DHCP server which is running in the DLink router and configure the tftpd32 utility to be the DHCP server. This means that you must always run tftpd32\64 on your PC whilst DHCP on your router is disabled – otherwise any other PC on your network will not be able to properly connect to the network and the internet. When you have finished playing with PXE booting, it would be best to enable DHCP on your router again and quit the tftpd32 utility – otherwise you must remember to switch on your PC first and start tftpd32/64 first before the other computers on the network are switched on or connected to the network.
Tip: If you have a spare hub/router, then use that with a few spare Ethernet cables to save mucking about with your home network.
References:
How PXE booting works and troubleshooting
LETS GET GOING!
- First, print out this tutorial or save it to your Desktop as a file – if you lose internet connectivity you may be glad you did!
- Next, make sure you backup your Windows system (type ‘Create a Restore Point’ in the Windows 7 Start menu box to run it).
- Ensure you know your routers username & password and how to set up the ADSL credentials which were originally given to you by your ISP (e.g. BT or Virgin or TalkTalk or whoever) – if you have to reset your router, you will need to put these details in again!
- Get a piece of paper and a pen to make a note of your current settings as you go along – no REALLY! Get some paper and a pen NOW! You haven’t done it have you? Look, you may have a fantastic memory, but if you lose network connectivity and internet connectivity and can’t get it working again, don’t blame me just because you couldn’t be bothered!
- Lastly, save your current router settings to a file on your PC – no REALLY! I really mean it – do it now! Then try to re-load the saved settings file to make sure it works.
Note: many modern systems will work if you directly connect the two Ethernet ports (computer <–> computer) together using an ordinary Ethernet cable, without the need for a hub/router or cross-over Enet cable. If you are reluctant to change your router settings, simply unplug it and connect the cable straight to your target PXE-boot system. It may or may not work. If it does not work (check for a link light on the Ethernet port) then you will have to use a hub or router.
These instructions could potentially screw up your network and internet access. Changing Windows 7 network settings and then changing them back again is easy and works well. The main issue you may have is with the router when you enable or disable DHCP – so back up the router configuration (most routers have a ‘save config to file’ option)!
1. The first thing to do is note down your current settings. In Windows 7, go to Control Panel – Network and Sharing Center – Local Area ConnectionUnsupported embed
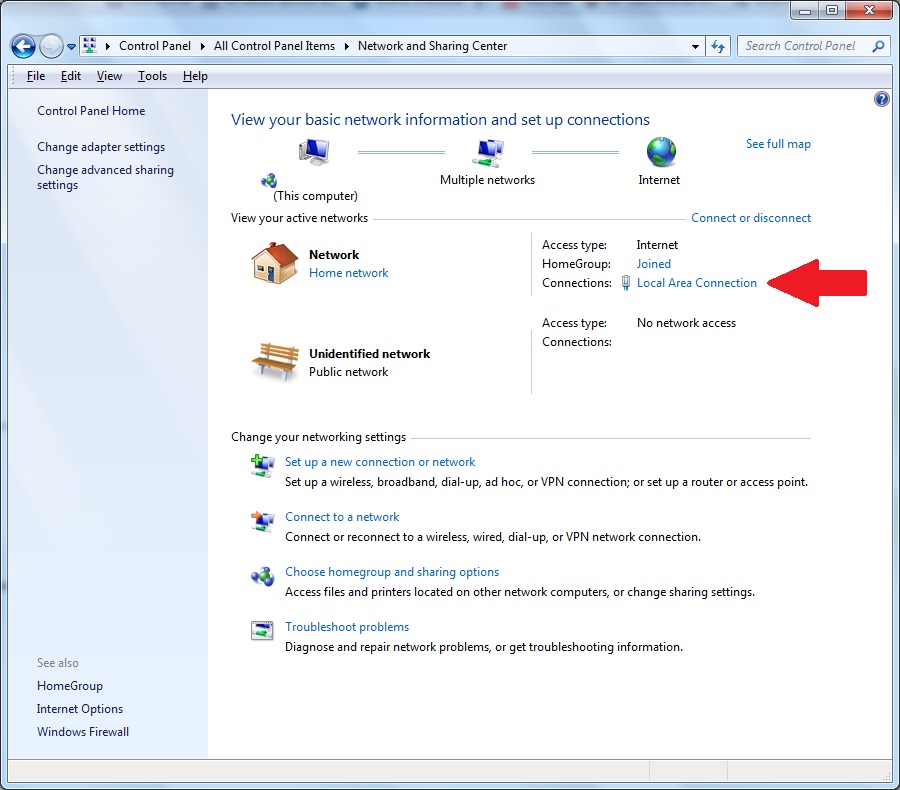
Fig. 1 Network Control Panel
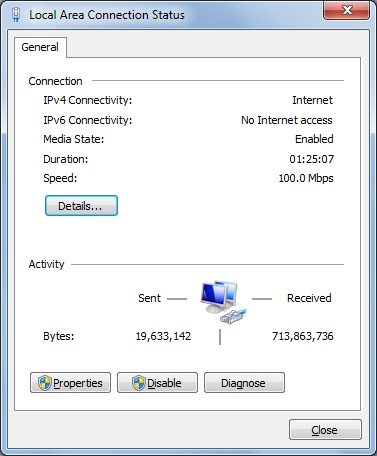
Fig. 2 Click on Details
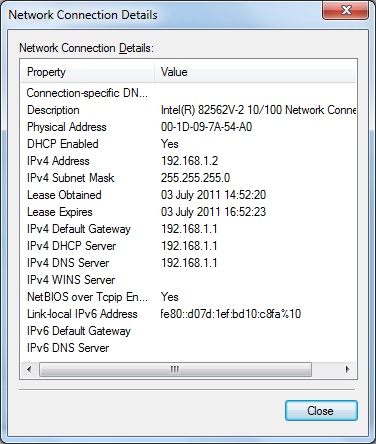
Fig. 3 Record the IPv4 details
Make a note of the following (on that piece of paper that you have ready – right?):
IPv4 Address 192.168.1.2 in my case – this is the IP address of the PC (given to it by the Dlink router)
IPv4 Default Gateway 192.168.1.1 (my DLink router’s IP address)
IPv4 DHCP Server 192.168.1.1 (my DLink router is the DHCP server)
IPv4 DNS Server 192.168.1.1 (my DLink router is the internet DNS server too)
Note that it says ‘DHCP Enabled Yes’ which means that it expects a DHCP server to be on the network (in this case my DLink router).
We now need to stop my Windows 7 PC from getting it’s IP address from the DLink router via DHCP and set the IP address of the Windows 7 PC to a specific, fixed IP address, because we are going to run a DHCP server (tftpd32) on the PC itself.
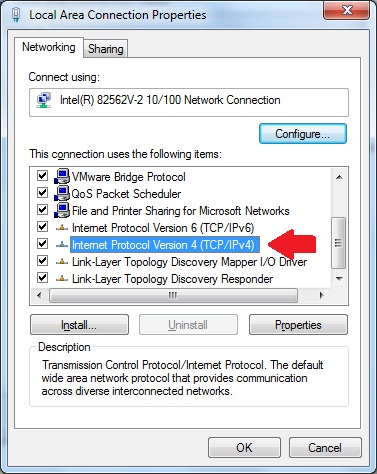
Click Close and then click on the Properties (see Fig. 2) and select Internet Protocol Version 4 (TCP/IP v4) and click on Properties.
Now set it up as shown below as we want to fix the PC’s IP address as it will become our DHCP server.
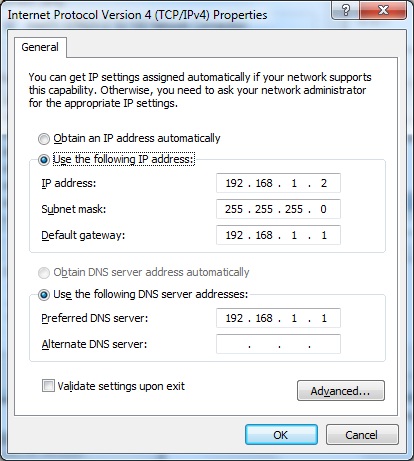
Fix the IP address to be the same as it was before.
Also set the DNS server IP address to the DLink router’s address
as that will still be our internet server.
The Default Gateway is also the Dlink internet router.
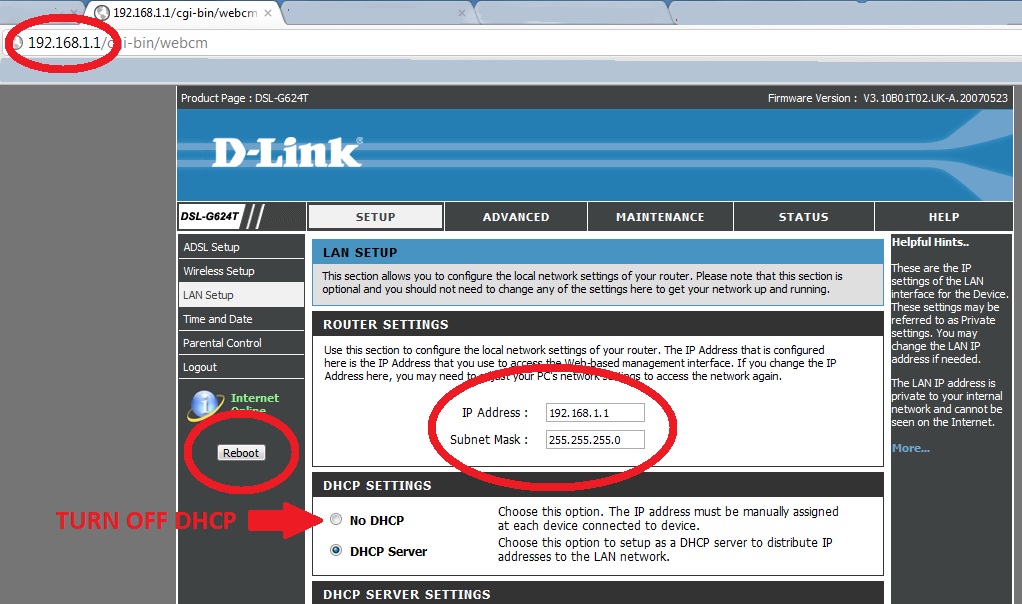
2. Now go to your router and stop it from being a DHCP server. IMPORTANT: Use Internet Explorer as the browser – some router web interfaces do not work fully with other browsers – e.g. Chrome! In my case this meant typing the DLink router’s IP address (192.168.1.1) into the Internet Explorer browser address bar, entering a username and password and then finding the DHCP menu and disabling DHCP. If you have a DLink router, the username and password are usually both set to be ‘admin’ by default (or after pressing in the reset button for 20 seconds).
WARNING: Before you do this, I strongly suggest you save your current router settings to a file on your computer. My DLink refused to re-enable DHCP again afterwards even after updating the firmware and using the reset button! Only a restore from an old saved config file and rebooting it seemed to rescue it! Also check you can load the config file again – my DLink router refused to load the config file from C:\Users\Administrator\Downloads but would load the same file when I copied it to D:\ !!!!
Click to enlarge
Keep the IP address of the router as 192.168.x.1, turn off DHCP, save the settings and reboot the router.
IMPORTANT: Check that DHCP on the router is displayed as being off and if not re-try and reboot it again – it does not always seem to work first time!
3. Download and install tftpd32 (or tftpd64 if you are running 64-bit Windows). Run the program and allow Windows to unblock the Firewall when prompted by Windows (click on UnBlock).
4. Now set up the settings in tftpd32/64 as shown below:
The current directory is not important, it can be configured so that it always shows this path
by changing the Start Menu shortcut properties ‘Working Folder’ to C:\tftp\grub4dos.
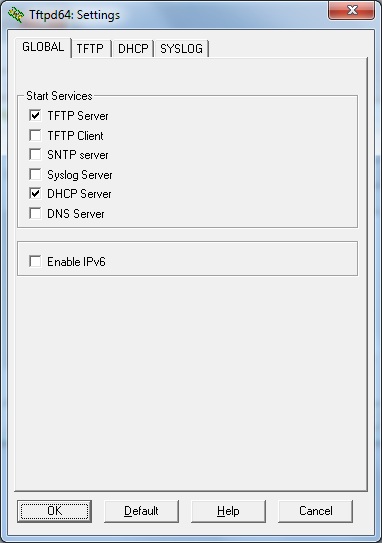
We need to enable a TFTP and DHCP server only.
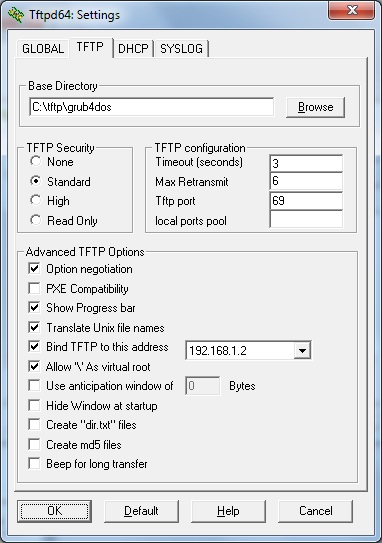
Note: set Option negotiation, Bind TFTP to the PCs IP address and Allow \ as virtual root.
These settings are important! Do not tick PXE Compatibility (except as a last resort!).
The Tftp port MUST be 69.
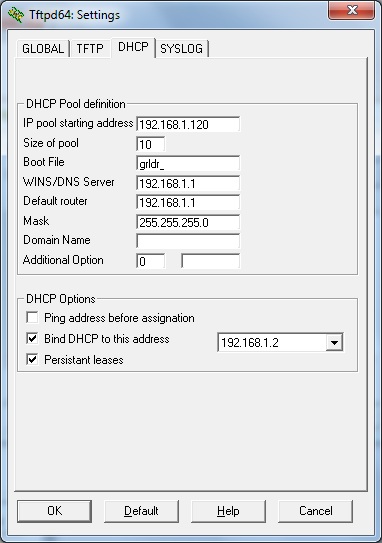
Set Boot File to grldr if you want grub4dos to boot (note the screenshot shows grldr_ but this is an artefact of the display, it should be set to grldr).
The DHCP settings should be set as above. This can support up to 10 PCs on the network (including wireless PCs) as the pool size is set to 10 (you can change it to more if you like).
New PCs will be assigned an IP address starting with the first one at 192.168.1.120, and the second one will be 192.168.1.121, etc.
The DLink router (192.168.1.1) still acts as our DNS server and Default router (gateway).
Again Bind the address to that of your PC and enable Persistant (sic) leases.
Close tftpd32/64 and re-run it so that the changes take effect.
5. Finally, we need to make a new folder structure on your PC – C:\tftp\grub4dos\menu.lst (note that menu.lst is a folder and NOT a file).
Place the grub4dos grldr file in the c:\tftp\grub4dos folder this is the file that will be requested and run by the PXE client.
Place the menu.lst file that you want to use in the C:\tftp\grub4dos\menu.lst folder and rename the file to default (with no extension) – so we now have a file C:\tftp\grub4dos\menu.lst\default as the full file pathname.
Place any other files that would normally be on a USB drive in the C:\tftp\grub4dos folder
An example default file (aka menu.lst) might be:
gfxmenu (pd)/message
title 1 linux iso boot\nlinux must run from RAM only and not reference files on the ISO once booted to linux
map –mem (pd)/linux/linux.iso (0xff)
map –hook
chainloader (0xff)
title 2 Boot DOS floppy image
map –mem (pd)/images/floppy.img (fd0)
map –hook
chainloader (fd0)+1
rootnoverify (fd0)
title 3 Hirens Boot CD 13.2 using firadisk \nBoot to Hirens Boot CD in RAM – see tutorial #36
map –mem (pd)/firadisk.gz (fd0)
map –mem (pd)/HirensBCD.13.2.iso (0xff)
map –hook
root (0xff)
chainloader (0xff)
Notes:
The tftp root folder is set to C:\tftp\grub4dos in tftpd32/64, so (pd)/linux/linux.iso refers to the file at C:\tftp\grub4dos\linux\linux.iso.
You must use –mem when mapping a file from a PXE (pd) device.
You cannot use the ls command with the PXE (pd) device.
If chainloading a file, you must use the –raw parameter.
See http://diddy.boot-land.net/grub4dos/files/pxe.htm for more information on grub4dos PXE booting and also the ReadMe file extract at the end of this Tutorial.
Ubuntu PXE boot (extracted from ISO)
See here
LABEL Ubuntu
MENU LABEL Ubuntu CD – Live
KERNEL images/ubuntu-13.10-desktop-i386/casper/vmlinuz
APPEND boot=casper vga=normal netboot=nfs nfsroot=192.168.2.150:/volume1/install/PXE/images/ubuntu-13.10-desktop-i386 fetch=tftp://192.168.2.150/install/PXE/images/ubuntu-13.10-desktop-i386/casper/filesystem.squashfs initrd=images/ubuntu-13.10-desktop-i386/casper/initrd.lz
Undoing the changes!
To undo these changes you just need to do 3 things:
1. Exit the tftpd32/64 utility to stop it acting as a DHCP server
2. Enable DHCP on your router again (or reload the config file that you saved earlier)
3. Go to your network control panel settings and set the TCP/IP settings back to ‘Obtain IP address automatically’ and ‘Obtain DNS automatically’ – though it should still work if you leave it set to a fixed address and it will save you having to enter the addresses in again if you later want to enable PXE booting again.
If you want to set the PC up as a PXE server again then:
1.Go to your network control panel settings and set the TCP/IP settings back to ‘Use IP address’ and ‘Use DNS address’ and set up the addresses as before.
2. Disable DHCP on your router
3. Run ftfpd32/64 – it should remember the settings.
BOOTING TO WINPE3 OVER PXE
If you PXE boot to a WinPE v3 image, you can install any Windows OS onto the target PC/notebook. You can use ImageX or Ghost or any imaging tool that you prefer once you are running WinPE.
When the WinPE OS boots, you just need to connect to another system on the network (e.g. a shared folder on another PC). You can then run any imaging program or backup/restore the PC across the network. You could have a variety of installation DVD folders on the shared network folder and just run setup.exe across the network, or copy the files to the local hard disk across the network and then run setup.exe locally off of the hard disk. In this way you can install XP/Vista/7/SVR2K8 onto any system on the network just by PXE booting to WinPE.
If you want to add a WinPE v3 (PE3/Win7PE) boot.wim image, then here is how to do it:
1. Install the Windows 7 WAIK from here
2. Extract and copy the file makepxe.cmd (from the Beta Downloads section) to your WAIK’s Tools\PETools folder – e.g. C:\Program Files\Windows AIK\Tools\PETools\makepxe.cmd
3. Right-click on makepxe.cmd (in the WAIK PETools folder) and run as Administrator – it should make a C:\Temp_pxe\Boot folder
4. Copy the Boot folder to the C:\tftp folder – the following 5 files should now be present:
c:\tftp\grub4dos\Boot (folder)
c:\tftp\grub4dos\Boot\pxeboot.n12
c:\tftp\grub4dos\Boot\bootmgr.exe
c:\tftp\grub4dos\Boot\BCD
c:\tftp\grub4dos\Boot\winpe.wim
c:\tftp\grub4dos\Boot\boot.sdi
Now either follow step 5a if you just want to boot directly to WinPE3, or follow 5b if you want to use grub4dos and have a menu so you can boot lots of different OS’s:
5a. Change the tftpd32/64 settings so that the TFTP Base Directory is c:\tftp\grub4dos\Boot and the DHCP Boot File is pxeboot.n12. (this will now PXE boot straight to WinPE).
Note: If you wish, you can modify the BCD so that it contains several boot choices. To do this you will need to modify the makepxe.cmd file. For example script modifications see here. It would be easier however to use grub4dos as a menu system and then choose which boot.wim file to boot from.
OR USE GRUB4DOS…
5b. Keep the same settings on the tftp32/64 DHCP/TFTP fields and instead edit the file c:\tftp\grub4dos\menu.lst\default to include the grub4dos menu item for WinPE3 (see examples below). If you like you can change the winpe.wim file for another one – e.g. just rename the boot.wim made by the WinBuilder MakePE3 project (e.g. C:\Make_PE3\win7pe_x86\ISO\sources) – see Tutorial #42 for details – or – edit the file c:\tftp\grub4dos\menu.lst\default to include the grub4dos menu item to add the whole WinPE3 ISO file (see menu #5 below).
# to prepare a WinPE boot image see the next section (more info at http://www.etherboot.org/wiki/winpe#transferring_winpe_to_a_tftp_server)
title 4 Run WinPE 3
pxe keep
chainloader –raw (pd)/Boot/pxeboot.n12
# pxeboot.n12 downloads Bootmgr.exe and the BCD store.
# The BCD store must reside in a \Boot directory in the TFTP root folder. Additionally, the BCD store must be called BCD.
# Bootmgr.exe reads the operating system entries from the BCD and downloads Boot.sdi and the Windows PE image.
# Bootmgr.exe begins booting Windows PE by running Winload.exe within the Windows PE image.
# just load the whole iso into a ramdrive
title 5 Run WinBuilder Make_PE3 project from ISO\nAny WinPE ISO can be loaded into RAM but Windows install DVDs cannot as they are too large!
pxe keep
map –mem (pd)/pe3_x86_M.iso (0xff)
map –hook
chainloader (0xff)
For other ISO’s based on WinPE – e.g to boot from a Norton Ghost 15 CD ISO use:
title Norton Ghost 15 (hd32)
pxe keep
root (pd)/iso/Ghost15.iso
map –mem (pd)/iso/Ghost15.iso (0xff)
map –hook
root (0xff)
chainloader /BOOTMGR
Note: /BOOTMGR is in uppercase!
See here for lots more grub4dos menu.lst working examples for PXE booting!
HOW TO INSTALL (OR RE-INSTALL) WINDOWS 7 (OR ANY OS!) VIA PXE
Once you boot to WinPE via PXE, you now have an OS running on the target (client) system. So you can load network drivers for WinPE and then run NET USE to connect to a Network Share folder on your main PC. You can then run Windows Setup.exe to install Windows across the network – OR – run DISKPART to CLEAN and partition and format the target system’s hard disk and run ImageX to pull an image from the main PC onto your hard disk – OR – why not make an image of your other PCs and keep them on your main PC. Then you can easily restore any image at any time in the future.
The steps involved are:
1. Make a working WinPE3 boot.wim and add the correct Win 7 network drivers to it for each system you want to use PXE booting on. You can either use DISM (part of the WAIK) to do this, or just put the Windows 7 network drivers on a USB flash drive and load the network drivers directly from the USB flash drive once you have booted to WinPE3 using DRVLOAD F:\mynetdrv.inf (where F: is the USB flash drive letter). You may need to wait a while for the network to start up, or you can type netcfg -winpe to force the network to start.
2. Now you have WinPE3 running and have a working network connection, use NET USE to connect to a shared folder on your master PC – e.g.
NET USE N: \\MYDELLPC\CD /U:myusername “mypassword”
Alternatively try using the IP address of the PC you have the file share folder on instead of it’s name:
net use n: \\192.168.1.2\cd /U:myusername “mypassword”
where \cd is a shared folder containing the contents of any DVD or CD or any other files you want access to (makes sure ‘Everyone’ has read access).
3. Check you can access files on the master PC – e.g. type DIR N:\ on the PXE client.
I suggest you place a copy of ImageX.exe in the shared folder so that you can now use it to take a copy of your hard disk
Now you can install Windows 7 from a Windows 7 (or Vista) DVD or mounted ISO on the master PC (or Vista or Server 2K8), just mount the appropriate Windows ISO and make a share of the drive as H:, then use a NET USE command to connect to the shared drive from WinPE and run Setup.exe, e.g.
NET USE P: \\MYDELLPC\H$ /U:myusername “mypassword”
P:\SETUP.EXE
OR, we can make and restore a backup of the current OS on the PXE-booted system in WinPE instead…
4. We can make an image of the OS that is on the hard disk using the command…
n:\imagex /capture C: N:\EEPC_OS.wim “EEPC C: drive June 30 2011” /check /verify
If we want to apply this image to the same PC in the future (maybe the contents have become corrupted) then we follow steps 1 to 4 above, but now we type:
format /q /x C:
n:\imagex /apply N:\EEPC_OS.wim 1 C: /check /verify
Note that ImageX is a single-file instancing compression utility, so you can simply add another backup to the current backup file using the Append ImageX command at a later date:
N:\ImageX /append C: N:\EEPC_OS.wim “EEPC C: drive July 1st 2011” /check /verify
Now image #2 will have this new backup and the wim file will only be slightly larger as it will only contain the new files that you added since the last backup. You can restore this second image using ImageX /Apply:
format /q /x C:
n:\imagex /info N:\EEPC_OS.wim
n:\imagex /apply N:\EEPC_OS.wim 2 C: /check /verify
OK – that is great – but what if my hard disk was totally trashed, I won’t have a C: partition at all?
Well, first you will need to have made a backup of both the boot partition and the OS partition (and any other partitions you want to backup). In the case of Win 7 (and most Vista systems) there is a hidden boot partition on the disk. To see what you have, run DISKPART (either from WinPE or from Windows on the actual system itself) and type SEL VOL C and then DETAIL PAR. Look for the Active: Yes entry – if it says Active then this is your boot partition as well as your system OS partition so you only need to back up that partition to be able to boot the OS! If it says Active: No then you need to find the active partition and back that up too. This is more tricky and is too complicated to describe here, but if you back up the C: volume then you should be able to repair a Vista/Win7 system using a Windows Recovery DVD or boot.wim which you can PXE boot to afterwards.
Let us assume you have lost all the contents of the hard disk on your notebook (win7) but you have a backup on the main PC of the C: (OS) drive – here is what to do to get it running again:
1. PXE boot from the notebook that you want to re-install and boot to WinPE3
2. Wipe, Partition and Format the target hard disk – this can be done using DISKPART as follows (assuming you want two partitions, 200GB + whatever remains) – just type:
DISKPART
SEL DIS 0
CLEAN
CRE PAR PRI SIZE=200000
FORMAT FS=NTS QUICK
ACTIVE
ASSIGN LETTER=C
CRE PAR PRI
FORMAT FS=NTFS QUICK
ASSIGN
EXIT
3. Apply the image as described above using ImageX /Apply
4. If the notebook was a Windows XP PC, type N:\bootsect /nt52 C: to make it boot to NTLDR (for XP) rather than BOOTMGR (for Vista/Win7). Bootsect.exe will need to be copied from the WAIK folder to your shared folder.
If the notebook had Windows 7 or Vista type: N:\bcdboot C:\windows to ensure the Windows OS is bootable. You will first need to copy bcdboot.exe from the WAIK Tools folder to your shared folder (or USB drive).
5. Now type wpeutil reboot and it should reboot to your newly installed OS. If you have any problems booting Win7 or Vista, boot from a Win 7 Recovery DVD (or PXE boot and run Setup.exe from a shared folder containing the DVD contents) and try to ‘Repair’ drive C:.
Now you can keep backups of all your PCs and notebooks hard disk volumes (keep a copy of the wim files on an external hard disk as well, just in case your main PC catches fire!) and restore any of your PCs in just a few minutes without needing any boot media (USB drive or DVD) at all.
PXE BOOT TO SYSLINUX
If you prefer to PXE boot to a syslinux menu rather than a grub4dos menu, there are some instructions here. Just download the diskless.zip file on that page and follow the instructions to configure the .\pxelinux.cfg\default file as you wish. The instructions are for a linux based diskless workstation to run a distributed computing project, but you can put whatever files you like in the default menu as long as you set the boot file to pxelinux.0.
TROUBLESHOOTING
Target PC/notebook will not start to PXE boot – Solution: Switch on the client/target computer and enter the BIOS Setup menu (usually by pressing DEL or F2) – find the Boot options menu and ensure that Network Booting is enabled. Then change the Boot Order so that Network is at the top of the list. If you have a BBS (BIOS Boot Selection) option, enable this so that you can press F12 (usual key) to start a PXE boot after switch on. You should see something similar to that shown below:
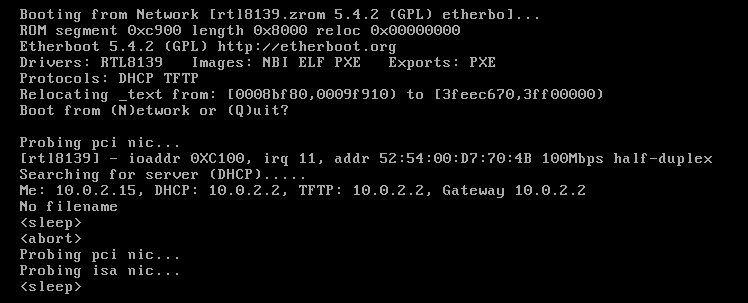
If the BIOS tries to PXE boot, you should see some mentions of ‘PXE’ or ‘UNDI’
and a MAC Address should be displayed.
Target PC/notebook starts to PXE boot but gives a DHCP not found error – Solution:This means that your tftpd32/64 application is not correctly configured and is not acting as a DHCP server. Check the Server tab on the main form of tftpd32/64 to see if it displays any MAC address or IP address – if it does not, check the Log Viewer panel (see below) to see if any packets were received.
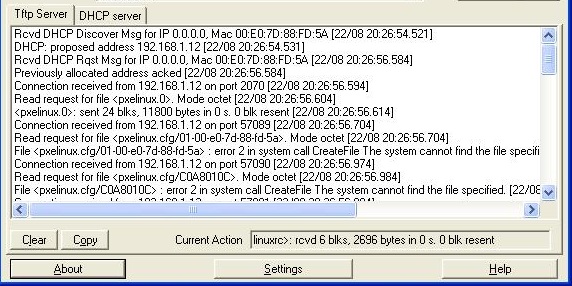
If you can see that some packets were received, check that the TFTP options are correct (try setting PXE compatibility instead of Option negotiation – but if it does not work remember to set it back to Option negotiation again afterwards as most setups only work with this set.)
Check also you have ticked the Bind TFTP and DHCP tick boxes!
PXE client starts to boot but bombs out with \Boot\BCD error – Solution: Change Advanced Tftp options – PXE Compatibilty DISABLED and Option negotiation ENABLED
PXE booting starts but hangs when loading a large boot file (e.g. boot.sdi) – Solution: Check router settings, ensure it is set to DHCP OFF and save and reboot it. Try unplugging it, switching off all PCs on the network, then plugging it back in and switching on your PCs again (you must start tftpd32/64 first if you have other PCs or notebooks on the network as this is your DHCP server).
If you have another PC, boot it to Windows and in a command console window type ipconfig /all – check that the Ethernet Adapter Local Area Connection adapter that is listed has an IPv4 address in the range of 192.168.1.12x – this proves that the tftpd32/64 DHCP server is working correctly.
PXE client times out with error ‘No ProxyDHCP Offers’ or ‘No PXE Boot file’ – Solution: If you have a switch or router that has a ‘SPANTREE PORT FAST ENABLE’ option then enable Port Fast.
For more PXE error codes see here.
GRUB4DOS README ON PXE BOOTING
******************************************************************************
*** PXE device ***
******************************************************************************
If PXE service is found at startup, GRUB4DOS will create a virtual device
(pd), through which files from the tftp server can be accessed. You can setup
a diskless boot environment using the following steps:
Client side
You need to boot from PXE ROM.
Server side
You need to configure a dhcp server and a tftp server. In the dhcp server, use
grldr as boot file.
You may also want to load a different menu.lst for different client. GRUB4DOS
will scan the following location for configuration file:
[/mybootdir]/menu.lst/01-88-99-AA-BB-CC-DD
[/mybootdir]/menu.lst/C000025B
[/mybootdir]/menu.lst/C000025
[/mybootdir]/menu.lst/C00002
[/mybootdir]/menu.lst/C0000
[/mybootdir]/menu.lst/C000
[/mybootdir]/menu.lst/C00
[/mybootdir]/menu.lst/C0
[/mybootdir]/menu.lst/C
[/mybootdir]/menu.lst/default
Here, we assume the network card mac for the client machine is
88:99:AA:BB:CC:DD, and the ip address is 192.0.2.91 (C000025B). /mybootdir is
the directory of the boot file, for example, if boot file is /tftp/grldr, then
mybootdir=tftp.
If none of the above files is present, grldr will use its embeded menu.lst.
This is a menu.lst to illstrate how to use files from the tftp server.
title Create ramdisk using map
map –mem (pd)/floppy.img (fd0)
map –hook
rootnoverify (fd0)
chainloader (fd0)+1
title Create ramdisk using memdisk
kernel (pd)/memdisk
initrd (pd)/floppy.img
You can see that the menu.lst is very similar to normal disk boot, you just
need to replace device like (hd0,0) with (pd).
There are some differences between disk device and pxe device:
1. You can’t list files in the pxe device.
2. The blocklist command will not work with a file in the pxe device.
3. You must use –mem option if you want to map a file in the pxe device.
4. When you use chainloader to load file from the pxe device, there is a option
you can use:
chainloader –raw (pd)/BOOT_FILE
Option –raw works just like –force, but it loads the file in one go. This can
improve performance in some situation.
You can use the pxe command to control the pxe device.
1. pxe
If used without any parameter, pxe command will display current
settings.
2. pxe blksize N
Set the packet size for tftp transmission. Minimum value is 512,
maximum value is 1432. This parameter is used primarily for very old
tftp server where packet larger than 512 byte is not supported.
3. pxe basedir /dir
Set the base directory for files in the tftp server. If
pxe basedir /tftp
then all files in the pxe device is related to directory /tftp, for
example, (pd)/aa.img correspond to /tftp/aa.img in the server.
The default value of base directory is the directory of the boot file,
for example, if boot file is /tftp/grldr, then default base directory
is /tftp.
4. pxe keep
Keep the PXE stack. The default behaviour of GRUB4DOS is to unload
the PXE stack just before it exits.
5. pxe unload
Unload the PXE stack immediately.
******************************************************************************
*** GRLDR as PXE boot file ***
******************************************************************************
GRLDR can be used as the PXE boot file on a remote/network server. The (pd)
device is used to access files on the server. When GRLDR is booted through
network, it will use its preset menu as the config file. However, you may use
a “pxe detect” command, which acts the same way as PXELINUX:
* First, it will search for the config file using the hardware type (using
its ARP type code) and address, all in hexadecimal with dash separators;
for example, for an Ethernet (ARP type 1) with address 88:99:AA:BB:CC:DD
it would search for the filename 01-88-99-AA-BB-CC-DD.
* Next, it will search for the config file using its own IP address in
upper case hexadecimal, e.g. 192.0.2.91 -> C000025B. If that file is not
found, it will remove one hex digit and try again. At last, it will try
looking for a file named default (in lower case). As an example, if the
boot file name is /mybootdir/grldr, the Ethernet MAC address is
88:99:AA:BB:CC:DD and the IP address 192.0.2.91, it will try following
files (in that order):
/mybootdir/menu.lst/01-88-99-AA-BB-CC-DD
/mybootdir/menu.lst/C000025B
/mybootdir/menu.lst/C000025
/mybootdir/menu.lst/C00002
/mybootdir/menu.lst/C0000
/mybootdir/menu.lst/C000
/mybootdir/menu.lst/C00
/mybootdir/menu.lst/C0
/mybootdir/menu.lst/C
/mybootdir/menu.lst/default
You cannot directly map an image file on (pd). You must map it in memory using
the –mem option. For example,
map –mem (pd)/images/floppy.img (fd0)
map –hook
chainloader (fd0)+1
rootnoverify (fd0)
boot
One more example,
map –mem (pd)/images/cdimage.iso (0xff)
map –hook
chainloader (0xff)
boot
******************************************************************************
*** Use ‘pxe detect’ in preset-menu ***
******************************************************************************
Now the “pxe” command has a new subcommand “detect”:
pxe detect [BLOCK_SIZE] [MENU_FILE]
BLOCK_SIZE specifies the block size for PXE. If it is not specified or it is
0, then grub4dos will go through a probing process and get a proper value
for data transfer.
MENU_FILE specifies the config file on the PXE server. If omitted, a standard
config file in the menu.lst sub-dir will gain control. For a description on
the config files in the menu.lst sub-dir, please refer to the section
“GRLDR as PXE boot file” above.
If MENU_FILE starts in a “/”, then the MENU_FILE on the PXE server will gain
control, else(if MENU_FILE does not start in a “/”) no menu will be executed.
Normally you want to use a “pxe blksize …” or a “pxe detect …” command
before you access the (pd) device, since the default blocksize of 512 might
not work on your system.