
Table of Contents
INTRODUCTION
I have a 2TB WD Passport USB 3.0 portable hard disk which has Easy2Boot installed. I can boot from this USB disk drive and take an image backup of the internal hard disk of my systems or restore a previous image to those systems at any time.
This tutorial assumes you also have a large external USB Hard Disk (preferably USB 3.0) and you want to use it to take image backups of the system disks in various systems.
A typical usage scenario would be:
- 1. Switch off a PC or notebook
- 2. Connect the large USB HDD to a USB port
- 3. Switch on the PC or notebook and configure the BIOS to boot from the USB HDD
- 4. From the menu select Create Backup Image or Restore a Disk Image
- 5. Choose a name for the backup image file and complete the operation
Note that this is a whole disk backup (disk clone). Therefore any image made will only be suitable to restore on the same system. In addition, if you have to replace the system hard disk due to disk failure, the replacement disk should be at least as big as the original.
REQUIREMENTS
1. A Clonezilla bootable ‘LiveCD’ ISO file – I used clonezilla-live-20131125-saucy-i386.iso
2. A large USB Hard drive (should be installed with Easy2Boot)
METHOD
WARNING: Before you start, be warned that a Restore operation will completely wipe any partitions and files that are on the ‘sda’ drive (drive 0).
It is your responsibility to ensure you restore an image to the correct drive.
Please do not blame me if you accidentally erase your system disk or USB Hard drive!
1. First create your Easy2Boot USB Hard drive by following Tutorial 72a – use NTFS as we need to store large files. Do not use a hard disk that already contains more than 137GB of files – I recommend you freshly format the USB hard disk.
Note: If you use your own grub4dos USB drive and create your own menu entries – you MUST ensure that the 4th partition of your USB Hard Drive is unused. If not, the menu used below will destroy that 4th partition!
2. Make a new folder at \_ISO\BACKUP\Clonezilla and copy the clonezilla ISO file clonezilla-live-20131125-saucy-i386.iso to the \_ISO\BACKUP\Clonezilla folder.
If you use a different ISO file then you will need to edit the .mnu file after Step 4 below.
3. Create a new empty folder on the USB drive at \clonezilla (note that this has all lowercase letters!). This will hold the backup images
4. Download the .mnu file and copy it to \_ISO\BACKUP\Clonezilla\Clonezilla.mnu. Note: The Clonezilla.mnu file in the Easy2Boot download may use the \_ISO\BACKUP\MNU folder read the .mnu file to see which folder to use.
USAGE
Note: The USB disk drive MUST be used on a real system and not in a VM. If a VM is used the drives names may be incorrectly assigned.
1. Boot from the Easy2Boot USB drive on a real system to get to the main E2B menu
Note: Only connect one USB drive, otherwise the backup drive may be configured as the wrong drive.
2. Press CTRL+B in E2B to get to the BACKUP MENU (or use the cursor keys to select that entry)
3. Now choose one of the three options in the Backup menu:

1 Create Backup Image of first Hard Disk (Clonezilla)
2 Restore a Disk Image to first Hard Disk (Clonezilla)
3 Clonezilla (boot directly from the ISO file)
If you choose options 1 or 2, you will briefly see some text about which drives will be selected and you can change the drive to be backed up and the drive on which the image files will be stored.
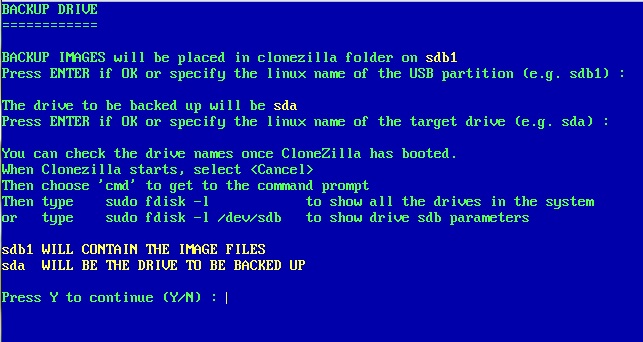
sdb1 WILL CONTAIN THE IMAGE FILES
sda WILL BE THE DRIVE TO BE BACKED UP
or
sdb1 WILL CONTAIN THE IMAGE FILES
sda WILL BE THE DRIVE THAT IS RESTORED
Note that the target drive will always be sda and the USB Hard disk will be auto-detected as sdb1 or sdc1 or sdd1, etc.
If you wish to see the verbose linux startup text, change the ‘splash’ words in the E2B clonezilla.mnu menu file to ‘nosplash’.
Take care to observe that the drive names and capacities are accurate and as expected, otherwise you could restore an image to the wrong drive!
4. You should see a blue&white loading bar and then a prompt for the name of the image file that you want.
If restoring an image then you will need to select an image file. If creating an image then you can edit the suggested name as required.
5. Lastly, you should see some confirmation text in red indicating which drive is about to be affected (this is caused by the -c parameter). Check this carefully before you press ‘y’ to continue.
6. The backup/restore should now proceed and you should eventually see an option to reboot or power off…
TROUBLESHOOTING
If anything goes wrong, it is probably due to the drive names (sda, sdb, etc.) not being correct. The E2B code in the .mnu file assumes that the last drive is always the USB boot E2B drive and that sda is the target drive.
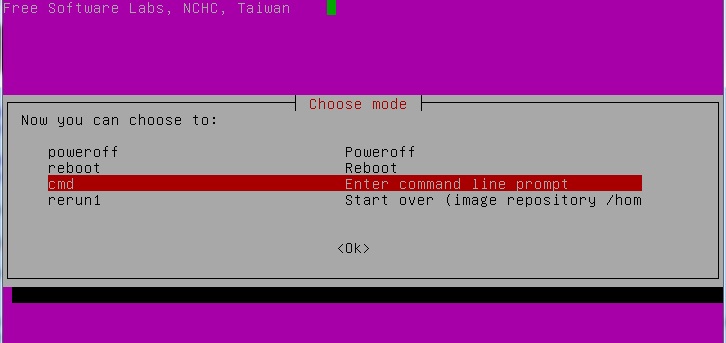
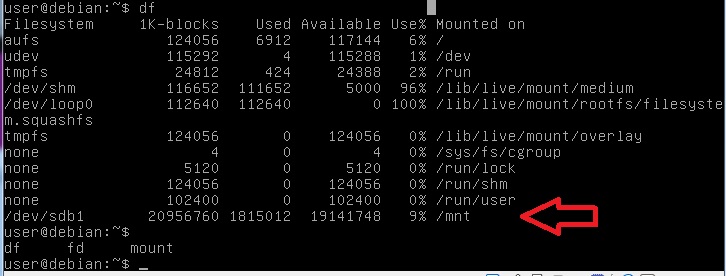
Go to the linux command console by choosing ‘cmd’ (see screenshot above) and then type
df
You should see the USB Hard disk mounted under /mnt
…
You can also use the
sudo fdisk -l
command to list all the drives or
sudo fdisk -l /dev/sda
to list each drive separately.
If there is an SD card in the card reader slot, you should remove it first to prevent it being mis-identified as the USB backup disk.
If you are still having trouble, use the 3rd menu option to run CloneZilla manually.
If you want the Clonezilla menu to appear in the Main E2B menu, simply place the clonezilla folder containing the iso and ,mnu file under the \_ISO\MAINMENU folder (don’t forget to create the \clonezilla folder in the root of the drive too).
Useful Clonezilla parameters may be found listed here.
Clonezilla reference card here.
BOOTING FROM A SMALL E2B USB FLASH DRIVE
You can boot from an E2B USB Flash drive, run Clonezilla Backup or Restore and use another external USB Hard Drive to store the images on.
You first need to find the linux device name of the drive that you want to backup however.
The large USB HDD should have an empty \clonezilla folder (for the backup images).
1. Boot from the USB Flash drive on the target system (you can also connect the USB HDD now if you wish) and get to the E2B menu
2. Connect the large USB HDD
3. Choose the Clonezilla backup or restore option from the E2B menu and boot to Clonezilla
4. Cancel the session and choose ‘cmd’ to get to the console
5. Type sudo fdisk -l to list all drives, note the drive name of the large USB Hard Drive, e.g. sdc
Now we know what the device name is of the USB HDD.
6. Reboot from the USB flash drive again
7. Connect the USB HDD (if not already connected)
8. Run the Clonezilla menu option again and type in the partition name of the USB Hard Drive (e.g. sdc1)
9. Complete the backup/restore operation (check carefully that the target drive sda is the correct one)
Note that some systems (e.g. Dell Inspiron 530) do not ‘like’ large USB HDDs. When I connected a 2TB WD Passport USB Hard drive to my Dell 530, it refused to list any USB drives (neither the USB Flash drive or USB Hard drive were detected by the BIOS)!. The solution was to boot from the USB Flash drive to E2B and only then connect the USB Hard Disk. Once linux boots, both drives will be detected.
Click here (OneDrive folder) if you cannot find any file mentioned in the articles on this site or Contact Me.