
Table of Contents
If you have ever tried booting and using linux from a USB pen drive but found it difficult to use due to your lack of familiarity with linux/Ubuntu, try a more Windows-like linux version like StartOS (was Ylmf). You can make a persistent version (2GB+ USB stick or USB hard disk required) so that any changes you make will be remembered (e.g. wireless WEP/WPA settings, country, wallpaper, etc.). StartOS includes OpenOffice and FireFox, WINE for running Windows apps, SMPlayer (a media player app) and Audacious media player + Samba for Windows File and Print Services – keep a StartOS USB bootable pen in your pocket and you can ‘borrow’ anyone’s PC or Notebook and use it to run your own OS instead!
StartOS is an independent Chinese Linux distribution with the GNOME desktop tweaked to resemble Microsoft Windows XP. In the beginning it was based on Ubuntu, but starting from version 4.0 it adopted custom package management (called YPK) and system installer, though the underlying live medium is still built using Ubuntu’s Casper tool.
In addition, once you have created a bootable StartOS stick – you can use it to install StartOS onto a PC (or even dual boot on a PC). This means you can turn your old PCs into thin clients or just use them as browsers.
See Tutorial #46 for Ubuntu 11.04 which has a more Windows-like desktop and better netbook/desktop support.
The first part of this ‘how to’ is NOT an RMPrepUSB tutorial. One way to make a persistent stick is to use Universal USB Installer. The first instructions are based on a very good tutorial to install Ubuntu using Universal USB Installer which can be found here. You just need to change the iso file name (see below for details).
If however, you wish to make a multiboot USB stick and have StartOS as an option in your grub4dos menu, the second part – Method 2 of this tutorial shows you how to use RMPrepUSB to prepare a USB stick which will boot directly from the ISO file and also with a persistent filesystem.
METHOD 1 – USING THE UNIVERSAL USB INSTALLER
You will need
- startos-5.0-20120808.iso
- 2GB or larger USB flash drive (fat32 formatted)
- Universal USB Installer
Live USB Flash Drive Creation
- Download the startos-5.0-20120808.iso
- Download and launch our Universal USB Installer, select the ISO file and follow the on-screen instructions – select your USB drive letter and the size that you want for the persistent casper-rw volume as below (you do not have to tick the format checkbox if it is already formatted as FAT32 and you want to keep the files on the USB drive)

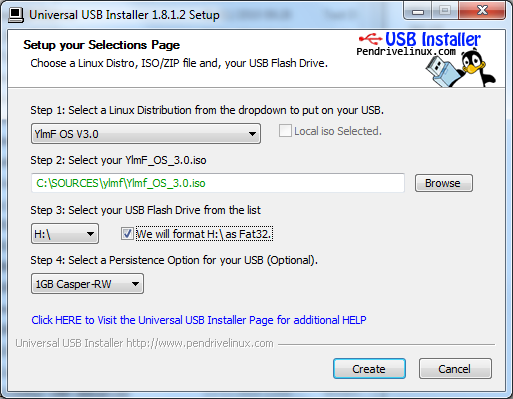
- Browse to the iso startos-5.0-20120808.iso (screenshot shows wrong iso!)
- Once it has finished, restart your PC and set your BIOS or Boot Menu to boot from the USB device, save your changes and reboot
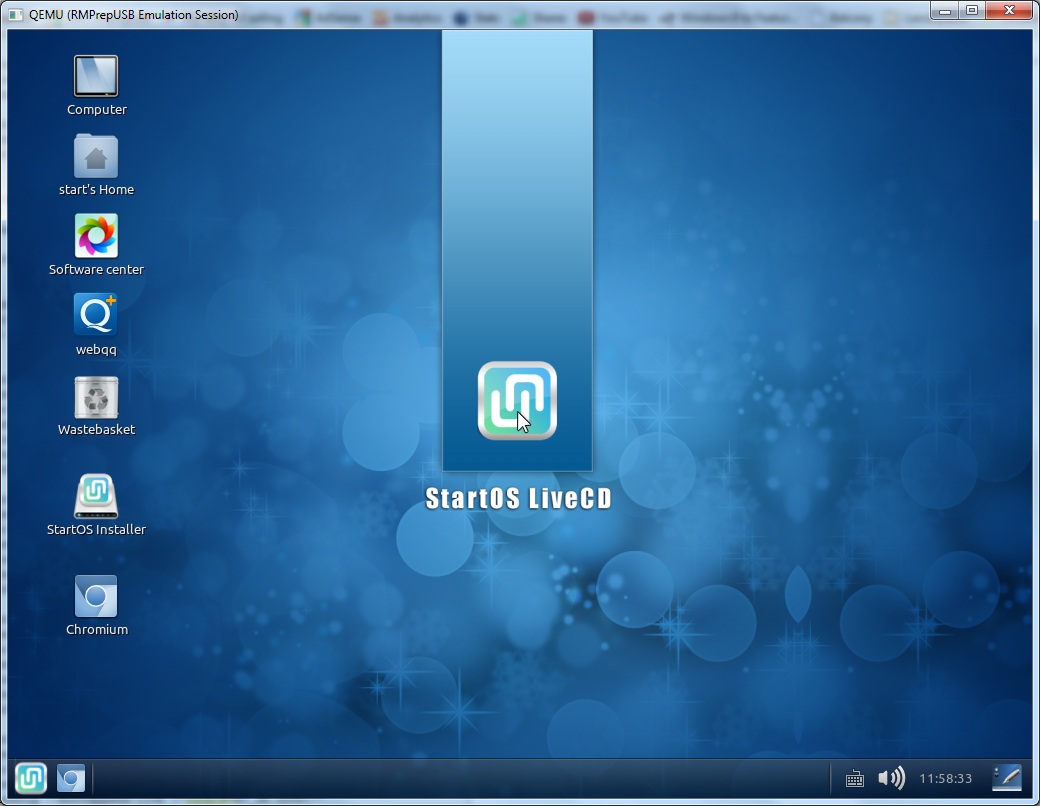
If all went well, you should be booting from your Live StartOS USBthat allows you to save most of your changes persistently.
You may find that the language is set to chinese though!
METHOD 2 – BOOT STARTOS FROM AN ISO
Do you want to have anEnglish OS but run from an ISO file and use grub4dos and have only 4 files on your USB drive? No Problem!
- Copy the single file startos-5.0-20120808.iso to a new folder on your hard disk (e.g. C:\StartOS)
- Cut and paste these lines into a new menu.lst file in the same folder, (make sure you save the file as menu.lst and not menu.lst.txt or menu.1st – in Notepad use Save As... and change the type to *.* – do not save as type *.txt) :
- title Boot StartOS(Windows Like OS) Non-Persistent
- find –set-root /startos-5.0-20120808.iso
- map /startos-5.0-20120808.iso (0xff)
- map –hook
- root (0xff)
- kernel /casper/vmlinuz file=/cdrom/preseed/ubuntu.seed boot=casper locale=en_GB.UTF-8 keyb=uk iso-scan/filename=/startos-5.0-20120808.iso splash
- initrd /casper/initrd.img
- # for USA use locale=en_US.UTF-8 keyb=us
- title Boot StartOS (Windows Like OS) Persistent
- find –set-root /startos-5.0-20120808.iso
- map /startos-5.0-20120808.iso (0xff)
- map –hook
- root (0xff)
- kernel /casper/vmlinuz file=/cdrom/preseed/ubuntu.seed boot=casper locale=en_GB.UTF-8 keyb=uk persistent iso-scan/filename=/startos-5.0-20120808.iso splash
- initrd /casper/initrd.img
- Format your USB drive using RMPrepUSB (v2.1.605 or later) – RMPrepUSB settings are all numbered for you 1 to 6:
- 1 MAX
- 2 (any name you like!)
- 3 WinPE v2
- 4 FAT32 + Boot as HDD
- 5 Copy Files source set to the C:\StartOS folder of your hard disk
- 6 Prepare Drive to start the format…
- and wait for it to finish. The two files will be copied over to your USB drive.
- If you already have a bootable USB drive with grub4dos and a menu.lst then skip this step and just copy over the ISO file and add the menu entries to your existing menu.lst file using Notepad. Note that persistence may not work on an NTFS formatted drive!
- In RMPrepUSB click on the Install grub4dos button and install a grub4dos MBR (answer=’Yes’) and allow it to copy the grldr file over (press Enter key when prompted and click on OK).
- Note: some PCs, when they boot, just show a flashing cursor instead of a menu, if so – re-format using RMPrepUSB and then use the PBR option (answer=’No’) when installing grub4dos instead of the MBR option.
- Make a new casper-rw file using the Create Ext2 FS button in RMPrepUSB. I suggest 1GB or larger. This file will keep all changes that you make when you boot to StartOS.
Note: ‘Jonathan’ has found that after a few boots the casper-rw file can get corrupted (linux may prompt for a password). If you experience this, I suggest using EaseUS Home Partition Manager to shrink the partition on the USB boot drive and create a new ext3 formatted partition. You may need to delete the casper-rw file if you have one already present.
Your usb pen should contain these 4 files in the root (top level): As a last check – in RMPrepUSB press the F4 key on your keyboard – you menu.lst file should be loaded into Notepad – if it is not then check the file extension is .LST.
- grldr
- startos-5.0-20120808.iso
- menu.lst
- casper-rw
You can now check it to see if it boots by clicking the Test Using QEMU button in RMPrepUSB.
Finally, hit the Eject button in RMPrepUSB and Exit from RMPrepUSB – that’s it – now go try it!
Note: If you want to place the ISO file in a different folder, make sure you change all the references to the iso file in menu.lst.
WARNING: If using a notebook, you may find Num Lock is enabled by default. This may cause issues when entering passwords! Switch NumLock off using the relevant key combination for your laptop.
STARTOS
Some tips once StartOS is running…
If booting from the LiveCD – it will be in Chinese – Press F2 and select English!
Terminal Server Client
You can start an RDP session and connect to a Terminal Server from Ubuntu.
To start the Terminal Server Client, type CTRL-ALT-T to open a command window. Then type tsclient to start the Terminal Server Client application.
Enter in the Computer name or IP address and the other details (Protocol, User Name, password, domain, client Hostname etc.
Just as you can save configuration settings on a Windows Terminal Server Client, the same can done with tsclient by setting options in the Display, Local Resources, Programs, or Performance tabs. Once the settings have been configured, you can save it as a file and open it when you need to connect to the server.
Once you have saved the settings to a file, you can quickly connect to a Windows Computer from a Terminal window instead of running tsclient from the GUI. To see the tsclient command prompt options, type:
tsclient –help
tsclient [OPTIONS]… [FILE]…
FILE an rdp format file containing options
-h, –help display this help and exit
-v, –version output version information and exit
-x FILE launch rdesktop with options specified in FILE
Citrix ICA
If you want to connect to a Citrix ICA server (such as RM CC4 Anywhere), you will need to download and install the Citrix ICA package from www.citrix.com – in the Downloads section, find the Xenapp section and Citrix Receiver for linux (v11.100 at the moment) and download and save the .tar.gz version (Using Ubuntu not Windows OS).
More instructions can be found here.