If your PC hard disk drive used to boot to XP, but now does not boot any longer, you can boot to the XP Repair Console and try a few repair commands.
1. First boot from a Windows XP Recovery disk or boot from a Windows XP install CD – if possible, use the same version as the version of Windows you are trying to repair.
For instance, if you are trying to repair a Windows XP SP3 hard disk, boot from an XP SP3 install USB disk (from an ISO file) or boot from an XP install CD.
You can make a bootable XP install USB flash drive by following Tutorial 30. When you boot from the grub4dos USB XP ISO file as in Tutorial 30, you should press F6 and select the FiraDisk and the WinVBlock driver – if you use a flat file XP USB boot drive you may get a BSOD 0x0000007B error!
Alternatively, make an Easy2Boot USB drive using the E2B+DPMS download and an XP Install ISO. This will allow you to repair or install to most SCSI/RAID/SATA (AHCI) systems without a 0x0000007b BSOD error.
Do NOT use a flat file USB boot disk (such as one prepared using WinToFlash) to repair your internal hard disk. It will repair the USB disk instead and the repair commands will not work correctly!
- Boot from the CD/ISO file
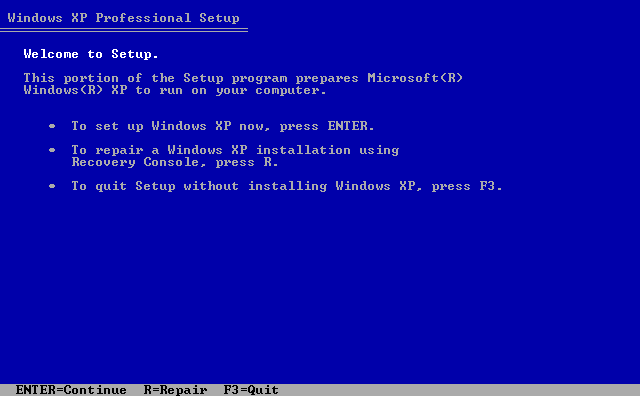
- Answer R to the textmode bluescreen question that you get when you first boot from the XP install/repair CD (see screenshot).
- Do not hit enter to choose a different keyboard as the dll file may not be present – just allow the keyboard selection prompt to timeout.
1: C:\WINDOWS
- The entry above is usually the choice that you want, so type 1
- Usually no Administrator password is required (just hit [Enter]).

After trying each of the steps below, try booting from the Windows XP hard disk again to see if it has been fixed. Do not just do all of the steps and then try to boot.
Some of these steps may not be necessary or may even make your system worse!
So start with step 2 below – then reboot from your hard disk and test it to see if it has been fixed.
If it has not been fixed, then do step 3 and reboot from your hard disk and test that.
Rinse and Repeat for the other steps.
2. Type map to list your devices and partitions: e.g.
C: NTFS 49951MB \Device\Harddisk0\Partition1
D: FAT32 79911MB \Device\Harddisk1\Partition1
Type fixmbr \Device\Harddisk0 to repair the hard disk MBR (Master Boot Record).
The internal hard disk will be listed as C:\Windows. Your USB drive will also be listed as D:\$WINDOWS.~BT (if booting from USB drive). Type exit to reboot.
3. Type fixboot X: – where X: is the drive letter of the disk you want to fix. This wrtes a new bootsector to that partition. If this returns an error and dir c:\ returns an error – reboot and run the Repair console again and try this command again.Unsupported embed
4. Type bootcfg /scan and then bootcfg /rebuild – this will search you drives for all OS’s and build a new boot.ini file. Answer A for All when prompted. If the command returns an error – reboot from the USB/CD and run the repair console again on a clean boot.
Check the boot.ini by typing type C:\boot.ini
Ensure that the default entry is correct and has rdisk(0) and not rdisk(1). e.g.
default=multi(0)disk(0)rdisk(0)partition(1)\WINDOWS=”Windows XP”
If your boot.ini looks like this
- [boot loader]
- timeout=15
- default=multi(0)disk(0)rdisk(1)partition(1)\WINDOWS
- [operating systems]
- multi(0)disk(0)rdisk(1)partition(1)\WINDOWS=”new”
then it will be trying to boot from the 2nd hard disk and not your first internal hard disk. In this case you need to edit the boot.ini file (or copy over a new version).
Be warned: If you have booted a USB repair drive using a flat file structure, bootcfg may well set the boot.ini to rdisk(1)! Always boot from an ISO file (see Tutorial 30) or a CD.
5. Assuming your target disk that you are trying to repair is C: and your USB/CD drive that has your XP install files on it is E: (use the map command to find the ISO/CdRom0 device letter) – type:
- E:
- cd i386
- copy ntdetect.com c:\
- copy ntldr c:\
This information was first published here – click the link for more screenshots.
